d6657.
d6657.book Page 2 Thursday, February 4, 1999 3:35 PM Notice The information contained in this document is subject to change without notice. Hewlett-Packard makes no warranty of any kind with regard to this material, including, but not limited to, the implied warranties of merchantability and fitness for a particular purpose. Hewlett-Packard shall not be liable for errors contained herein or for incidental or consequential damages in connection with the furnishing, performance, or use of this material.
d6657.book Page iv Wednesday, February 3, 1999 5:38 PM CLASS 1 LASER PRODUCT LASERSCHUTZKLASSE 1 PRODUKT TO EN60825 CAUTION: This appliance contains a laser system and is classified as a “CLASS 1 LASER PRODUCT”. To use this model properly, read this Installation Guide carefully and keep this guide for your future reference. In case of any trouble with this model, please contact your nearest HP or repair-authorized reseller service center.
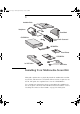
d6657.book Page 1 Wednesday, February 3, 1999 5:38 PM 1 Installation Guide Headphones Sound Board CD-ROM Drive Fixing Kit with Screws and Rails CD-ROM Filler Driver Diskette CD-ROM Disk 1or 2 IDE Cables Audio Cables Installing Your Multimedia Sound Kit This guide explains how to physically install the multimedia sound kit in your PC, and then how to install the driver software required to use the kit. The guide also explains how to use the CD-ROM drive.
d6657.book Page 2 Wednesday, February 3, 1999 5:38 PM 1 Installing Your Multimedia Sound Kit Before You Install Before You Install NOTE Your PC may already be equipped with an integrated sound card, if so this must be deactivated (refer to your PC user guide), before installing this HP Multimedia Sound Kit. WARNING For your safety, never remove the PC’s cover without first removing the power cord from the power outlet and any connection to a telecommunication network.
d6657.book Page 3 Wednesday, February 3, 1999 5:38 PM 1 Installing Your Multimedia Sound Kit Step 1: Installing the CD-ROM Drive Step 1: Installing the CD-ROM Drive To install the CD-ROM drive, you may need a flat-headed screwdriver (not supplied with the drive kit). 1 Switch off the monitor and PC, disconnect all power cords and any telecommunication cables.
d6657.book Page 4 Wednesday, February 3, 1999 5:38 PM 1 Installing Your Multimedia Sound Kit Step 1: Installing the CD-ROM Drive 5 For PCs that have a drive tray or removable drive bay unit: Remove the drive tray or the drive bay unit. Removing drive bay unit Removing drive tray ❶ ❶ ❷ ❶ ❶ ❷ For other PCs: Remove the RFI metal filler plate from the chosen shelf.
d6657.book Page 5 Wednesday, February 3, 1999 5:38 PM 1 Installing Your Multimedia Sound Kit Step 1: Installing the CD-ROM Drive 6 For PCs that have a drive tray or removable drive bay unit: Attach the CD-ROM drive to the drive bay or drive tray. Attaching mounting bracket to CD-ROM drive Attaching screw-less drive tray and CD-ROM drive ❷ Attaching CD-ROM drive to drive bay unit with screws ❷ ❶ For other PCs: Check if the CD-ROM drive needs rails to be installed into the shelf.
d6657.book Page 6 Wednesday, February 3, 1999 5:38 PM 1 Installing Your Multimedia Sound Kit Step 1: Installing the CD-ROM Drive 7 For PCs that have a drive tray or removable drive bay unit: Insert the drive bay unit or drive tray into the computer.
d6657.book Page 7 Wednesday, February 3, 1999 5:38 PM 1 Installing Your Multimedia Sound Kit Step 1: Installing the CD-ROM Drive For other PCs: Slide the CD-ROM drive into the chosen drive shelf then, using the screws, fasten it into place.
d6657.book Page 8 Wednesday, February 3, 1999 5:38 PM 1 Installing Your Multimedia Sound Kit Step 1: Installing the CD-ROM Drive 9 Attach the data and power connectors to the rear of the CD-ROM drive. NOTE For Windows 3.11 users only. If you use the IDE cable connector branching off the cable connected to the hard disk drive, move the pin at the rear of the CD-ROM drive to enable the jumper labeled CS.
d6657.book Page 9 Wednesday, February 3, 1999 5:38 PM 1 Installing Your Multimedia Sound Kit Step 2: Installing the Sound Board Step 2: Installing the Sound Board 1 Select a free ISA slot. 2 Remove the retaining bracket or screw that holds the slot cover in place. 3 Remove the slot cover. 4 Aligning the sound board carefully, slide it into position and press it firmly into the slot. 5 Secure the sound board in place by replacing the retaining bracket or screw.
d6657.book Page 10 Wednesday, February 3, 1999 5:38 PM 1 Installing Your Multimedia Sound Kit Step 3: Connect the CD-ROM and Sound Board Step 3: Connect the CD-ROM and Sound Board 1 Using the cable provided, connect the CD-ROM drive and sound board. 2 Replace the computer’s cover, and reconnect the power cable and any telecommunications cables. 3 Switch on your PC. In order to complete the CD-ROM and Sound Board driver installation follow the relevant sections in ‘Installing the Accessory Software’.
d6657.book Page 11 Wednesday, February 3, 1999 5:38 PM 1 Installing Your Multimedia Sound Kit Installing the Accessory Software Installing the Accessory Software Windows 95 Installing the CD-ROM and Sound Board Drivers NOTE HP recommends that the operating system be installed and functioning fully before the board is installed in its slot. Windows 95 automatically detects the CD-ROM drive and loads the required software driver when you switch on your PC.
d6657.book Page 12 Wednesday, February 3, 1999 5:38 PM 1 Installing Your Multimedia Sound Kit Installing the Accessory Software 3 Double-click on the Add/Remove Programs icon . 4 Click on the Install... button, and then the Next button. 5 Type d:\wavtbl\setup and then click on the Finish button. Follow the instructions that appear on the screen. (The CD-ROM drive may be your E drive. In this case you would enter e:\wavtbl\setup.
d6657.book Page 13 Wednesday, February 3, 1999 5:38 PM 1 Installing Your Multimedia Sound Kit Installing the Accessory Software 5 Type d:\nt40 and then click on the OK button. Follow the instructions that appear on the screen. (The CD-ROM drive may be your E drive. In this case you would enter e:\nt40. You can check by clicking the Browse button in the Run Installation Program dialog box, and then browsing to the CD-ROM drive.
d6657.book Page 14 Wednesday, February 3, 1999 5:38 PM 1 Installing Your Multimedia Sound Kit Installing the Accessory Software 5 In the Adapter list in the Select SCSI Adapter Option window, select IDE CD-ROM (ATAPI 1.2)/Dual-channel PCI IDE and click on Install. 6 Follow the instructions on the screen. You will be prompted to insert the correct Windows NT setup floppy disk containing the driver. 7 When you have installed the CD-ROM driver, shut down and restart the computer for the driver to be loaded.
d6657.book Page 15 Wednesday, February 3, 1999 5:38 PM 1 Installing Your Multimedia Sound Kit Installing the Accessory Software 1 With Windows NT running, double-click on the Main program group . 2 Double-click on the Control Panel icon 3 Double-click on the Drivers icon . . 4 Check whether the driver (MCI) CD Audio is displayed in the Installed Drivers list. If it is, click on the Cancel button to exit the installation procedure. If the driver is not displayed, continue from step 5. 5 Click on Add.
d6657.book Page 16 Wednesday, February 3, 1999 5:38 PM 1 Installing Your Multimedia Sound Kit Installing the Accessory Software If the SMARTDRV statement is found in the AUTOEXEC.BAT file, the parameter /U is added to the statement, if not already present. This parameter disables the SMARTDRV CD-ROM caching. NOTE If your AUTOEXEC.BAT file includes the WIN command (to start Windows automatically), you must edit your AUTOEXEC.BAT file to place WIN after the MSCDEX.EXE /D:MSCD0HP /M:12 line.
d6657.book Page 17 Wednesday, February 3, 1999 5:38 PM 1 Installing Your Multimedia Sound Kit Installing the Accessory Software Installing the Sound Board Driver NOTE HP recommends that you let the ISA Configuration Utility(ICU) automatically configure the reources used by the sound board. If, however, you use the ICU to manually specify the resources used, the configuration choices available are: Audio You can select configuration choices 1, 2,or 3. Configuration choices 4 and 5 cannot be selected.
d6657.book Page 18 Wednesday, February 3, 1999 5:38 PM 1 Installing Your Multimedia Sound Kit Installing the Accessory Software (If you experience a problem with the ICU when trying to change the sound board settings, it could be due to the version of your BIOS. Call HP Support for assistance). Installing the CD Audio Driver The CD player requires that the CD audio driver be installed. 1 With Windows running, Double-click on the Main program group .
d6657.book Page 19 Wednesday, February 3, 1999 5:38 PM 1 Installing Your Multimedia Sound Kit Installing the Accessory Software (The CD-ROM drive may be your E drive. In this case you would enter e:\win311\clefstud\setup . You can check by clicking the Browse button in the Run dialog box, and then clicking on the Drives drop-down list. OS/2 Warp Installing the CD-ROM and Sound Board Drivers OS/2 Warp contains its own driver software for the CD-ROM.
d6657.book Page 20 Wednesday, February 3, 1999 5:38 PM 1 Installing Your Multimedia Sound Kit Installing the Accessory Software The driver software for the sound board is on your HP Multimedia Sound CD. If you already have OS/2 Warp installed with any embedded audio driver on your system, you must uninstall the Multimedia Software Support under OS/2, and then reinstall the Multimedia Software Support.
d6657.book Page 21 Wednesday, February 3, 1999 5:38 PM 1 Installing Your Multimedia Sound Kit Installing the Accessory Software 15 Double-click on the Multimedia folder. 16 Double-click on the Multimedia Application Install folder. 17 Insert the HP Multimedia Sound CD in the CD-ROM drive. 18 In the installation window, select the drive letter that corresponds to the CD-ROM drive (D: or E:) and click on the Install button.
d6657.book Page 22 Wednesday, February 3, 1999 5:38 PM 1 Installing Your Multimedia Sound Kit Installing the Accessory Software 4 Enter/correct the following lines: : DEVICE=C:\MMOS2\SSMDD.SYS DEVICE=C:\MMOS2\ROSTUB.SYS 5 Save the file as a plain text file. 6 Close the OS/2 System Editor program. 7 Shut down and restart the PC. 8 Continue with the installation.
d6657.book Page 23 Wednesday, February 3, 1999 5:38 PM 1 Installing Your Multimedia Sound Kit Using Your CD-ROM Drive Using Your CD-ROM Drive Your CD-ROM drive reads information or programs on a CD. It cannot record to a CD. For instruction about accessing specific information stored on a CD, refer to the documentation supplied with the CD. (The CD-ROM drive layout may vary slightly from that shown here.) Open/Close Pushbutton. Opens or closes the CD-ROM drawer.
d6657.book Page 24 Wednesday, February 3, 1999 5:38 PM 1 Installing Your Multimedia Sound Kit Reading the On-Screen User’s Guide Reading the On-Screen User’s Guide Your HP Multimedia Sound CD contains a user’s guide with more information about setting up and using sound on your PC. The user’s guide is viewable using Acrobat Reader, which is also on the CD. 1 Insert the HP Multimedia Sound CD in your CD-ROM drive. 2 If your operating system is OS/2, run Windows.
d6657.book Page 25 Wednesday, February 3, 1999 5:38 PM 1 Installing Your Multimedia Sound Kit Solving Problems with Your CD-ROM Drive Solving Problems with Your CD-ROM Drive If you are having problems reading data on a CD, try the following steps: 1 Ensure that the CD is correctly inserted in the drive and that the disk drawer is closed. 2 Ensure that the disk in the CD-ROM drive is a data disk, and not an audio disk.
d6657.book Page 26 Wednesday, February 3, 1999 5:38 PM 1 Installing Your Multimedia Sound Kit Connecting Speakers and Other Devices Connecting Speakers and Other Devices After installing the sound board, you can connect speakers, headphones, and other devices to your computer’s rear panel as shown below. Some models of computers also have a front panel with a headphones socket and a volume control.
d6657.book Page 27 Wednesday, February 3, 1999 5:38 PM 1 Installing Your Multimedia Sound Kit CD-ROM Drive (32X Maximum) Specifications CD-ROM Drive (32X Maximum) Specifications Data Capacity • Data Transfer Rate • 650 MB (Mode 1) • 742 MB (Mode 2) • Buffer Size • Sustained Transfer Rate (1k-210-1,024) Inner-side 2,055 kbytes/s (14X, Mode-1) Outer-side 4,800 kbytes/s (32X, Mode-1) Burst Transfer Rate PIO Mode 4 16.6 Mbytes/s max. Single Word DMA Mode 2 8.3 Mbytes/s max.
d6657.book Page 28 Wednesday, February 3, 1999 5:38 PM 1 Installing Your Multimedia Sound Kit Sound Board Specifications Sound Board Specifications Digitized Sounds • • • • • Music Synthesizer • Mixer • Built-in Stereo Power Amplifier • Built-In Interfaces • Sound Blaster 2.
d6657.
d6657.
d6657.book Page 31 Wednesday, February 3, 1999 5:38 PM 1 Installing Your Multimedia Sound Kit HP Hardware Warranty FCC (for USA only) Federal Communications Commission Radio Frequency Interference Statement Warning: This equipment has been tested and found to comply with the limits for a Class B digital device, pursuant to Part 15 of the FCC Rules. These limits are designed to provide reasonable protection against harmful interference in a residential installation.
d6657.book Page 32 Wednesday, February 3, 1999 5:38 PM 1 Installing Your Multimedia Sound Kit HP Software Warranty HP Software Warranty THIS WARRANTY STATEMENT TAKES PRECEDENCE OVER ANY OTHER SOFTWARE WARRANTY STATEMENT INCLUDED WITH THIS PRODUCT. Ninety-Day Limited Software Warranty HP warrants for a period of NINETY (90) DAYS from the date of the purchase that the software product will execute its programming instructions when all files are properly installed.
d6657.book Page 33 Wednesday, February 3, 1999 5:38 PM 1 Installing Your Multimedia Sound Kit HP Software License Agreement HP Software License Agreement CAREFULLY READ THIS LICENSE AGREEMENT BEFORE PROCEEDING TO OPERATE THE HP ACCESSORY. RIGHTS IN THE SOFTWARE ARE OFFERED ONLY ON THE CONDITION THAT THE CUSTOMER AGREES TO ALL TERMS AND CONDITIONS OF THIS LICENSE AGREEMENT. PROCEEDING TO INSTALLING AND USING THE ACCESSORY INDICATES YOUR ACCEPTANCE OF THESE TERMS AND CONDITIONS.
d6657.
d6657.