
HP Multimedia Sound Kit (D6657A), Installation Guide


1 Installing Your Multimedia Sound Kit
Installing the Accessory Software
14 English
5 In the Adapter list in the Select SCSI Adapter Option window, select
IDE CD-ROM (ATAPI 1.2)/Dual-channel PCI IDE
and click on
Install.
6 Follow the instructions on the screen. You will be prompted to insert
the correct Windows NT setup floppy disk containing the driver.
7 When you have installed the CD-ROM driver, shut down and restart
the computer for the driver to be loaded.
NOTE If you are using Windows NT version 3.5 with the ATAPI driver version
1.2, you may notice an incompatibility problem when you perform a
warm reboot (Shutdown and then Restart without switching off). The
operating system may not recognize the CD-ROM drive. To correct this
problem, instead perform a cold reboot (switch the computer off and on
again). Upgrading to Windows NT version 3.51 will resolve the problem.
Installing the Sound Board Drivers
1
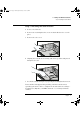
1 With Windows NT running, insert the HP Multimedia Sound CD in
the CD-ROM drive. (Insert the CD label side up; press the open/close
pushbutton to open and close the drawer.)
2 From the Program Manager, click on the File menu and click on Run.
Type d:\nt351\setup and then follow the instructions
that appear on the screen.
(The CD-ROM drive may be your E drive. In this case you would
enter e:\nt351\setup . You can check by clicking the
Browse button in the Run dialog box, and then clicking on the
Drives drop-down list.)
3 When the driver has been installed, you see the 16-bit Audio Board
Setup window.
4 Click on the OK button.
5 Restart the computer.
Installing the CD Audio Driver
The audio driver ((MCI) CD Audio) may be already installed on your
computer. You can check whether it is and, if it is not, install it by
performing the following steps.
d6657.book Page 14 Wednesday, February 3, 1999 5:38 PM