
Describes how to upgrade 3Com ExecutiveAssistant Firmware

Updating 3Com ExecutiveAssistant
Before you can begin to over-install, ExecutiveAssistant must be shutdown
completely on the server and all clients. You can verify that ExecutiveAssistant is
shutdown by viewing the processes from TaskManager and verifying that you do
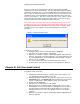
not see a process named “Assistant.exe” in the list. If the server or clients are not
shutdown then the over-install will fail usually with a Windows “write permission”
error as seen in Figure 1. This error occurs because the server, a client, or many
clients have files open that the installer is trying to update. If the files are open,
then the installer doesn’t have permission to write to the files.
Please Note: if it is not practical or possible to shutdown all clients prior to over-
installing on the server, then temporarily unshared the “Data” folder on the server.
By stopping the Data share, it disconnects the clients and closes all files, which
should prevent the error in Figure 1 from occurring during the over-install
procedure.
Figure 1 – write permission error
To begin the over-install:
1. Navigate to the setup files and double-click the Setup.exe.
2. Follow the on-screen instructions of the wizard.
3. When the over-install is complete, it will display window stating that it has
finished. The typical over-install usually takes less than 5 minutes but can
be considerably longer if the Assistant.mdb or History.mdb files are quite
large (in excess of 100MB).
4. The server software has now been updated and can be started.
5. From the Menu, click Help and verify the version number has updated.
Chapter III. Full Over-Install (client)
To begin the client over-install:
1. Shutdown ExecutiveAssistant if it is running on the client computer. Do
not shutdown ExecutiveAssistant on the server.
2. Navigate through the network to the setup files stored on the server in the
ClientSetup folder. (The ClientSetup folder should have been previously
shared as outlined in the “Client_Machine_Setup_Instructions.pdf”)
3. Double-click the Setup.exe.
4. Follow the on-screen instructions of the wizard.
5. When prompted for the database path, verify the path is correct. If the
default path is not correct, then update accordingly before proceeding. If
the wrong path is provided, then the client will display a message box
indicating it cannot access the server database after the over-install is
complete.
6. When the over-install is complete, it will display window stating that it has
finished. Click OK.