
Neoview Database Administrator's Guide (R2.2)


2 Getting Started
Your system is delivered ready to use:
• The system is preconfigured.
• Table spaces are available and ready for data.
• ODBC and high-speed data loaders are installed and ready to go. For details on installing
ODBC drivers, see the Neoview ODBC Driver Manual.
This chapter provides an overview of the Neoview platform and covers the administrative tasks
you need to perform when you first receive your system.
Additional administrative tasks are covered in
• “Managing Roles, User IDs, and Linux Accounts” Chapter 3 (page 23)
• “Planning Your Database” Chapter 4 (page 33)
• “Managing Database Objects” Chapter 5 (page 37)
This chapter describes:
• “Security Considerations” (page 17)
• “Java Considerations” (page 18)
• “Management Tools” (page 19)
• “Starting the Neoview DB Admin Tool” (page 19)
• “Working With Schemas” (page 20)
• “Working With Tables” (page 20)
• “Working With User IDs” (page 21)
• “Scripting Support” (page 21)
• “System Name Display and Logon Help Link” (page 21)
Security Considerations
Neoview User Roles and IDs
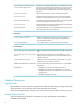
Your Neoview system is delivered with three preconfigured user roles and user IDs:
PasswordUser IDRole
hp4BAdmnROLE.MGRMGR
hp4BinfoROLE.DBADBA
hp4BinfoROLE.USERUSER
You should use the ROLE.MGR user ID to set up user IDs on your system as described under
“User IDs” (page 23).
CAUTION: For your system’s security, change these passwords as soon as you receive your
system.
To change a password, follow the procedures under “Changing the Password and Expiration
Date of a Role” (page 25).
Security Considerations 17