
HP NetRAID 2M Battery Replacement Installation


HP NetRAID-2M Battery Backup Unit
4
Replacing the Battery Backup Unit
When working on the HP NetRAID-2M and when the Battery Backup Unit is
connected, do not allow the card or the battery to touch the HP Netserver since
this may short the battery and damage other components.
Tools and Supplies Needed
Phillips (cross-head) screwdriver
Antistatic wrist strap (recommended)
Antistatic mat
Complete the following steps to change the Battery Backup Unit:
1. Power down the HP Netserver.
CAUTION Use an antistatic mat. Do not place the HP NetRAID-2M
adapter on a conductive surface when removing or installing
the battery pack.
2. Remove the HP NetRAID-2M adapter and place it on the antistatic mat.
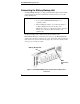
3. Unplug the battery wire connector from the board located at J2.
(See Figure 1.)
4. Unscrew the three screws holding the battery in place on the board.
5. Remove the battery and place it on a nonconductive surface.
6. Align the new Battery Backup Unit with the connectors on the HP
NetRAID-2M Adapter and press it firmly into place.
7. Reinstall the three screws to secure the new Battery Backup Unit to the
board.
8. Plug the battery wire connector located at one corner of the battery unit
into the J2 connector on the board.
9. Install the adapter in the HP Netserver.
10. Power up the server.
11. Use HP NetRAID Express Tools or Config to verify that the battery is
operating properly.