Microsoft Cluster Installation Documentation for HP NetServer LH3 with HP Rack Storage/12 & HP NetRAID-3Si Adapter To assist you in installing your HP NetServer Microsoft Cluster, this file contains the documents listed below in one pdf file. • Installation Overview - This page provides an overview of the installation steps provided in the Installation Guide.
Version History 20 January 2000 Initial release
Installing a Cluster “The Big Picture” What you will be doing! The Overall Tasks Gathering Hardware, Software, etc. ➮ Gather: Hardware Software (Windows NT, NIC drivers, etc.) IP Addresses, subnet mask, etc. User names, password, and domain Tools Install components: into NetServers (i.e., LAN adapters) into Shared Storage (i.e., drives) Setting Up Hardware ➮ Configure NetServer and Shared Storage: Cabling Switches Etc.
This page intentionally left blank.
HP NetServer LC3 with HP Rack Storage/12 Cluster Configuration Guide 20 January 2000 (see Version History at the end of this document) Introduction This document defines the supported HP NetServer LC3 configurations with HP Rack Storage/12s and Microsoft Cluster Server. These configurations minimize single points of failure (SPOF), provide maximum availability, and have been certified by Hewlett-Packard and Microsoft. This guide is prescriptive; it describes the configurations supported by HP.
SPU Model Clock speed No. of CPUs BIOS version CPU cache RAM Local storage I/O slots: HP NetServer LC3 400, 450, 500, 550 MHz. 1 – 2, but must be the same number of CPUs in each server 4.06.23 PQ Any size 64 MB minimum. Must be HP. Internal or external, using any controller. Must use HP disks. See Local Storage below. P5 - Shared storage controller P4 – Intra-cluster (Heartbeat) LAN P1 – Client LAN All others - Any other plug-in cards.
Cabinet RAID arrays No. of cabinets Model Status SCSI ID Disk SCSI Ids Disk drives: Cables A RAID array (logical disk) must be composed of all the same disk model (i.e., part number and suffix). Different size or speed disks are not allowed in the same RAID array. Any combination of disk models is allowed on a SCSI channel. Any combination of disk models is allowed in a cluster. RAID arrays may not span NetRAID Adapters.
Shared Storage Cabling This part of the guide defines the allowable cabling configurations for clusters using the HP NetServer LC3 and HP Rack Storage/12s. Only these cabling configurations and cables are supported.
Version History 20 January 2000 Initial release.
This page left blank intentionally 6
HP NetServer Microsoft Cluster Installation Guide with Shared Storage System Supplement Rack Storage/12FC Rack Storage/12 Rack Storage/8 Storage System/6 HP SureStore E 12H Disk Array or HP A3661B Model 30/FC High Availability Disk Array 18 January 2000 (See Version History below)
This page intentionally left blank.
Notice The information in this document is subject to change without notice. Hewlett-Packard makes no warranty of any kind with regard to this material, including, but not limited to, the implied warranties of merchantability and fitness for a particular purpose. Hewlett-Packard shall not be liable for errors contained herein or for incidental or consequential damages in connection with the furnishing, performance, or use of this material.
Contents Some topics in this guide are applicable to all HP NetServer clusters while others are HP NetServer and shared storage specific. A complete installation guide consists of two documents: this document (common to all HP NetServers) and the supplement for your shared storage system. OVERVIEW ................................................................................................................................................... 5 VERSION HISTORY ...............................................
Overview HP NetServer clusters provide increased availability solutions for critical applications. The basic cluster consists of two HP NetServer systems coupled to shared storage units. The operating system files, application files, and other files local to each node are stored on fixed or hot swap disks. Local disks are usually located internally in the system. Both HP NetServers share external drives located in the shared storage unit(s).
NOTE Hewlett-Packard only supports and recommends installation of clustered HP NetServer systems using Microsoft Cluster Server software by a Microsoft or HP Cluster Certified Installer.
A Graphical Overview to Setting Up the Cluster CAUTION Departing from the sequence shown here can cause unnecessary work and unpredictable results.
1 What’s Needed Before beginning the installation, make sure you have the following items prepared and tools and resources available. Some information in this part is shared storage specific. See part "1 What’s Needed" of the Shared Storage Supplement and the Configuration Guide for your cluster. Review the supplement, refer to the Configuration Guide as directed, then return to this part.
NOTE When performing this search on the Microsoft web site you may be prompted to register with Support Online. If prompted to register, you must first complete the questionnaire and then complete the search. • HP NetServer Navigator CD. HP recommends you use the latest version, however you may use an earlier version if it is specified in the Configuration Guide for your cluster. • Cluster Installation Test.
2 NetServer Hardware Setup When HP NetServers are shipped from the factory, they are configured for stand-alone operation. The first step in creating a cluster is to install additional hardware that allows the HP NetServers to: • Share data • Communicate with one another • Communicate with the LAN CAUTION Installing hardware requires opening the HP NetServers. HP therefore, recommends using a grounding kit. See part "1 What’s Needed" for details.
3 Shared Storage Hardware Setup part "3 Shared Storage Hardware Setup" in the Shared Storage Supplement HP NetServer Installation Guide 11
4 Cluster Cabling and Setup Setup Cluster Hardware Non-racked clusters - Follow the Site Preparation guidelines provided in the Planning Guide under Plan on the HP NetServers Clustering Solutions web site. Racked clusters - Follow the Road Map supplied with the system and instructions in the shared storage supplement. In addition you should have rack layouts of your system printed from the HP NetServers Rack Assistant program. If not, see HP NetServers web site to download this program.
5 NetServer Software Setup Follow the procedures in this part to configure the hardware and BIOS and to install Windows NT including the applicable Service Pack. Start Here In this part you will perform two major tasks. First you will configure the NetServer Hardware and BIOS and Install Windows NT following a procedure specific to your HP NetServer as listed below. Secondly, you will install the applicable Service Pack on the NetServer.
7. Choose Install/Update Utility Partition. When finished, the system reboots and displays the Custom Configuration window. Install Windows NT 1. Remove the HP NetServer Navigator CD, insert the first CD of the Microsoft Windows NT Server, Enterprise Edition, and exit Navigator to reboot the server. 2. Select the following options when prompted: • Choose the unpartitioned space and install Windows NT. • Choose NTFS file system.
9. Select the following options when prompted: • Choose the unpartitioned space and install Windows NT. • Choose NTFS file system. • When prompted to search for a Network Adapter, load NIC drivers for both the intra-cluster and the client LAN. Be sure to load the correct intra-cluster LAN driver version as specified in the Configuration Guide for your cluster. If you are using two HP D5013A/B NICs, load the driver twice, once for the intra-cluster NIC and once for the client NIC.
2. Select the following options when prompted: • Choose the unpartitioned space and install Windows NT. • Choose NTFS file system • When prompted to search for a Network Adapter, load NIC drivers for both the intra-cluster and the client LAN. Be sure to load the correct intra-cluster LAN driver version as specified in the Configuration Guide for your cluster. If you are using two HP D5013A NICs, load the driver twice, once for the intra-cluster NIC and once for the client NIC.
9. From the Navigator main menu, install a utility partition on the local storage disk by choosing Configuration Assistant and Installation Assistant, then Custom, Microsoft, MS Windows NT 4.0 Enterprise Edition, and No for automated NOS installation. 10. Choose Install/Update Utility Partition. When finished, the system reboots and displays the Custom Configuration window. 11. Make an NT 4.0 Drivers disk by choosing Create Driver Diskette(s), Execute, and following the prompts.
4. Once the NT installation is complete, the D5013A/B NIC drivers must be manually set to the correct LAN speed. Log on and from the start menu select: Settings, Control Panel, Network, and Adapters. For each D5013A/B adapter, select Properties then Settings and set the network speed to the appropriate setting (either 10 Mbps or 100 Mbps) for your network. The intra-cluster LAN should be set to 100 Mbps. Do not use the Auto setting.
9. From the Navigator main menu select, Configuration Assistant, then Custom, Microsoft, MS Windows NT 4.0 Enterprise Edition, and No. Check the advisories in Configuration Advisor for IRQ conflicts and other problems. Click Continue. 10. Define the local storage RAID arrays. Select Configure Disk Array and use HP NetRAID Assistant to define the arrays. Be sure to define the arrays for the local storage adapter (Adapter_0), not the shared storage adapter (Adapter_1).
• When prompted to search for a Network Adapter, load NIC drivers for both the intra-cluster and the client LAN. Be sure to load the correct intra-cluster LAN driver version as specified in the Configuration Guide for your cluster. If you are using two HP D5013A/B NICs, load the driver twice, once for the intra-cluster NIC and once for the client NIC. • Make sure TCP/IP Protocol is selected. Other protocols may be selected in addition, but TCP/IP is required.
7. Select Update, then Execute. Follow screen prompts to update the BIOS. 8. After the server reboots, return to the Navigator main menu by clicking the Back button twice on the displayed window. 9. From the Navigator main menu, install a utility partition on the local storage disk by choosing Configuration Assistant and Installation Assistant, Custom, Microsoft, then either: • MS Windows NT4.0 Enterprise Edition Cluster Server if using Navigator if L.15.05 or later. • MS Windows NT 4.
• If you are using two HP D5013A NICs, when prompted for TCP/IP Properties: Make sure adapter [2] is highlighted and specify its IP address and subnet mask. This will be the LAN adapter for the intra-cluster LAN. Select adapter [1] and specify its IP address and subnet mask. This will be the LAN adapter for the client LAN. Set TCP/IP Properties for DNS, WINS Address, etc. at this time. NOTE 4. The Client LAN IP addresses and Intra-cluster LAN IP addresses must be on different subnets.
12. Make a NT4.0 Drivers floppy disk by choosing Create Driver Diskette(s), Execute, and following the prompts. Label the floppy disk NT 4.0 Drivers. Return to the Navigator main menu. Install Windows NT NOTE Windows NT must be installed from floppy disks, not the CD, so that the mass storage drivers will be loaded correctly. If you have not created a set of Windows NT boot floppy disks, see Software in part “1 What’s Needed” of the installation guide supplement for additional information. 1.
Part "6 Shared Storage Software Setup" in the Shared Storage Supplement and start with Install Fibre Channel HBA Driver. LPr These procedures provide instructions for servers using NetRAID and SureStore E 12H shared storage solutions. NOTE If you are use NetRAID adapters for both shared and local storage go to the next procedure, LPr (with NetRAID Local and Shared Storage) on page 26. Configure NetServer Hardware and BIOS 1. Make sure you power down System A and power up System B. 2.
Install Windows NT NOTE Windows NT must be installed from floppy disks, not the CD, so that the mass storage drivers will be loaded correctly. If you have not created a set of Windows NT boot floppy disks, see Software in part “1 What’s Needed” for additional information. 1. Remove the HP NetServer Navigator CD, insert the boot floppy for Windows NT4.0, and exit Navigator to reboot the server. 2.
LPr (with NetRAID Local and Shared Storage) A NetRAID adapter may only be used for either shared storage or local storage; one adapter may not be used for both. To use NetRAID adapters for both shared and local storage, you must use two adapters. Configure NetServer Hardware and BIOS 1. Make sure you power down System A and power up System B. 2. Insert the HP NetServer Navigator CD in the CD-ROM drive and restart the server. 3.
Install Windows NT NOTE Windows NT must be installed from floppy disks, not the CD, so that the mass storage drivers will be loaded correctly. If you have not created a set of Windows NT boot floppy disks, see Software in part “1 What’s Needed” for additional information. 1. Remove the Navigator CD, insert the boot floppy for Windows NT4.0, and exit Navigator to reboot the server. 2. When Setup prompts to detect mass storage devices, skip detection and manually specify the mass storage drivers: 3.
LX/LXr Pro Configure NetServer Hardware and BIOS 1. Make sure you power down System A and power up System B. 2. Insert the HP NetServer Navigator CD in the CD-ROM drive of System B and restart the server. The server boots from the CD and displays the Navigator Main menu. NOTE If prompted that the HP NetServer Navigator BIOS is a newer version, choose Continue and go to step 3; otherwise go to step 6. 3. To update the BIOS, choose Configuration Assistant, then Custom, Microsoft, MS Windows NT 4.
LXr 8000 These procedures provide instructions for servers using NetRAID, SureStore E 12H, and Model 30/FC shared storage solutions Configure NetServer Hardware and BIOS 1. Make sure you power down System A and power up System B. 2. Insert the HP NetServer Navigator CD in the CD-ROM drive and restart the server. NOTE If prompted that the HP NetServer Navigator BIOS is a newer version, choose Continue and go to step 3; otherwise go to step 6. 3.
• Choose the unpartitioned space and install Windows NT. • Choose NTFS file system • When prompted to search for a Network Adapter, load NIC drivers for both the intra-cluster and the client LAN. Be sure to load the correct intra-cluster LAN driver version as specified in the Configuration Guide for your cluster. If you are using two HP D5013A NICs, load the driver twice, once for the intra-cluster NIC and once for the client NIC. • Make sure TCP/IP Protocol is selected.
7. Select Update, then Execute. Follow screen prompts to update the BIOS. 8. After the server reboots, return to the Navigator main menu by clicking the Back button twice on the displayed window. 9. From the Navigator main menu, install a utility partition on the local storage disk by choosing Configuration Assistant and Installation Assistant, Custom, Microsoft, then MS Windows NT4.0 Enterprise Edition Cluster Server. 10. Choose Install/Update Utility Partition.
NOTE 4. The Client LAN IP addresses and Intra-cluster LAN IP addresses must be on different subnets. Once the NT installation is complete, the D5013A NIC drivers must be manually set to the correct LAN speed. Log on and from the start menu select: Settings, Control Panel, Network, and Adapters. For each D5013A adapter, select Properties then Settings and set the network speed to the appropriate setting (either 10 Mbps or 100 Mbps) for your network. The intra-cluster LAN should be set to 100 Mbps.
2. 3. When Setup prompts to detect mass storage devices, skip detection and manually specify the mass storage drivers: • The drivers are loaded from the NT 4.0 Drivers floppy disk you created from the Navigator CD. • First, load the driver for the device you want to boot from. For drives in the LXr 8000 internal bays this will normally be the embedded SCSI Symbios driver. • Secondly, load the IDE driver, since the CD drive is on the IDE bus. • Finally, load any other mass storage drivers you need.
5. Exit the Setup Utility (F10, Save, and Exit). The server reboots. If you have special NetServer local SCSI bus options enter the Symbios utility, by pressing Ctrl+C at the Symbios boot banner during reboot and set the options you need; otherwise allow the server to reboot. The server boots from the CD and displays the Navigator Main menu. NOTE If prompted that the HP NetServer Navigator BIOS is a newer version, choose Continue and go to step 6; otherwise go to step 9. 6.
Configuration Guide for your cluster. If you are using two HP D5013A/B NICs, load the driver twice, once for the intra-cluster NIC and once for the client NIC. • Make sure TCP/IP Protocol is selected. Other protocols may be selected in addition, but TCP/IP is required. • If you are using two HP D5013A/B NICs, when prompted for TCP/IP Properties: Make sure adapter [2] is highlighted and specify its IP address and subnet mask. This will be the LAN adapter for the intra-cluster LAN.
6 Shared Storage Software Setup Use these procedures to install host bus adapter (interface) software, create the arrays and array file systems. Shared Storage Setup Part "6 Shared Storage Software Setup" in the Shared Storage Supplement. For Fibre Channel solutions go to Configure the Storage Devices using FCArray Assistant in the supplement Create the Array File Systems Use the instructions below and Windows NT Disk Administrator to partition, assign drive letters, and format the shared logical drives.
Disk Administrator, Scanned Logical Disks Create Full Disk Partitions for each Array 1. Click the disk box to select the shared array to be partitioned. Disk Administrator highlights the selected disk. 2. From Disk Administrator’s Partition menu, choose Create. A dialog appears indicating the maximum size of a single partition. NOTE 3. Don’t be misled by the displayed disk capacity for your arrays.
Disk Administrator, Partitioned Disk Array NOTE Do not partition a disk into separate drives. Microsoft Cluster Server Software will only manage one partition per disk. 4. Repeat steps 1 through 3 to create a partition for each disk array to be shared by the cluster. 5. From Disk Administrator’s Partition menu, choose Commit Changes Now, then choose Yes to save changes and OK when prompted.
Disk Administrator, All Disk Arrays Partitioned and Committed Assign Drive Letters Disk Administrator has assigned sequential and temporary drive letters to the disk arrays you partitioned. You must assign a permanent (static) drive letter to each drive you want to make available to both Systems A and B. NOTE When partitioning logical drives with Windows NT the logical drive letters are sequentially assigned in a predefined sequence.
Disk Administrator, Assigning Drive Letters 4. Repeat steps 1 through 3 to assign a drive letter for each array to be shared in the cluster. Format Logical Drives 1. Click a disk box to select one of the arrays that you just partitioned and assigned a drive letter. Disk Administrator highlights the selected disk. 2. From the Disk Administrator’s Tools menu, choose Format. A dialog appears with a list of formatting options. Disk Administrator, Formatting and Assigning Volume labels 3.
5. Select Quick Format in the Format Options field, and then Start to begin formatting the logical drive. NOTE 6. No action is necessary for the Capacity and Allocation Unit Size fields. Repeat steps 1 through 5 to format each drive to be shared in the cluster. The following example depicts both drives formatted with permanent drive letters assigned. Disk Administrator, Formatting and Assigning Volume labels 7. Exit Disk Administrator.
7 Microsoft Cluster Server Software Setup During installation of Microsoft Cluster Server Software (MSCS) at System A, you will create a Microsoft Cluster Server. Initially, it is a cluster with only one server (System A). Later, you will join System B to the cluster and thus create a standard two-server (node) cluster. If you need more information about the installation process outlined here, see the Microsoft Cluster Server Administrators Guide.
5. Setup prompts you for the location to store cluster files. Either accept the default or type a new location and click Next. 6. Setup prompts you for the cluster domain account. Provide a user name and password for an appropriate Microsoft Domain account for the cluster. Click Next. NOTE 7. If you are unsure of the correct MS Domain account, consult the Windows NT documentation supplied with your system. Setup presents a two-column list of Available unshared and Shared cluster disks.
NOTE • Use only for internal cluster communications Choose this option if you are configuring an intra-cluster LAN adapter. • Use only for client access Choose this option if you are configuring a client LAN adapter and System A and B reside on different IP subnets. In this example, the intra-cluster LAN is shown first with the Adapter Name and IP Address already filled in. However, your configuration may display the Client LAN first.
Microsoft Cluster Server Setup, Setting the LAN Priority 12. Follow the on-screen instructions to order the adapters so that the intra-cluster LAN adapter is identified first (at the top of the list). After you have ordered the adapters click Next. NOTE If you previously defined the client IP addresses of Systems A and B as residing on different subnets, the client LAN will be unable to assume responsibility for intra-cluster communication. 13. Setup prompts you for the Cluster IP address.
Install MSCS on System B While you have been configuring System A, System B has been idling at the Restart dialog. 1. Click Restart to reboot System B to Windows NT. 2. Insert the Component CD of Microsoft Windows NT Server (Enterprise Edition) in the CD-ROM drive of System B. 3. Run the Microsoft Cluster Server setup program. Setup.exe is located in the following folder on the Component CD: \mscs\cluster\i386. 4.
8 Cluster Testing There are two programs for testing the installed cluster. These programs are the Hardware Verification and Labeling Utility and the Cluster Installation Test. Hardware Verification and Labeling Utility The Hardware Verification and Labeling Utility scans the system and checks system integrity before you perform system configuration. It helps you simplify the assembly process that must be performed while trying to setup a new product.
NetRAID Supplement to HP NetServer Microsoft Cluster Installation Guide 8 March 1999
Notice The information in this document is subject to change without notice. Hewlett-Packard makes no warranty of any kind with regard to this material, including, but not limited to, the implied warranties of merchantability and fitness for a particular purpose. Hewlett-Packard shall not be liable for errors contained herein or for incidental or consequential damages in connection with the furnishing, performance, or use of this material.
Contents NOTE This supplement is incomplete without the HP NetServers Microsoft Cluster Installation Guide. VERSION HISTORY ....................................................................................................................................... 2 1 WHAT’S NEEDED ................................................................................................................................... 4 SOFTWARE ........................................................................................
1 What’s Needed Software • Obtain HP NetRAID Utilities as stated below. • MS-DOS version 6.0 or later if using NetRAID or NeRAID-1. Not required for NetRAID-3Si.
6. For NetRAID (D4943A) or NetRAID-1 (D4992A) • At Windows NT Explorer, extract the downloaded file by double-clicking the filename. The file is self-extracting, and when executed, creates the following subdirectories: Subdirectory Contents Label Floppy Disk Fw_dvr NetRAID firmware update and NetRAID Driver for Windows NT NR Cluster Firmware and Driver Nrast_1 HP NetRAID Assistant program Setup HP NetRAID Assistant 1 Nrast_2 HP NetRAID Assistant program files HP NetRAID Assistant 2 7.
2 NetServer Hardware Setup 1. Install HP NetRAID Adapters in the PCI slots specified by the HP NetServer Configuration Guide for your cluster configuration. 2. Make sure that previously installed adapters are in the correct PCI slots. NOTE 3. For clusters using HP NetRAID adapters, typically, only one is provided (installed) in the server for management of shared storage. Some cluster configurations use two NetRAID adapters.
3 Shared Storage Hardware Setup This section includes instructions for setup of three types of shared storage devices. Follow the instructions for the type(s) of devices that you are using in your cluster. See the Configuration Guide for allowed shared storage devices that can be used in your cluster.
HP Rack Storage/8 Setup HP Rack Storage/8 units for shared storage in the cluster must be set up for single bus operation. When cabled as a single bus unit, the HP Rack Storage/8 provides up to 8 hard disk drives on a single SCSI bus. Although the HP Rack Storage/8 are shipped from the factory configured for single bus operations, check their setups as outlined below and make changes as necessary. Set Option Switches Set the option switches as shown below.
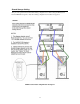
HP Storage System/6 Setup This section describes how to prepare the HP Storage System/6 for cluster operations by: • Configuring the internal cabling on the HP Storage System/6. • Assigning SCSI IDs for the disks in the HP Storage System/6 using DIP switches. Access the Cabinet Interior Before connecting the disks housed in the HP Storage System/6, set up the internal cables to support the cluster. To gain access proceed as follows: 1. Unlock the bezel from the chassis. 2.
Verify and Reconnect Internal Cabling Using the schematic view of the HP Storage System/6’s internal cabling shown below, check and if necessary, reroute the three cables located inside the storage unit. These are: • C14: A short cable connecting the lower cage to the upper cage. • C20: A cable connecting the external port and routed to the "in" side of the lower disk cage. • C20: A cable connecting the other external port to the upper cage.
Assign SCSI IDs To configure the shared disks, change the SCSI ID assignments for each of the HP Storage System/6 units in the cluster: 1. Check, and if necessary reassign, SCSI IDs for both the upper and lower cages. Configure the upper and lower cage DIP switches as indicated below. Note that the upper cage settings are shown in their default positions. 2. Reattach and close the HP Storage System/6 side cover. Replace the front bezel. Leave the power off. 3.
4 Cluster Cabling and Setup Connect Shared Storage NOTE NetRAID channels must not cross. That is, make sure to connect channel 0, 1, and 2 from one HP NetServers through the storage cabinet to channel 0, 1, and 2 respectively on the second HP NetServer. Follow the cabling diagram(s) in the configuration guide carefully. It is a good idea to number or color-code the cable ends for the channels used.
5 NetServer Software Setup This part of the supplement is intentionally left blank.
6 Shared Storage Software Setup NOTE In “Update the Firmware” and “Launch HP NetRAID Express” you are required to take action during bootup. Review these procedures before restarting the system so that you are prepared to take the necessary actions. Update the Firmware Perform one of the two following procedures based on the NetRAID version you are using for shared storage. Update the Firmware for NetRAID (D4943A) or NetRAID-1 (D4992A) 1.
Configure Your Systems NetRAID Adapters Launch HP NetRAID Express When the following prompt appears, press Ctrl+M: Option: Experienced users may press for HP NetRAID Express Tools now. NOTE Configure the NetRAID Adapters in your system using one of the two following procedures. The procedure you will use is based on whether your are or are not using a NetRAID Adapter for Local Storage. Configure the Adapters (not using a NetRAID Adapter for Local Storage) 1.
Configure the Adapters (using a NetRAID Adapter for Local Storage) 1. From the Management Menu check that the BIOS is Enabled. If not, enable it. HP NetRAID Express Tools displays the message, BIOS Is Currently Enabled. 2. If you are using a NetRAID (D4943A) or NetRAID-1 (D4992A) for local storage: From the Management Menu select the local storage NetRAID adapter (Select Adapter, Adapter-0). Then select Objects, SCSI Channel.
Install NetRAID Software 1. With System A off reboot System B to NT. 2. If you are using a NetRAID Adapter for local storage you have already installed the NetRAID driver, therefore go to step 7. Otherwise, start with the next step to install the driver. 3. At the Windows NT’s Control Panel start the SCSI Adapters utility. 4. Select the Drivers tab, Add, and then Have Disk. 5.
Power Up Shared Storage Turn on power for the HP shared storage cabinet(s). Create the Arrays CAUTION From this point forward and until Microsoft Cluster Server Software is fully installed after part "7 Microsoft Cluster Server Software Setup" in the Installation Guide, make sure that only one HP NetServer is running Windows NT 4.0 at a time. The other system must be held at the NT loader prompt.
From the Windows NT Start menu, click Programs|NetRAID|NetRAID Assistant. The HP NetRAID Assistant program loads and displays its main window. HP NetRAID Assistant Screen HP NetRAID Assistant lists the Physical Devices (actual physical drives) and Logical Devices (RAID arrays) on the NetRAID Assistant screen. The Physical Devices heading lists the drives in columns by channel. Some clusters do not use channel 2 and so no devices will be listed.
available after the failure of one drive. To rebuild the RAID array after a failure, the failed drive is replaced and the data simply copied from the good drive to the new drive. The following table shows how data is distributed: Raid Level 1 Data Distribution Stripe Drive 1 Drive 2 1 Block 1 Block 1 2 Block 2 Block 2 3 Block 3 Block 3 A RAID 10 disk array comprises multiple RAID 1 disk arrays to provide a larger volume (2 for NetRAID or NetRAID-1 and up to 4 for NetRAID-3Si).
Set Array Parameters After the array has been defined, set its parameters as follows: 1. Click Next. The wizard displays its Logical Drive Definition window. 2. This window shows the array’s RAID level and its usable size. NOTE Since all data is duplicated, the size of the array is one-half the sum of the capacity of the two drives composing the array. 3. Click Advanced and set the Write Policy to Write Thru. Click OK. 4. If you are creating a RAID 1 array, press Accept.
A RAID 50 disk array comprises multiple RAID 5 disk arrays to provide a larger volume (2 for NetRAID or NetRAID-1 and up to 4 for NetRAID-3Si). Define the Array RAID arrays are defined using the Configuration Wizard. To define an array: 1. On the NetRAID Assistant’s menu bar click Configuration, then Wizard. 2. Select Custom in the dialog and click Next. The Configuration Wizard displays its Array Definition window. HP NetRAID Array Definition 3.
array is less than the total capacity of all drives in the array. The useable array capacity will be C(N-1), where N is the number of drives and C is the capacity of one drive. 3. Click Advanced and set the Write Policy to Write Thru. Click OK. 4. If you are creating a RAID 5 array, press Accept. If you are creating a RAID 50 array, check the Span Arrays box, then press Accept. 5.