
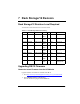
HP NetRAID-4M Configuration and Upgrade Guide (Release 5)


Chapter 8 Internal Cabling
32
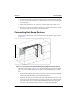
6. Connect the terminated end of the cable that has the terminator block with the
devices located in the Common Tray. (Start with the connector at the terminated
end of the cable.)
7. Ensure that all cables are out of the way, and then replace the system cover.
8. After all covers have been replaced and secured, reconnect the power cord and
all external cables as described in your documentation.
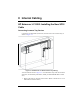
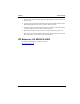
Connecting Hot-Swap Devices
Connect the new SCSI cable (5185-2362) to the hot-swap right side cage as shown
in Figure 8-3:
Figure 8-3. HP Netserver LH 3000\LH 6000 Hot-Swap Right Side Cage Cabling*
*The slot location shown in Figure 8-3 is for illustration only. Other slot locations
will work. (For maximum performance install your HP NetRAID-4M in a 64-bit
slot.)
1. Install the HP NetRAID-4M in a PCI slot. (Refer to the documentation supplied
with the HP NetRAID-4M for more detailed instructions.)
2. Install the new point-to-point SCSI cable to the right-side hot-swap cage. (The
hot-swap cage on the left side does not need a new cable. The existing twisted-
pair cable on this side can reach the HP NetRAID-4M. Disconnect the cable
connector to the motherboard and connect it to the HP NetRAID-4M.)