
Integrated HP NetRAID Controller Config. Guide


25
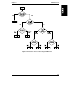
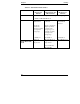
3 Configuration Overview
To configure your integrated HP NetRAID controller, you need to perform the
following steps. Steps A through M are described in Chapters 4 through 7 of this
guide.
Step A. Plan Your Hardware (Chapter 4
and Worksheet A)
Step H. Decide I
2
O Operation or Non-
I
2
O Operation (Chapter 6)
Step B. Plan Arrays and Logical Drives
(Chapter 4 and Worksheets A
and B)
Step I. Use HP NetServer Navigator
CD-ROM to Prepare Diskettes
(Chapter 6)
Step C. Verify Hardware Setup
(Chapter 5)
Step J. Install NOS and HP NetRAID
Drivers (Chapter 6)
Step D. Enable Integrated HP NetRAID
Controller (Chapter 5)
Step K. Install NOS-specific
Configuration Utility (Chapter 6)
Step E. Launch HP NetRAID Assistant
(Chapter 5)
Step L. Run HP NetRAID Express Tools
(Chapter 6)
Step F. Configure Arrays and Logical
Drives (Chapter 5)
Step M. (Optional) Prepare for Online
Capacity Expansion (Chapter 7)
Step G. Save Configuration and
Initialize (Chapter 5)
Once you have configured your HP NetRAID system, refer to Chapter 8,
"Managing Servers over the Network," and the HP NetRAID Series User Guide
for information on managing your controller from a remote location.
If you have configured and are operating a one-channel HP NetRAID system, and
later you want to configure a second channel, follow the steps in Chapter 9, "For
HP NetServer LH 3/3r and LH 4/4r, Configuring a Second Channel."
Chapter 10, "Understanding HP NetRAID Utilities," provides menu maps for the
three utilities that are available to manage your HP NetRAID system.