
HP NetServer AA 6200 Solution Release 3.0 Administrator's Guide


Chapter 9 Maintenance
236
Replacing a Failed Mirrored Disk
Warning: If the failed disk is the source of a mirror copy, do not implement
this procedure until completing all precautions to save data from
this disk.
Often disks can be replaced within a RAID system with no need for special considerations at all.
Caution: Before proceeding, make sure you are properly grounded using, for instance, a
wrist strap with an attached alligator clip that is connected to an appropriate
ground.
To replace a failed mirrored disk for a mirror set with local hardware redundancy and in which
the other mirrored disk is active:
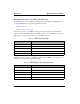
Step Action Notes
1 Acquire a replacement disk that is equal to
or larger in size than the failed disk.
The replacement disk must be of the same SCSI
variety as the failed disk; for example, the old and
new disks must both be narrow or both wide. This
release does not support disk replacement with disks
of a different SCSI variety.
Logical disks on RAID configurations are an
exception. The RAID subsystem masks any physical
disk attributes from Windows NT.
2 Shut down the IOP that contains the failed
disk.
Follow the procedure on page 210.
3 Remove the failed disk. When removing the failed disk, carefully handle and
store this disk (as if it were a new disk) until the
replacement disk is installed and is fully operational.
4 Install the replacement disk following the
manufacturer’s instructions.
Do not modify any SCSI BIOS settings. Your
system must maintain the SCSI BIOS settings
selected during initial server installation.
5 Reboot the IOP in Offline Endurance
I/O Processor Mode.
6 Using the Windows NT Disk
Administrator, partition the replacement
disk, as described in the next table.