
HP Netserver AA 6200 Solutions Release Notes v4.0 SP1
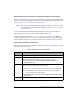
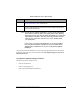
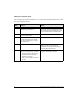
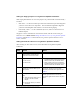
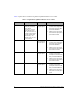

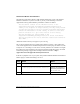
Table Of Contents

10 Endurance Release Notes for Release 4.0 Service Pack 1
Cabling for Loopback Tests
After completing the hardware installation, if you want to perform BIOS loopback tests, install
the loopback plugs as follows:
Step Action Notes
1 Remove the two loopback plugs from
the Endurance accessory kit.
The local and remote ports of the V4.3 MIC use
different fiber optic wave lengths than those in
the V4.2 MIC, requiring the installation of plugs
into the individual ports for loopback testing.
2 Carefully remove the protective covers
from the loopback plugs.
3 Insert one plug into the REMOTE port
and the second plug into the LOCAL
port, gently pushing them in until you
hear a slight click.
4 Perform the BIOS loopback tests. Refer to Using the MIC BIOS Setup Utility
starting on page 7-3 in the Endurance
Administrator’s Guide for information about
performing BIOS loopback tests.
5 After loopback tests are complete,
remove the loopback plugs, as follows:
• Gently compress the arched fitting
located behind the rectangular
plastic box on the plug.
• After you hear a slight click, remove
the plug.
After removing the plugs, carefully put the
protective covers back on the plugs.