
HP Netserver AA Solution Administrator's Guide v4.0 SP1


Endurance Server Maintenance 9-17
Installing a Replacement MIC
Caution: Before proceeding, make sure you are properly grounded using,
for instance, a wrist strap with an attached alligator clip that is
connected to an appropriate ground.
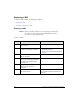
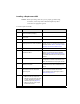
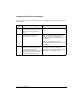
To install a replacement MIC:
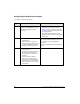
Step Action Notes
1 Carefully remove the replacement MIC
from its anti-static packaging.
2 Install the replacement MIC into the
correct slot.
3 Replace the cover.
4 Attach the MIC fiber connections by
clipping them into the cable receptacles.
Ensure that local and remote connections are
cabled correctly. For information about cabling
the MICs, refer to Table 2-1 in Chapter 2 of HP
Netserver AA Solution Installation Guide.
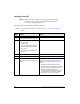
5 Power up the system.
6 Make a flash diskette with which you
will flash the MICs.
Prepare this from an Endurance distribution
diskette or a subsequent hotfix if applicable.
Refer to Making an MTC Diskette in Chapter 7
for detailed information about creating the flash
diskette.
7 Flash the MICs.
Mtcflash - f results in the correct
configuration. If all flash components are up to
date, MTCFLASH does not reprogram the MIC.
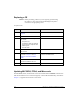
8 Compare the revision levels to other
MICs in your system.
Verify that the revision level of the new MIC
matches those of the other three MICS in the
server.
9 On the MIC, make sure that the local
and remote connection fiber status
lights are green.
If the connection fiber status lights are not
green, correct the condition and continue.
For a description of the status lights, refer to
MIC LEDs in Appendix A.
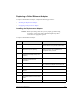
10 Using Endurance Manager:
• Make sure that any components
affected by this procedure are active
or online. Reenable any faulted or
disabled components (page 9-31).
• Make sure that the system rejoins
the Endurance server.