
HP Netserver AA Solution Administrator's Guide v4.0 SP1


Endurance Server Maintenance 9-27
Replacing a Failed Mirrored Disk
Warning: If the failed disk is the source of a mirror copy, do not implement
this procedure until completing all precautions to save data from
this disk.
Often disks can be replaced within a RAID subsystem with no need for special Endurance
considerations at all. Refer to your vendor’s RAID documentation and ignore this procedure.
Caution: Before proceeding, make sure you are properly grounded using,
for instance, a wrist strap with an attached alligator clip that is
connected to an appropriate ground.
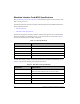
To replace a failed mirrored disk for a mirror set (with no hardware RAID) and in which the
other mirrored disk is active, follow this procedure:
Step Action Notes
1 Acquire an appropriate replacement
disk.
When replacing a disk that is incorporated into a
hardware RAID set with local IOP hardware
redundancy, comply with the RAID controller
vendor’s requirements.
When replacing a disk that was configured using no
hardware RAID (RAID 0), the replacement disk must
be the same size or larger than the failed disk being
replaced: the same size or larger than the other
member of the same mirror set on the other IOP.
2 Before proceeding, verify that the
other IOP is independently capable
of sustaining the server, including the
CE operating system and
connections to the redirected
networks:
• From the application task bar,
select Start Programs
Marathon Endurance
Endurance Manager.
• Verify that the IOP is online (bright
green).
• Verify that all disks on the other
IOP are online (bright green).
• Verify that all network connections
on the other IOP are online (bright
green) or in standby (dark green).
If you make an error in the following steps, it is likely
that the IOP on which you are replacing a failed disk
will be removed.
Refer to Chapter 4 for detailed information about
how to run and use the Endurance Manager.