
HP Netserver AA Solution Installation Guide v4.0 SP1
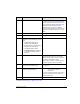
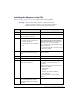
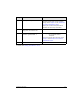
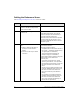
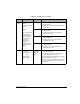

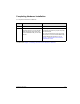


Table Of Contents
- Contents
- Tables
- Figures
- Preface
- Preparing for the Installation
- Installing the Hardware
- Installing Windows and the Endurance Software
- Adding a KVM or Video Switch to the Hardware
- Index

Installing the Hardware 2-3
Continue with Installing the Adapters in the CEs.
5 Install the SCSI adapters. If the SCSI adapter was not delivered already
installed in your computer, using the information
that you recorded on the SCSI Configuration
Chart, install and configure the SCSI devices
following the manufacturer’s directions.
Make sure that you follow any installation
requirements imposed by the manufacturer. For
example, some adapters must have a unique
IRQ.
6 Replace the cover.
7 Power on the IOP.
8 If the following BIOS options are
available for your SCSI adapter, ensure
that:
• Extended BIOS translation is
enabled for the SCSI adapter.
• BIOS support for Int13 extensions is
enabled for the SCSI adapter.
• Host Adapter BIOS is loaded.
• Scan BIOS on Boot is enabled only
for the CE boot disk and the IOP
boot disk.
9 Specify the identity of the MIC. The MIC BIOS Utility starts automatically
because the MIC does not have an identity
setting. Refer to Chapter 7 in the HP Netserver
AA Solution Administrator’s Guide.
Specify IOP1 or IOP2 to correspond with the
intended role of the IOP you are building.
10 Insert the MIC utilities diskette in the
floppy drive, and restart the IOP.
For information about the MIC utilities diskette,
see page 1-9.
11 Run MTCFLASH to update the MIC
firmware: type MTCFLASH -f.
Warning: Once you start MTCFLASH, it must
run to completion without
interruption.
For more information about this utility, refer to
Chapter 7 of the HP Netserver AA Solution
Administrator’s Guide.
12 Remove the MIC utilities diskette.
Step Action Notes