HP NetServer E 45 and E 50 Remote Administrator Guide Server Management Solution
Notice The information contained in this document is subject to change without notice. Hewlett-Packard makes no warranty of any kind with regard to this material, including, but not limited to, the implied warranties of merchantability and fitness for a particular purpose. Hewlett-Packard shall not be liable for errors contained herein or for incidental or consequential damages in connection with the furnishing, performance, or use of this material.
Contents 1 What Is Remote Administration? ................................................................1 HP Remote Console ......................................................................................1 Graphics Console Redirection (Windows NT).................................................3 RCONSOLE (NetWare) .................................................................................4 Recommended Modems ................................................................................
Contents B Terminal Emulation Keys.......................................................................... 33 Index ...............................................................................................................
1 What Is Remote Administration? The HP NetServer E 45 and E 50 incorporates remote access capabilities. Using pcANYWHERE32 (included on the HP NetServer Navigator CD-ROM) or terminal emulation software of your own choosing, you can access your NetServer from a remote site. Remote access is particularly useful for network administrators, VARs, support technicians, and other support experts who can evaluate, maintain and, if necessary, reconfigure a NetServer remotely.
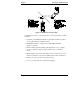
Chapter 1 What is Remote Administration? Figure 1-1. HP Remote Console Setup Using Remote Console, you can remotely access a customer's NetServer Utility Partition to: • Update the system BIOS. This feature is particularly useful since it allows you to update a NetServer's BIOS remotely. • Run HPVGSet Utility to configure and test HP 10Base-T adapters (J2973A or J2970A). • Run the SCSI Configuration Utility.
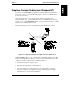
Chapter 1 What is Remote Administration? Graphics Console Redirection (Windows NT) You can use pcANYWHERE32's capabilities (when installed at both NetServer and remote console) to gain virtually full graphic control over an HP NetServer from a remote location. Using this feature, the console display exactly mimics the display at the NetServer. In this way, you can take full control of your HP NetServer from the remote console.
Chapter 1 What is Remote Administration? RCONSOLE (NetWare) You can use Novell NetWare's RCONSOLE program to take control of a customer's HP NetServer running Novell NetWare/IntranetWare. RCONSOLE works at the NOS-level to provide full character-based remote access to a NetServer running Novell NetWare/IntranetWare.
Chapter 1 What is Remote Administration? Documentation The HP NetServer includes the following documentation: • This guide, which describes how to install and use the Remote Console feature to manage your HP NetServer. • pcANYWHERE online documentation. The complete pcANYWHERE User Guide is in Adobe Acrobat PDF format on the HP NetServer Navigator CD-ROM in the \UTIL\PCA32L\language subdirectory (where language represents a two letter abbreviation for your local language).
2 Installing HP Remote Console The HP NetServer's built-in Remote Console Redirection feature can be used to provide troubleshooting and diagnostic services. Remote Console Redirection allows you (or a VAR or system administrator) to manage, monitor and configure a server without traveling to the NetServer site. Using Remote Console Redirection, you can access and initiate all the configuration and diagnostic features incorporated into the HP NetServer Utility Partition.
Chapter 2 Installing HP Remote Console Redirection Minimum Server Requirements In order to use HP Remote Console, your server needs: • An installed HP Utility Partition. • An external modem or direct connection via one of the HP NetServer E 45 or E 50's two serial ports. • An HP NetServer Navigator CD-ROM Version F.00.35 or later. (To find the version number, look on the CD-ROM, opposite the HP logo.
Chapter 2 Installing HP Remote Console Redirection Installation of HP Remote Console Installing HP Remote Console is a two-part process including setup at the NetServer and at the workstation designated as the remote console. You first set up and configure Remote Console at the NetServer. Steps include assigning a serial (COM) port and password, and then initializing the modem.
Chapter 2 Installing HP Remote Console Redirection 2. On the BIOS Setup Main Menu, using the arrow keys, cursor to the Configuration pull-down menu. Select "Integrated I/O Ports," and press Enter. The server displays a list of Integrated I/O Ports. 3. On the Integrated I/O Ports screen, cursor to "Console Redirect Port" and select a serial port for console redirection Using [F7] and [F8] to toggle through the options, match your port to the interrupt data provided in Table 2-1. Table 2-1.
Chapter 2 Installing HP Remote Console Redirection Modem Installation To enable console redirection, you need to connect an external modem to the NetServer port you assigned for use with console redirection. The ports are designated on the back of the NetServer. Connect the modem to the port you have chosen for console redirection, either Serial A or Serial B. Modem Initialization At the HP NetServer, the third step required to enable a Remote Console is initializing the modem.
Chapter 2 Installing HP Remote Console Redirection initialization string supplied by the manufacturer of the modem you connected to the NetServer. HP Modem Initialization Utility Modem initialization string: AT&F Login Password: hp OK NOTE
Chapter 2 Installing HP Remote Console Redirection Ending the Remote Console Session To end a remote console session and return to normal HP NetServer operation, press the space bar at the "HP Modem Initialization Utility" screen displayed at the HP NetServer. NOTE Once the NetServer's modem has been initialized, your HP NetServer awaits a call from the remote console and is functionally disabled until a connection is made, or until you disable the remote login by pressing the space bar at the server.
Chapter 2 Installing HP Remote Console Redirection The remote console's display should closely resemble the characteristics of the server's display if you use a PC-based, ANSI color terminal emulator that supports 25-line mode and the IBM PC character set. The following table provides the terminal settings to use when configuring your communications software for use with HP Remote Console. Table 2-3.
Chapter 2 Installing HP Remote Console Redirection After the initial installation is complete, pcANYWHERE32 displays the main program window. pcANYWHERE32 menu bar pcANYWHERE32 action bar Once you have completed the initial pcANYWHERE32 installation, configure the software for your system by selecting a modem model and identifying the phone number for your HP NetServer(s). To set the host phone number: 1. On the pcANYWHERE32 action bar, click Call Online Service.
Chapter 2 Installing HP Remote Console Redirection Type in the new name. Later, to rename the connection item you created, right-click the connection item. From the popup menu, choose Rename. 3. Enter the serial (COM) port assignment and telephone number of the server you identified in the previous screen. Be sure the Baud rate for communication between the HP NetServer and the local modem is set at 19,200. To do this, click the Details button.
Chapter 2 Installing HP Remote Console Redirection 4. Click OK to return to the main program window. pcANYWHERE32 displays a connection icon in the main program window representing the HP NetServer you just configured. NOTE You can copy and paste the connection icon multiple times to create an icon for each HP NetServer you want to manage. Be sure to modify the server name and phone number entries for the individual entries.
Chapter 2 Installing HP Remote Console Redirection Using HP Remote Console Originating a remote management session between an HP NetServer and a remote console involves initialization at the server (to put the server in standby mode) and an initiating call from the remote console. Because Symantec's pcANYWHERE32 communications software is included with your customer's HP NetServer, the following instructions assume use of this software product at the remote console.
3 Installing Graphic Console Redirection (Windows NT) If you want to access an HP NetServer running Windows NT 4.0 and your remote console is running either Windows NT or Windows 95, you can redirect all the information displayed on the HP NetServer to your remote console using pcANYWHERE32. The following figure shows how the Graphic Console Redirection is set up. Figure 3-1. A Typical Installation of Graphics Console Redirection A window on the console display exactly mimics the display at the NetServer.
Chapter 3 Installing Graphic Console Redirection pcANYWHERE32 allows you to redirect what's graphically displayed on an HP NetServer running Windows NT 3.51 or 4.0 to a remote Windows NT 3.51, 4.0, or Windows 95 PC console. Installation of pcANYWHERE32 is a two-part process. Separate setup steps are required for installation at the NetServer and at the workstation designated as the remote console.
Chapter 3 Installing Graphic Console Redirection Installing pcANYWHERE32 on the Remote Console See the instructions in the preceding chapter in the "Installing and Configuring pcANYWHERE32 at the Remote Console" section to do the initial modem setup of pcANYWHERE32 at the remote console. Then do the following to enable Graphic Console Redirection of your Windows NT NetServer. 1. Run pcANYWHERE32 from the pcANYWHERE32 program group in your Windows Program Manager. 2. Click the "Remote Control" button. 3.
Chapter 3 Installing Graphic Console Redirection NOTE You can copy and paste the connection icon multiple times to create an icon for each HP NetServer E 45 or E 50 you want to manage. Be sure to modify the server name and phone number entry for server by right-clicking on the icon and going into "Properties…".
Chapter 3 Installing Graphic Console Redirection 3. Click "Settings..." and then "Advanced...". Configure using the following address and IRQ settings: Table 3-1. HP NetServer E 45 and E 50 Default Serial Port Interrupts Label Port Interrupt Serial A COM 1 3F8h IRQ 4 Serial B COM 2 2F8h IRQ 3 For best performance, check the FIFO Enabled box. Be sure to select the same COM port you identified when you configured the NetServer during BIOS setup.
Chapter 3 Installing Graphic Console Redirection 3. Right-click the Modem connection item to display the drop-down menu. 4. Choose "Properties…" from the drop-down menu in the Connection Info section. After verifying that the COM port and modem type are set correctly, click OK to return to pcANYWHERE32's main program window. 5. Run the Modem connection item by double-clicking it. This initializes the modem and establishes the Modem connection item you just set up as the default.
Chapter 3 Installing Graphic Console Redirection Using Graphics Console Redirection Initiating a graphic console redirection of an HP NetServer to a remote console involves two steps. First, run pcANYWHERE32 at the server and set it into "Host mode." Second, connect to the server using the "Call Online Service" from a remote console running pcANYWHERE32. At the HP NetServer To initiate a graphics console redirection of the server console, do the following at the server: 1.
Chapter 3 Installing Graphic Console Redirection pcANYWHERE's Keyboard Mapping and Macro Features Any communications software you use for console redirection must be able to send special keystroke sequences, either via a "macro" key, or by sending individual characters, that comprise an escape sequence. HP has already set up a special macro file that includes keyboard combinations and keystroke sequences for use by pcANYWHERE32.
4 Installing RCONSOLE (NetWare) Novell NetWare's RCONSOLE feature works at the NOS level to provide full remote access to a NetServer running NetWare/IntranetWare. Installation of RCONSOLE requires specific setup steps at both the console and NetServer before you can establish an RCONSOLE communications link. Only the NetServer needs to be running NetWare/IntranetWare; the RCONSOLE program can be run from a DOS prompt. Thus, the only software requirement is that the client has access to DOS.
Chapter 4 Installing RCONSOLE (NetWare) Minimum Server Requirements In order to use RCONSOLE, your server needs: • An external modem or direct connection via one of the HP NetServer's two serial ports • An HP NetServer E 45 or E 50 running Novell NetWare/IntranetWare (3.12 or 4.11), IntranetWare for Small Business 1.10, and including RCONSOLE software and utilities Minimum Console Requirements For best results, use an ANSI color terminal that supports 25-line mode and IBM PC character set.
Chapter 4 Installing RCONSOLE (NetWare) 4. Save and exit the edit by pressing [F10], then quit the install program. 5. Take the server off line. Type: down 6. Quit the NOS. Exit the NetWare environment and enter DOS, type: exit 7. Reboot, then run NetWare. Change to the NetWare server directory and type: server At this point, your server is permanently enabled for RCONSOLE connection.
Chapter 4 Installing RCONSOLE (NetWare) 4. Press [Esc] to return to the previous menu, and select "Connect to Remote Location." 5. Press [Ins] to enter data in the supplied fields. Provide the phone number and location as prompted. Enter the name of the server you want to manage and the server's phone number. 6. Press [Esc] to return to the previous screen. Highlight the phone number of the server you want to call using RCONSOLE and press [Enter].
A Software License, Warranty, and Support HP Software License Agreement ATTENTION: USE OF THE SOFTWARE IS SUBJECT TO THE HP SOFTWARE LICENSE TERMS SET FORTH BELOW. USING THE SOFTWARE INDICATES YOUR ACCEPTANCE OF THESE LICENSE TERMS. IF YOU DO NOT ACCEPT THESE LICENSE TERMS, YOU MAY RETURN THE SOFTWARE FOR A FULL REFUND. IF THE SOFTWARE IS BUNDLED WITH ANOTHER PRODUCT, YOU MAY RETURN THE ENTIRE UNUSED PRODUCT FOR A FULL REFUND.
Appendix A Software License, Warranty and Support Copies and Adaptations. You may only make copies or adaptations of the Software for archival purposes or when copying or adaptation is an essential step in the authorized Use of the Software. You must reproduce all copyright notices in the original Software on all copies or adaptations. You may not copy the Software onto any public network. No Disassembly or Decryption.
B Terminal Emulation Keys When keyboard commands are redirected to the NetServer's keyboard from a remote console, keystrokes generated on a generic terminal keyboard may not be able to control all the NetServer's keyboard keys. When there is no direct mapping between the remote keyboard and the NetServer keyboard, special keys on the NetServer keyboard are emulated using character strings.
Appendix B 34 Terminal Emulation Keys Sequence Legend Sequence Legend Esc [ M F5 Esc [ 7 0 ~ cF7 Esc [ U Page Down Esc [ 7 1 ~ cF8 Esc [ V Page Up Esc [ 7 2 ~ cF9 Esc [ Z Shift Tab Esc [ 7 3 ~ cF10 Esc [ i Print Screen Esc [ 7 4 ~ cF11 Esc [ 2 i Shift Print Screen Esc [ 7 5 ~ cF12 Esc [ 1 7 ~ F6 Esc Esc Esc Esc [ 1 8 ~ F7 Esc Del Ctrl-Alt-Del
Index C Console Redirection Installing, 9 D Docmentation, 5 G Graphic Console Redirection Overview, 3 Graphics Console Redirection using, 25 I Installation RCONSOLE setup at the NetServer, 28 RCONSOLE setup at the remote client, 29 server setup for Remote Console redirection, 9 Remote Console, 14 Installing Remote Console, 9 K Keyboard mapping, 26 M Modems recommended for Remote Console, 4 N NetWare RCONSOLE, requirements for using at the remote console, 28 NetWare RCONSOLE, requirements for using at the se
Index using RCONSOLE, 4 Utility Partition features, 1 Remote Console setup, 13 Requirements Remote Console, 8 Remote Console server, 8 S Serial connection communications parameters, 13 Serial ports setting at the server, 23 Server requirements Remote Console, 8 Graphic console redirection, 19 Software license, 31 Support Anywhere documentation, 5 36 Support information, 31 T Technical support, 32 Terminal emulation keys for pcANYWHERE32, 33 Terminal emulation settings, 14 W Warranty information, 31 Windo