
HP NetServer Common Tray Ultra3 Hard Disk Drive Installation Guide


Chapter 3 Mount the Drive in the NetServer E 45 or E 50
19
Step 2: Mount the Drive in the System
To prepare to install the drive:
•
Turn off your system and the display.
•
Disconnect the power cords.
•
Detach any external cables.
•
Remove the cover from the HP NetServer.
•
Remove any hardware necessary to reach the cables or insert the drive.
Consult Information Assistant on the HP NetServer Navigator CD-ROM
for your system for specific instructions for removing components.
If you are mounting the drive in shelf 5 or 6, continue with "Mount the Drive in
Shelf 5 or 6" If you are mounting the drive in shelf 3 or 4, continue with "Mount
the Drive in Shelf 3 or 4."
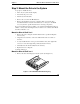
Mount the Drive in Shelf 5 or 6
•
Remove the rear-cooling fan. Confirm that the fan is operational. Replace
it if necessary.
•
Align the four screw holes of the rear shelf with the four screw holes of
the drive.
•
Loosely install all of the screws (provided with the drive), then tighten the
screws to no more than eight inch-pounds (0.9 Newton meters).
•
Carefully insert the fan wire fully into the drive bay.
•
Replace the rear cooling fan.
Continue with Step 3.
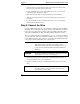
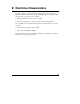
Mount the Drive in Shelf 3 or 4
•
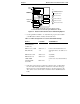
Remove the drive mounting tray from the system. (See Figure 3-2.)
Figure 3-2. E 45 Hard Disk Drive Mounting Tray