
HP Netserver E 45 and E 50 Installation Roadmap


Verify Contents
Obtain HP NetServer Navigator CD-ROM Release History
Connect Monitor, Keyboard and Mouse
3
Preparation
4
2
Unpack and verify the contents of the shipping box against the Contents Checklist included with your NetServer. If anything is missing or damaged,
contact your reseller.
5
XXXXXXXX
H
P
N
e
t
S
e
r
v
e
r
N
a
v
i
g
a
t
o
r
H
P
N
e
t
S
e
r
v
e
r
N
a
v
i
g
a
t
o
r
To obtain drivers and utilities for non-HP components of your system, follow the directions provided by the component or network operating system
manufacturer to access the necessary Internet, BBS, or CompuServe site containing the drivers and software.
To ensure that you have the latest versions of the software, obtain the current release history. This report describes the latest
Obtain the release history from one of these sources:
software updates to
each release of the and instructions for obtaining a current release.HP NetServer Navigator CD-ROM
!
!
!
!
Call HP’s fax system at 1-800-333-1917 (or 1-208-344-4809 from your fax machine) and
request document number 6005
ftp://ftp.hp.com/pub/servers Click on /nsnavcd and view file 6005.txt
GO HPPC; download 6005.txt from the NetServer library
Fax—
Internet WWW—
Internet FTP—
CompuServe—
http://www.hp.com/netserver/servsup/cdinfo
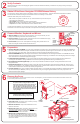
1. Set line voltage:
2. Connect cables:
3. Connect UPS:
Check that the correct line voltage for your country is selected. (The line
voltage is selected during manufacture and should be correct.)
Connect the monitor, keyboard, and mouse to the HP NetServer and plug
in the power cords to the NetServer and to the monitor.
If you have an Uninterruptible Power Supply (UPS), install it and turn it on.
Refer to the user guide included with the UPS for instructions.
Line
Voltage
Switch
Monitor
Mouse
Power
Connector
Keyboard
1. Boot the Navigator CD-ROM:
2. Read the README file:
3. Install Information Assistant:
4. Run Diagnostic Assistant (optional):
5. Visit Order Assistant:
6. Choose the NOS
Turn on the power to the NetServer and the monitor. Open the NetServer front door and press the CD-ROM drive
eject button. Place the in the drive and press the eject button again to close the drive. Turn off the power switch, wait
10 seconds and turn on the power again. If the system fails to boot, follow the instructions displayed on the screen.
When the Navigator CD-ROM boots, select "README File" from the Navigator Main Menu. The README file contains
the latest information to help you install your NetServer. Read it carefully before beginning your installation. If the native language needs to be changed,
select "Set Preferences" and select the appropriate language.
It is a good idea to install HP Information Assistant (IA) on the server management client system before
continuing with the installation. Having IA available on a stand-alone system during installation will be of great assistance to you.
If you want to verify the NetServer hardware as shipped, run Diagnostic Assistant now from the
Navigator CD-ROM.
Order Assistant provides you with a list of those HP and third-party components that were tested with, and are known to
work with, your HP NetServer. Also available from Order Assistant is a list of HP accessories, cables, and connectors for use with your HP NetServer.
Order Assistant is available on the Internet at http://www.hp.com/go/netserver
you are going to install and obtain all software disks. If you are installing the optional IntranetWare for Small Business software
that was included with your NetServer (E 45 only), obtain the activation key prior to beginning NOS installation. Use the key request form in the
NetServer Software Option package.
HP NetServer Navigator CD-ROM
6
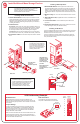
Remove the Cover
If you are installing options, you will need to remove the cover. To install options, you will need a flat 1/4-inch screwdriver and TORX T15 driver. You
do not need any tools to remove the cover.
1. Turn off the NetServer
2. Unlock the cover:
3. Release the latches:
4. Remove the cover:
5. Remove the cooling duct/cover:
and disconnect the power cord.
To unlock the cover, use the key in the key
bag located on the rear of the NetServer.
Lift up the two release latches on the
sides of the front bezel.
Place your hands on the top of the cover,
one along each edge (see figure at right). While
, pull the cover sharply forward to release it
and then slide it forward and off the chassis.
Unplug the fan cable
from the power supply harness (see figure at right). Lift up on the
front of the cooling duct/cover until it is free of the processor heat
sink, and pull it gently toward the front of the NetServer. Lift it up
and out of the chassis.
applying
downward pressure
WARNING Before removing the cover, always disconnect
the power cord and unplug telephone cables.
Disconnect the power cord to avoid exposure to
high energy levels that may cause burns when
parts are short-circuited by metal objects such as
tools or jewelry. Disconnect telephone cables to
avoid exposure to shock hazard from telephone
ringing voltages.
CAUTION Wear a wrist strap and use a static-
dissipating work surface connected to
the chassis when handling components.
Hook
Cooling Duct/Cover
Release
Latches
Cover
Key Lock
Power Supply Harness
Fan Cable
Fan Connectors
Tabs and Slots
Heat Sink