
HP Netserver E 45 and E 50 Installation Roadmap

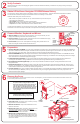


Install Additional Memory
7
SIMM Installation Rules
!
!
!
!
Use only HP SIMMs listed on the Technical Reference Card
located in the pouch on the side of the NetServer chassis.
All SIMMs must be 60 ns, 36-bit, fast-page mode type.
SIMMs must be installed in identical pairs.
Install pairs of SIMMs in Bank A first, then Bank B, then Bank C
(a pair of SIMMs are preinstalled in Bank A).
1. Remove the cover:
2. Install the SIMM:
If you have not yet removed the cover, remove it
and the cooling duct/cover as described in panel 6: "Remove the Cover."
Align the notched corner of the SIMM with the key on
the end of the socket and insert the SIMM fully into the socket at a 45-degree
angle, as shown below. Pivot the SIMM to the 90-degree position until the
retaining clips on both ends of the socket snap into place.
3. Replace the cover: If you are not installing accessory boards or mass
storage devices, replace the cooling duct/cover and the NetServer cover
as described in panel 10: "Replace the Cover and Connect All Cables."
Otherwise, continue with panel 8: "Install All Adapter Boards."
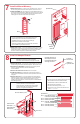
Install All Adapter Boards
8
1. Remove the cover:
2. Read the documentation
3. Remove the slot cover screw
4. Install the boards:
5. Replace the cover:
If you have not yet removed the cover, remove it
and the cooling duct/cover as described in panel 6: "Remove the Cover."
included with each accessory board.
Follow any special instructions, and follow all installation
recommendations.
and slot cover bracket.
Some boards have preferred slot locations, in
which case special installation instructions will be provided in the board's
user guide.
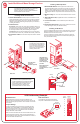
If you are not installing mass storage devices,
replace the cooling duct/cover and the NetServer cover as described in
panel 10: "Replace the Cover and Connect All Cables." If you are
installing mass storage devices, continue with panel 9: "Install Additional
Mass Storage Devices."
NOTE For a list of boards HP has tested, and to view the
README file containing the latest configuration
information, see the .HP NetServer Navigator CD-ROM
NOTE If you have installed any ISA non-Plug-and-Play
accessory boards, you reserve system
resources (memory, I/O addresses, IRQ, and DMA)
for each of the boards. You will perform this step in
panel 12: "Configure the HP NetServer."
must
System Board
Slot 1 — 16-bit ISA (half-length)
or 32-bit PCI (occupied)
Slot 2 — 32-bit PCI (available)
Slot 3 — 32-bit PCI (occupied)
Slot 4 — 16-bit ISA
or 32-bit PCI (available)
Slot 5 — 16-bit ISA (available)
Slot 6 — 16-bit ISA (available)
An adapter board can be
identified by the offset of
the bracket and the shape
of the edge connector
PCI Board —
left-side offset
ISA Board —
right-side offset
Network Interface
Board (Slot 3)
SCSI Controller
Board (Slot 1)
Slot Covers
Bank A
Bank B
Bank C
System Board
90°
45°
Notch
Boot Device Priority
The system searches for a bootable device in this order:
1. IDE CD-ROM drive with a bootable CD-ROM
2. Flexible disk drive with a bootable flexible disk
3. IDE hard disk drive (if installed)
4. PCI Slots in the following order: 3, 1, 2, 4
5. SCSI devices on any one SCSI bus will boot in this
order: 0, 1, 2, 3, 4, 5, 6
Slot Cover Bracket