
HP Netserver E 45 and E 50 Installation Roadmap


9
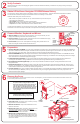
Install Additional Mass Storage Devices
NOTE With certain mass storage configurations, you may
need additional cables or adapters. For configuration
information and part numbers for HP cables,
adapters, and trays, see HP Information Assistant or
Order Assistant at the HP web site.
SCSI Termination
The NetServer SCSI cable is terminated.
Verify that no added devices are terminated.
0
1
2
3
4
5
6
7
TE
A0
A1
A2
reserved
SCSI
Address
Jumpers
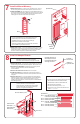
Set the jumpers on the device to an
unused SCSI address. Refer to the drive's user guide, the Technical
Reference Card (located in the pouch on the side of the NetServer
chassis) or to the SCSI addressing example ( below) for instructions
on setting this address. Verify that the drive's SCSI termination power
is off.
from one of the front shelves and save it for future
use.
supplied with the drive, and install it in the
shelf opening.
Connect SCSI and power cables to the
tape drive.
for the shelf from inside the front bezel
before replacing the cover (see illustration below).
Installing a SCSI Tape Drive
1. Set the SCSI address:
2. Remove a tray
3. Attach the drive rails,
4. Connect the cables:
5. Remove the filler panel
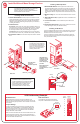
Set the jumpers on the disk drive to an
unused SCSI address. Refer to the drive's user guide, the Technical
Reference Card (located in the pouch on the side of the NetServer
chassis) or to the SCSI addressing example (below) for instructions
on setting this address.
Remove the rear cooling fan and install the drive in the
bay using the four 1/4-inch screws supplied with the device. Replace
the cooling fan after installing the disk drive. Be careful to insert the
fan wire fully into the drive bay before installing the cooling fan.
Remove the mass storage tray from an empty shelf
and install the drive onto the tray. Install the drive and tray in the shelf.
Connect SCSI and power cables to the disk
drive.
Installing a SCSI Hard Disk Drive
1. Set the SCSI address:
2. Install the drive:
3. Connect the cables:
Rear Shelf 6:
Front Shelves:
If you are installing an IDE device, such as a hard disk drive, refer to the
IDE device installation instructions in the "Accessories" chapter of the
.
If you are installing a removable-media device (such as a tape drive),
remove the filler panel from inside the front bezel before replacing the
cover (see illustration below).
Installing an IDE Device
HP NetServer E 45 and E 50 User Guide
Preinstalled Devices
!
!
!
!
A flexible disk drive is preinstalled in Shelf 1
An IDE CD-ROM drive is preinstalled in Shelf 2
A SCSI tape backup drive (SCSI ID=4) is
preinstalled in Shelf 3 in certain models
A SCSI hard disk drive (SCSI ID=0) is
preinstalled in Shelf 5 in certain models
SCSI Addressing Example
SCSI Addresses
Jumper Settings
Each SCSI device must have a unique SCSI address. This
address (0 through 6) dictates the SCSI device's boot priority, and
is set via jumpers, typically located on the underside or on the side
of the device.
The figure and table to the right are typical of a SCSI hard disk
drive that may be preinstalled in your HP NetServer Model. Use
these as a general reference for jumper locations and settings.
Typically, jumpers A0, A1, and A2 determine the SCSI address.
Jumper TE should not be installed.
Refer to the documentation that came with the SCSI device for the
recommended jumper setting. Refer to the Technical Reference
Card, located in the pouch on the side of the NetServer chassis, for
the recommended SCSI addresses.
Front View
Hard disk drives
installed in a front
shelf must first be
mounted on the
mass storage tray
provided
Removable-media
drives must be
mounted to rails or
brackets
NOTE A 50-pin-to-68-pin SCSI adapter is
provided (for E 50 only) at Shelf 3
on the SCSI cable. This adapter is
for use with 50-pin SCSI devices.
Remove or relocate this adapter to
another shelf, as needed, when
installing SCSI devices.
Rear View
Cover
Filler Panel
JUMPERS
TE
A0
A1
A2
Rear fan
x4
Hard disk drive
(No tray or
brackets required)