
HP Netserver E 45 and E 50 Installation Roadmap


Configure the HP
Verify Installed Accessories (Optional)
12
11
1. Turn on the HP NetServer and monitor,
2. Allocate system resources to ISA
boards:
3. Run Configuration Assistant:
4. Select the NOS
and insert the
into the CD-ROM drive. Turn
the power off, wait 10 seconds and turn the power on again. If the
system fails to boot, follow the instructions on the screen:
Press F2 to enter Setup, or
Press F4 to accept automatic configuration update
Go to
the HP NetServer Navigator Main Menu and choose
"Configuration Assistant." Choose "Express" from the next screen
to begin the configuration process.
you want to install.
HP NetServer Navigator CD-ROM
!
!
If you have installed ISA non-plug-and-play accessory
boards, you must now allocate system resources to each of these
boards. For instructions on allocating system resources, refer to
"Configuring ISA Non-Plug-and-Play Boards" in Chapter 4,
"Accessories" in the .HP NetServer E 45 and E 50 User Guide
If you wish, you may now verify accessories you have installed. These
include memory, mass storage devices, and plug-and-play accessory
boards.
To verify installed hardware:
Turn on the HP NetServer and monitor.
View the text that displays on the boot screen as the system boots.
This includes:
• System memory
• Cache memory
• Plug-and-play adapter boards
• IDE mass storage devices
• SCSI mass storage devices
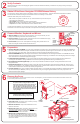
1. View the boot screen:
2. View the System Hardware
Summary screen:
When prompted on the screen, press the
Escape key to display the System Hardware Summary screen.
Immediately press [F5] to continue viewing the screen. The System
Hardware Summary screen shows the NetServer's hardware
configuration. This includes:
• System memory
• Cache memory
• Plug-and-play adapter boards
• IDE mass storage devices
Any hardware you have installed that does not show up on either
of these screens (excluding the exceptions noted above) indicates a
defective component or improper installation.
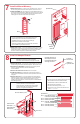
Replace the Cover and Connect All Cables
1. Replace the cooling duct/cover:
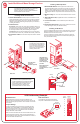
2. Replace the NetServer cover:
3. Connect the power cord and all other cables.
Insert the tabs at the rear of the cooling duct/cover into the
slots at the top rear of the chassis. Lower the cooling
duct/cover, working it past the heat sink until the cover hook
engages with the top of the chassis. Plug the fan cable into
the connector on the power supply harness.
Align the rear lower corners of the cover with the
channels in the chassis
Place one hand on either side of the cover and press
inward lightly to assist aligning clips on the inside edge of
the cover with the rear edge of the chassis
Close the cover firmly
Lower the release latches on the sides of the front of the
cover
Lock the cover with the key provided
!
!
!
!
!
NOTE Non-plug-and-play adapter boards installed in
the NetServer cannot be detected at boot time.
Only plug-and-play boards will be displayed on
the System Hardware Summary screen.
NOTE SCSI devices connected to a SCSI adapter
board cannot be displayed at boot time. Only
IDE mass storage devices will be displayed on
the System Hardware Summary screen.
NOTE Install the cooling duct/cover before
replacing the NetServer cover. The cooling
duct/cover be installed to avoid
damage to the NetServer caused by lack of
proper cooling.
must
NOTE Non-plug-and-play adapter boards installed in
the NetServer cannot be detected at boot time.
Only plug-and-play boards will be displayed on
the boot screen.
NOTE If you plan to use the Remote Console Redirection
feature to run TopTools utilities remotely, you must
create the utility partition. If you choose "Express"
configuration, the partition will be created
automatically. If you perform a "Custom"
configuration, you will need to choose
"Install/Update Utility Partition" from within
Configuration Assistant to create the partition.
10
5. Obtain IntranetWare key:
6. Select the installation mode:
7. Install the NOS:
8. Install or Configure Tape Backup Software:
9. Refer to Information Assistant
If you are installing the optional
IntranetWare for Small Business software included with your NetServer
(E 45 only), obtain the activation key prior to beginning NOS installation.
Use the key request form in the NetServer Software Option package.
If you choose certain versions of
Novell NetWare / IntranetWare or Microsoft Windows NT Server, you
will be prompted to choose between automated or manual NOS install.
Choose automated mode for first-time installation of Novell
NetWare/IntranetWare or Microsoft Windows NT Server on a factory-
configured HP E-Series NetServer.
Perform a manual install if you are installing a NOS other than Novell
NetWare/IntranetWare or Microsoft Windows NT Server, or if you
replaced HP components (for example, replacing an HP NIC or SCSI
controller board with a third-party board).
If you selected the HP automated installation
process, you will be guided through the process by a series of HP
display screens.
If you selected the NOS vendor's installation process (manual install),
view and print the HP NOS installation instructions, and create the
driver disk(s) for the NOS. Install the NOS using the installation utility
supplied with the NOS.
If your
NetServer includes a preinstalled tape backup device, install and
configure the tape backup software now. (See the
for instructions on installing and configuring the tape
backup software).
on the
for further information about your HP NetServer-- it is your reference.
Tape Backup Getting
Started Guide
HP Navigator CD-ROM
Release
Latches
Clips Inside
Rear of Cover
Rear of Chassis
Bottom of Cover
Bottom of Chassis
Cover
Hook
Cooling Duct/Cover
Tabs and Slots