
HP Netserver E 45/E 50 Remote Administrator Guide
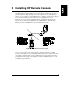

Chapter 2 Installing HP Remote Console Redirection
9
Installation of HP Remote Console
Installing HP Remote Console is a two-part process including setup at the
NetServer and at the workstation designated as the remote console.
You first set up and configure Remote Console at the NetServer. Steps include
assigning a serial (COM) port and password, and then initializing the modem.
Once the modem at the NetServer has been initialized, you can use
pcANYWHERE32 (with either Windows NT or Win 95), or any standard
communications program running on a console workstation to establish a simple,
character-based terminal connection.
Setup at the HP NetServer
At the NetServer, the installation of HP Remote Console includes three steps:
1. BIOS-Level Setup
(Enables console redirection at the BIOS level.)
2. Modem Installation
(Refers to physical installation of the external modem hardware.)
3. Modem Initialization
(Modem setup for communication with the remote console. Note that in
order to do this step, a Utility Partition must have already been installed
on the HP NetServer using the Configuration Assistant utility found on
the HP NetServer Navigator CD-ROM.)
BIOS Level Setup
HP Remote Console is built into the NetServer system BIOS and is enabled
through a series of steps in the BIOS setup program.
NOTE The HP NetServer must be rebooted as part of the installation
for Remote Console Redirection at the server.
The HP NetServer is equipped with two built-in serial ports located on the back
of the unit. They are designated Serial A (COM 1) and Serial B (COM 2).
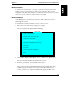
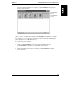
To enable and configure Remote Console at the server:
1. Power on (or reboot) the HP NetServer and, when prompted during boot-
up, press [F2] to run the Setup program.