
HP Netserver E 45/E 50 Remote Administrator Guide
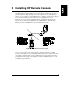

Chapter 2 Installing HP Remote Console Redirection
10
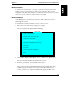
2. On the BIOS Setup Main Menu, using the arrow keys, cursor to the
Configuration pull-down menu. Select "Integrated I/O Ports," and press
Enter.
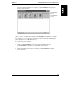
The server displays a list of Integrated I/O Ports.
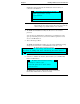
3. On the Integrated I/O Ports screen, cursor to "Console Redirect Port" and
select a serial port for console redirection Using [F7] and [F8] to toggle
through the options, match your port to the interrupt data provided in
Table 2-1.
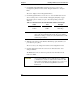
Table 2-1. HP NetServer E 45 and E 50 Default Serial Port Interrupts
Label
Port Interrupt
Serial A COM 1 3F8h IRQ 4
Serial B COM 2 2F8h IRQ 3
NOTE Your serial port IRQ and I/O address settings must match the
entry in the Console Redirect Port field. If you are unable to
match these settings, consult your system administrator or HP
technical representative.
4. When the entry in the Console Redirect Port field properly identifies your
port selection, press [Esc].
The server saves your changes and returns to the Configuration menu.
5. On the Configuration menu, move the cursor to Exit and select "Save
changes and Exit."
The HP NetServer reboots and incorporates the new information in the
NetServer's BIOS.
CAUTION As long as the BIOS-level Console Redirection is enabled,
your NetServer's security is easily breached. Therefore, HP
advises that you disable console redirection as soon as you or
the remote user are finished using HP Remote Console
Redirection.