
HP Netserver E 60, LC 3, LH 3/3r, and LPr Processor Upgrade Guide


Chapter 4 Installation in E 60 and LPr
42
Installing Processor Modules
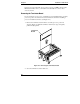
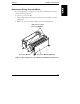
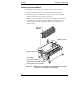
To install a processor module, refer to Figure 4-5 and do the following:
1. Slide the blue plastic release levers toward the center of the board.
2. Orient the processor module to the correct processor position. The heat
sink faces toward the center of the system board.
3. Slide the processor module into the processor mounting bracket and press
it firmly into the slot until it is seated completely. When the processor
module is fully seated, the blue plastic release levers snap back in the
locked position.
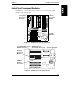
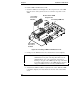
Processor
Module
Secondary
Processor Position
Primary Processor Module in
Primary Processor Position
Release Lever
Release Lever
Figure 4-5. Installing a Processor Module in HP NetServer E 60 and LPr
(Shown for Secondary Processor Module)