
HP Netserver E 60 Remote Administrator Guide


Chapter 2 Installing HP Remote Console
10
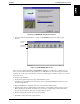
Table 2-4. Terminal Emulation Settings
Setting
Recommended Alternate
Emulation ANSI Color Monochrome ANSI/VT-100
Character Set Extended PC/IBM PC ANSI
Screen Dimensions 80 x 25 80 x 24
Line Wrap OFF
Local Echo OFF
Scroll ON
Carriage Return Translation None
Backspace Translation None
Cursor Underline, blinking
Installing and Configuring pcANYWHERE32 at the Remote Console
Although there are several connection options, typically you access the HP NetServer via a modem. Unless
you have decided to use another communications package, you need to install the pcANYWHERE32 to
enable character-based console redirection at a remote workstation. Note that pcANYWHERE32 console
software is included with the HP NetServer.
To install pcANYWHERE32 at the remote console:
1. Insert the HP NetServer Navigator CD-ROM into your Windows NT or 95 console’s CD-ROM drive
and choose "Run" from the File menu in Program Manager, or the Start menu in Windows, and enter:
x:
\util\pca32\
language
\disk1\setup.exe
where
x:
is the CD-ROM drive containing the HP NetServer Navigator CD-ROM and
language
is
an abbreviation for your local language (US=English, FR=French, GE=German, IT=Italian,
SP=Spanish, JP=Japanese).
2. After pcANYWHERE32 is installed, restart Windows NT or Windows 95.
3. Go to \UTIL\PCA32\US\HPEXTN directory on the HP NetServer Navigator CD-ROM and double
click on the file "HPPCA.REG". This will create three new registry entries under the OnlineService
Key under pcANYWHERE\CurrentVersion.
4. Copy the following files from the pcANYWHERE32 install directory in the HP NetServer Navigator
CD-ROM:
\UTIL\PCA32\
language
\HPEXTN\hpbioscr.scr
\UTIL\PCA32\
language
\HPEXTN\e60client.osf
\UTIL\PCA32\
language
\HPEXTN\hpcrsupp.mk7
into the "data" subdirectory under the pcANYWHERE32 program directory on the hard drive. In the
above,
language
is an abbreviation for your local language (US=English, FR=French, GE=German,
IT=Italian, SP=Spanish, JP=Japanese).
5. Change the attribute of these files from read only to read and write.
6. To run pcANYWHERE32, double-click the pcANYWHERE32 program icon in the
pcANYWHERE32 program group, or choose it from the Start menu.
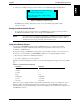
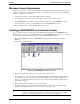
7. The first time you start pcANYWHERE32, the Smart Setup Wizard (shown below) helps you
configure your system by prompting you for basic information such as the COM port (COM 1 or
COM 2) and your modem specifications.