IBM OS/2 Installation Guide for all Hewlett-Packard NetServers NOTICE: The information in this document was last updated for the HP NetServer Navigator CD-ROM version E.10.00 or L.16.00. If you don't have the E.10.00 or L.16.00 version CD-ROM and you're obtaining this document from the HP NetServer web site as a reference to install an operating system, be sure to also check the HP NetServer web site for the latest available drivers.
Tip 19) Configuring IDE drives as boot device Tip 20) LPr CD-ROM must be configured as "Non-Listed IDE CD-ROM" Tip 21) NetServer LH 3 Embeded SCSI and Raid Adapter Configuration Tip 22) Installing multiple D5013 NICs Tip 23) "Unable to Access the Hard Drive error" message during OS/2 installation Tip 24) IBM's Recommended Procedure Installing OS/2 with New AIC78XX.
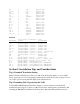
LS LH Pro LH LD Pro LC LC 2000 LF LM LE E 40 E 45 E 50 E 60 LPr LH 3 LH 4 LH 3000 " 2 2 2 1 1 2 2 2 1 1 1 1 2 1 1 1 2 1 \7800 \7800 \7800 \7800 \7700 \SYM897 \7700 \7700 NA \7800 \7800 \7800 \7800 \sym895 \sym895 \sym895 \SYM896 \7800 AIC7870.ADD AIC7870.ADD AIC7870.ADD AIC7870.ADD AIC7770.ADD SYM_HI.ADD AIC7770.ADD AIC7770.ADD AIC7870.ADD AIC7870.ADD AIC7870.ADD AIC7870.ADD SYM8XX.ADD SYM8XX.ADD SYM8XX.ADD SYM_HI.ADD AIC7870.
logical parameters of 255 heads and 63 sectors to support drives up to about 8 GB in capacity. Standard SCSI translation, with 64 heads and 32 sectors, is limited to a maximum capacity of 1024 MB (1 GB). You can enable Extended SCSI translation in the BIOS Configuration section of the EISA Configuration Utility options for the D2078A/B EISA Fast SCSI-2 Host Adapter. This information also holds true for the embedded AIC7870 SCSI Host Adapter.
provides information on improving the performance of OS/2 systems. Contact IBM for more details. Tip 7) Troubleshooting System Hangs When Loading CONFIG.SYS Reboot the system. When the "OS/2" prompt appears in white text at the upper left portion of the screen, press the Alt and F2 keys simultaneously. Read the driver name on the bottom of the display as they are loaded. The last driver displayed may be the one causing the system hang. Try booting from diskette to edit CONFIG.
Fix: This is caused by the wrong AIC7870.ADD driver. It is possible that you skipped one of the steps where the driver and CONFIG.SYS are updated either manually or by using the UPDATE.EXE utility. Issue 6: After the first auto-reboot during the file and print installation section the system may stop with an error when loading drivers in CONFIG.SYS the error will read like this "Invalid path specified in line xy c:\cid\...". Fix: This error usually occurs because the CD-ROM driver is not present in CONFIG.
4) Select "IBM OS/2" 5) Select "Warp Family" 6) Select "Continue" 7) Select "Show Configured Card" 8) Select "View Resources" It shows a table with the following column headings: SLOT IRQ DMA MEMORY I/O PORTS 9) Select "Save to Disk" note that there is no printer support for the Navigator 10) Select "Continue" 11) Select "Continue" 12) Select "Exit" 13) Print the information saved to diskette in step 9 if you want a hard copy Tip 10) How to Run the HPVGSET.
Tip 12) HPFS386 Drive cache size issue on systems with 4GB RAM The installation procedure of IBM OS/2 defaults to calculating the disk cache size based on the amount of memory installed on your system. It appears that this calculation does not work properly when the system has a 4GB of RAM installed. In this case the disk cache is set to the lowest value of 256K. Hewlett-Packard reported this issue to IBM. As a workaround you can edit the file C:\IBM386FS\HPFS386.INI.
Configuration #2: Four HP NetRAID disk array cards Two NIC's To resolve this issue ServicePack 29 is required. You can obtain this update by contacting your IBM representative. Tip 16) Specific to E Series NetServers: How to boot from a NetRAID adapter while a 2910Bui SCSI card is present on the system The following steps are involved during system boot to install boot partition on NetRAID adapter disk arrays. 1. Disable Host Adapter BIOS by using during boot-up.
6. The default IDE configuration is usually set to automatic which reports the following parameters: Cyl = 14848 Head = 9 Sector = 63 Workaround: Run setup to apply the following IDE configuration values: Cyl = 8174 Head = 16 Sector = 63 Final Fix: Contact IBM or connect to the following web site to obtain the new IBM IDE driver: http://service.software.ibm.
Tip 23) "Unable to Access the Hard Drive" error during the OS/2 installation. (Also, see Tip #24) This error usually occurs due to one of the following reasons. 1. The basedev stament for the target driver is not present in config.sys. 2. The target disk driver is not present on diskette one. For example there is a new Adaptec driver aic7870.add required for new systems that support Ultra Wide SCSI like in the NetServer E 60.
6. Add a new Basedev statement in config.sys BASEDEV=AICNEW.ADD 7. In config.sys make sure the following statement is present SET SAVECONNECT=1 By default, this statement is inserted by cdinst. 8. At the end of installation, aicnew.add gets copied to the root partition of the boot drive, and the config.sys will have a corresponding BASEDEV statement. You can choose to copy this driver to the c:\os2\boot directory. Do not rename this driver back to AIC7870.ADD. Reference: http://service.software.ibm.
Embedded Adaptec Adaptec 2740A Embedded IDE HP DAC Adapter HP NetRAID HP Symbios Embedded NetRAID Other AIC7870.ADD AIC7770.ADD IBM1S506.ADD HPDA.ADD MRAID.ADD SYM8XX.ADD MRAID.ADD NAME.
Manager on the drive with the lowest SCSI ID. The system will boot from the drive with the lowest SCSI address among the drives connected to the first controller in the boot order. HP recommends SCSI ID 0 for the boot drive. If you configure the boot drive with another SCSI ID, your system may not boot when additional SCSI drives are installed later. Section 2.
4. Select OS/2. 5. From the menu, select the version of OS/2 that you want to Install. Select "Warp 3.0" for any version of Warp that you want to install. (Starting with Navigator CD-ROM version G.00.10 this selection button is called "Warp Family". 6. Read the information provide on the "Configuration Advisor" panel. Save it to disk if you desire. 7. Select Continue. 8. From the "Custom Configuration" menu select "Create Drivers Diskette".
Use this procedure to create a "Drivers/Utilities" diskette using the "Diskette Library" on the Navigator CDROM: 1. Boot Navigator 2. Click. NetServer Utilities 3. Click, More Utilities 4. Click, Diskette Libraries 5. Select "NOS Drivers - OS/2 Warp Family" and then click execute (see the following note). NOTE: Only "OS/2 Warp Family" is supported on the E40. There is no OS/2 2.11 support for the E40. 6. Select "COPY ALL" to create the two driver diskettes.
• Installing OS/2 Warp 3.0, OS/2 Warp Connect 3.0 and Warp Server 4.0 • Installing OS/2 2.11 for SMP • Installing Service Pack S.631 (or later) manufacturing refresh for OS/2 2.11 for SMP Installing Warp 3.0 or Warp Conn. 3.0 or Warp Server 4.0 Overview for Installing Warp and Warp Connect If you are an experienced OS/2 user you can follow this overview to complete the product installation.
power user, it is OK to use the "Manual Process" to complete the installation. Phase 1: Create copy of IBM "Diskette 1" label it "Work Diskette 1" 1. Create the Drivers/Utilities diskette using the HP Navigator CD-ROM. Follow the steps described in "Section 2" of this document. 2. Create a copy of IBM "Diskette 1" and label it "Work Diskette 1". Follow the Step by Step procedure described in Section 2 of this document.
already added which are calling the same drivers. You don't want duplicate driver names. This can cause Trap 00D or Trap 00E during the OS/2 boot process. C) While editing CONFIG.SYS on the "Work Diskette 1". Locate the section with all the IBM type 2 drivers, they will read as follows... basedev=ibm2flpy.add basedev=ibm2adsk.add basedev=ibm2scsi.add You will need to remark out these lines by adding the REM command so they read as follows... REM basedev=ibm2flpy.add REM basedev=ibm2adsk.
MD HPTEMP CD HPTEMP B) Insert the "Drivers/Utilities" diskette in drive A of the workstation, and enter the following copy commands: COPY COPY COPY COPY COPY A:\7800\AIC7870.ADD A:\7700\AIC7770.ADD A:\HPDA\HPDA.ADD A:\NETRAID\MRAID.ADD A:\UPDATE.EXE C) Remove the Drivers Diskette from drive A, and insert the "Work Diskette 1". Delete the following files to make room on "Work Diskette 1" for new drivers by entering the following commands: DEL DEL DEL DEL IBM2FLPY.ADD IBM2ADSK.ADD IBM2SCSI.ADD AHA*.
Select "Accept the drive." NOTE: If you change the partition information, you will be prompted to reboot. In this case, repeat steps 5 and 6. Highlight "Format Partition" when you have chosen an installation partition. Format the partition with the file system of your choice (FAT or HPFS). Phase 4: First Reboot 7. This step is a must do for the LS, LX. See Table 3 in "Section 2". You can skip it for any other model by doing what the OS/2 installation program is requesting on the display and go to step 9.
following driver is present in CONFIG.SYS: basedev=mraid.add basedev=aic7870.add 9. Complete the OS/2 Installation GUI screen. Select VGA for the video driver. Do not change the SCSI configuration. Remove the Work Diskette from drive A, and press Enter to reboot the machine and continue with OS/2 installation. CAUTION: At the System Configuration Screen, the SCSI Adapter selection may read "none". In this case, do not select a controller from the pull-down menu. The UPDATE.
Manual Process: B) If you have an HP DAC verify that the following drivers are present in CONFIG.SYS. If they are not present you must add them. Please keep in mind the order of drivers as listed in Section 2. basedev=hpda.add basedev=aic7870.add C) If you have an HP NetRAID, or if you don't have any disk array installed, verify that the following driver is present in CONFIG.SYS: basedev=mraid.add basedev=aic7870.add 12. Enter the following command: Exit This will close command prompt session.
16. Press C on the menu selection to boot to the OS/2 command prompt. 17. You need to edit CONFIG.SYS with TEDIT to verify that the embedded SCSI driver BASEDEV=AIC7870.ADD is present. Enter the following command at the command prompt: TEDIT CONFIG.SYS Search for the driver name: /BASEDEV=AIC7870.ADD It is possible that a REM command was placed in front this the driver command line. If so, delete the "REM" command.
DIR A:\AIC7870.ADD Write down the size and date. It should be the same as the file found on your boot drive. If they are not the same, please copy the one on the diskette to the boot drive by entering the following command: COPY A:\AIC7870.ADD C:\OS2\BOOT\AIC7870.ADD Make sure you delete the other copy of the driver if it is not on the boot:\os2\boot path. Congratulations! You have completed the OS/2 Warp Server 4.0 installation. Installing Warp 4.0 or Warp Server SMP 4.0 Overview for Installing Warp 4.
If you experience any problems doing the generic installation process then try using the custom installation process. Procedure #1: Install IBM OS/2 product using standard IBM installation process and then apply Hewlett-Packard specific drivers. Phase 1: Create Copy of IBM diskettes 1. Make copies of IBM diskettes. Label the copies "Work Install Diskette", "Work Diskette 1", and for Warp 4.0 you will have a "Work Diskette 2". Phase 2: OS/2 Start OS/2 Installation 2.
Device Support", Select "Non-Listed IDE CD-ROM" from the list, next deselect "OTHER". 6. Complete the OS/2 setup and Installation screen. Select the options that you want. Select Next to continue. 7. Click OK on the Advanced options screen to accept "Add existing programs to the desktop". 8. Complete the Networking Product configuration. You must configure networking products. There is no way to skip this section like in Warp Connect.
Processing complete and so on... 14. The system will start a graphical display. More files are transferred to the hard drive. It will take about ten minutes to complete this file copy process. Next the system will auto-reboot again. 15. The system will boot to the Registration/Tutorial screen. Select close to go to the OS/2 desktop. The IBM OS/2 product is now installed. The following steps are not required if you are using Procedure #2.
17. This step is not required if you are using Warp 4.0 (Merlin) or Warp Server SMP 4.0. The IBM bundled driver passed all Hewlett Packard tests. You can use the HP SCSI driver aic7870.add if you suspect any issues with the IBM driver. Next, apply the HP version of the AIC7870.ADD driver. Insert the Drivers/Utility diskette in drive A. Enter the following commands: C: Where C: is your boot driver. CD \OS2\BOOT COPY AIC7870.ADD AIC7870.IBM COPY A:\7800\AIC7800.ADD C: 18.
Use a spare PC running DOS, OS/2 or NT to complete the following tasks. Please read "Consideration 1" in Section 1 of this document and complete the table in that section before you proceed with this step. A) If you have an HP DAC, find the lines that read: basedev=dac960.add basedev=ibm1s506.add basedev=aic7870.add Remark them out with the REM command as follows: (Note that this step is done to avoid boot order issues. See "Consideration 1" in Section 1 for details.) rem basedev=dac960.
IBM type 2 drivers, as follows: basedev=ibm2flpy.add basedev=ibm2adsk.add basedev=ibm2scsi.add Remark out those driver lines using the REM command, since they are not needed, so that they read as follows... REM basedev=ibm2flpy.add REM basedev=ibm2adsk.add REM basedev=ibm2scsi.add E) While editing the CONFIG.SYS file, locate the Adaptec drivers section with the following Adaptec driver lines: basedev=aha154x.add basedev=aha164x.add basedev=aha174x.
COPY A:\UPDATE.EXE C) Remove the Drivers Diskette from drive A, and insert the "Work Diskette 1". You must next delete some files to make room on "Work Diskette 1" for new drivers by entering the following commands: DEL DEL DEL DEL IBM2FLPY.ADD IBM2ADSK.ADD IBM2SCSI.ADD AHA*.ADD Copy new drivers to "Work Diskette 1" by entering the command: COPY *.* A:\ You may delete all the files in the C:\HPTEMP directory and also delete the C:\TEMP directory.
workstation". 2. Continue answering the question prompts in a manner appropriate to your system until you reach the "LAPS Configuration" window. 3. Place the Drivers Diskette in Drive A and select "Other adapters..." 4. At the "Path" prompt, enter... A:\NICDRV This step copies the device driver from the Drivers Diskette to the hard drive and then returns you to the "LAPS Configuration" window. 5. Scroll the "Network Adapters" list box down until you see the entry "HP DeskDirect 10/100 PCI LAN Adapters".
adapter. 1. Boot OS/2 and install the IBM LAPS program. To install LAPS, place the IBM LAPS (LAN Adapter and Protocol Support) disk in Drive A. Open an OS/2 Fullscreen session, and enter: A:\LAPS 2. When the LAPS main dialog box appears, select the "INSTALL" button, and follow the prompts to install LAPS. When installation is complete, you will be back at the LAPS main dialog box. Remove the LAPS floppy from Drive A. Do not exit LAPS. 3. Select the "INSTALL" button again.
system and verify that the HP 10BaseT adapter is firmly mounted in its slot and that the Ethernet cable is also connected firmly. If the physical connection is working, the green light on the back of the adapter will come on when you power up the system. NOTE: OS/2 2.X requires an IBM service pack. IBM OS/2 2.0, 2.1, and 2.11 need a new version of the OS2LDR module to allow drivers to register shared interrupts. This is documented in IBM APAR PJ14230.
2. Click Install. 3. When prompted, insert the HP Support disk in a floppy drive, specify A:\NICDRV for driver location, and click OK. 4. When Install reads the hptxeo2.NIF, installation is complete. Click OK. The adapter driver has been copied to your system. 5. Click Configure from the MPTS window. 6. At the Configure window, make sure the LAN adapters and protocols button is on and click CONFIGURE. 7. At the LAPS Configuration window, select the HP 10/100TX adapter (OS/2 driver: hptx.
negotiate), 1 (for half), 2 (for full). [Example: FORCEDUPLEX = 2] SLOT: (required for multiple adapters, see TIP 9 in section one for instruction on obtaining the slot number) This parameter is optional if only one adapter is present. If it is specified but is incorrect, a message indicates that the value doesn't match the configuration but the driver finds the adapter and loads anyway. This parameter is required if more than one adapter is present in either one bus or multiple PCI buses of a system.
6. Select "Yes" to change your display driver settings. 7. Select a screen resolution and close System Settings dialog box. 8. Select test to check the new resolution 9. Select yes to "Do you wish to retain these selections?" 10. Close the "System - Setting " configuration book 11. Close down Drive A - Icon View. 12. Remove the diskette from Drive A: 13. Shut down and reboot the system.