
HP Netserver LH 3r Third Party Rack Installation Guide

Chapter 3 Installation
9
Installing the Bar Nuts, Screws, and Rack Nuts
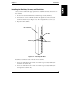
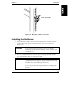
Once you have marked the appropriate holes, install the bar nuts and screws on
the columns:
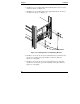
1. Position one bar nut behind holes 20 and 22 (previously marked).
2. Insert the two screws, with flat washers, through the two holes and start
them into the bar nut (see Figure 3-2). Do not tighten these screws, yet.
3. Repeat for all columns.
Bar Nut
Screws
Rack Column
Washers
Figure 3-2. Installing Bar Nuts
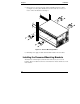
Install two rack nuts in each of the two front columns:
1. Insert one rack nut in hole 14 and one in hole 19 (previously marked) in
the left front column only.
2. Insert one rack nut in hole 11 and one in hole 15 (previously marked) in
the right front column only.