
HP Netserver LH Pro NetRAID Installation Guide


Part 6: Installing and Testing Microsoft Cluster Server Software
HP NetServer LH Pro Microsoft Cluster Installation Guide - 1 October 1997 30
On each cluster node enable the local disk for sharing. In Windows NT Explorer, right click the local drive, then
select Properties | Sharing | Share As | OK.
Setting up Two File Shares (use the example below).
NOTE When setting up file shares, names must be assigned to resources. The example below uses default
names and names that are typically assigned when running this test. You are free to use names that are
commonly used in your organization.
For each of two disk groups of the cluster you will:
•
Set up an:
IP address resource
Network Name resource
File Share Resource
•
Bring the group on line:
•
Associate each group with one node of the cluster
Start the Cluster Administrator (Start | Programs | Administrative Tools | Cluster Administrator) and connect to the
cluster.
NOTE When the cluster was set up, at least two disk groups must have been created. We will use Disk
Group 1 and Disk Group 2 for this test. Perform the instructions below for both disk groups.
Setting Up an IP Address Resource
1. Click the Disk Group (i.e., Disk Group 1 or 2). You will see that a physical drive resource was created for
this group and a drive letter was assigned.
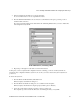
2. Right click the Disk Group and select New | Resource.
3. On the New Resources dialog complete the following fields, then click Next. Note that this dialog allows
you to set up different types of resources such as the physical drive that already appears.
•
Resource Type. Select "IP Address" from the popdown list.
•
Resource name. Name it something like "IP for Virtual U" where U is simply the designation you
assigned for the physical disk already created.
• Resource Description. Nothing needs to be entered here.
• Group. Select the appropriate Disk Group from the popdown list.
4. On the Possible Owners dialog check to see that both cluster nodes are in the Possible Owners pane. If not,
add them, then click Next.
5. On the Dependencies dialog click Next. (There are none for an IP address.)