HP NetServer Installation Guide For the HP NetRAID-4M and Microsoft Cluster Services with Microsoft Windows NT Server 4.
Notice The information in this document is subject to change without notice. Hewlett-Packard makes no warranty of any kind with regard to this material, including, but not limited to, the implied warranties of merchantability and fitness for a particular purpose. Hewlett-Packard shall not be liable for errors contained herein or for incidental or consequential damages in connection with the furnishing, performance, or use of this material.
HP NetRAID-4M Cluster Installation Guide Contents Contents Introduction........................................................................................................................................iv Intended Audience..............................................................................................................................iv Recommended Reading ......................................................................................................................
HP NetRAID-4M Cluster Installation Guide Introduction Introduction The following pages contain a cursory set of procedures for setting up the clustering components of HP NetServers with the HP NetRAID-4M disk controller running Microsoft Windows NT Server 4.0 Enterprise Edition operating system.
HP NetRAID-4M Cluster Installation Guide Introduction Chapter 14, Working with Disksets, explains how to manage a new object type called the diskset, which is required to create containers on shared storage. Chapter 15, Working with Diskset Resources, explains how to put containers hosted by disksets under the control of the MSCS cluster software. Version History 1 November 2001 Added note about not using RAID-1 for quorum drive. 13 April 2001 Initial release.
HP NetRAID-4M Cluster Services Installation Guide Overview 1 Overview 1.1 Software and Networking Requirements • Microsoft Windows NT Server 4.0 Enterprise Edition with the latest service pack installed on each server • Microsoft Windows NT Server 4.0 Enterprise Edition CD-ROM set (2 discs) and the latest NT 4.0 service pack, either on CD-ROM or available to the nodes from the network.
HP NetRAID-4M Cluster Services Installation Guide Overview 1.4 Alternative Installation Sequence NOTE For the purpose of illustration, the two server nodes depicted in this guide are referred to as Server A, or node A, the first node to establish the cluster, and Server B, or node B, the second node to join the same cluster. The ultimate assignments of cluster resources are not prescribed in this document. Those design considerations are at the discretion of the cluster planner.
HP NetRAID-4M Cluster Services Installation Guide Hardware, Drivers and Utilities 2 NetRAID-4M – Cluster Hardware Component Installation • Create the installation diskettes required for the HP NetRAID-4M and HP NetServer 10/100BaseT LAN Adapter (D5013B) • Install the HP NetRAID-4M and HP D5013B LAN Adapter into each HP NetServer cluster node and connect the appropriate cables • Update the HP NetRAID-4M firmware and configure the controller BIOS settings • Install and configure the Windows NT 4.
HP NetRAID-4M Cluster Services Installation Guide Hardware, Drivers and Utilities 2.1 Create Installation Floppy Diskettes NOTE Refer to an HP NetServer Cluster Configuration Guide for the supported versions of the Navigator CD, server BIOS and NetRAID-4M firmware and driver. 1. Power on Server A and immediately insert the HP NetServer Navigator CD-ROM into the Server A CD-ROM drive. 2. Allow Server A to boot from the HP Navigator CD-ROM. 3.
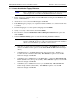
HP NetRAID-4M Cluster Services Installation Guide Hardware, Drivers and Utilities 2.2 Install the NetRAID-4M and Heartbeat NIC 1. Power off both Server A and Server B. 2. Disconnect all cables from the back of Server A. 3. If working on a racked server, extend the rack enclosure foot. 4. Extend Server A and open the cover to gain access to the PCI slots. 5. Insert an HP D5013B NIC into any 32-bit slot available in the server. 6.
HP NetRAID-4M Cluster Services Installation Guide Hardware, Drivers and Utilities 11. Connect one end of a 10BaseT Crossover cable to the HP D5013B NIC that was just installed into Server A. 12. DO NOT connect the HP NetRAID-4M controller SCSI cables at this time. 13. Repeat the above steps, 1 through 8 to add the HP NetRAID-4M and HP D5013B NIC to Server B. 14. Close Server B, and if working on a racked server, slide the server back into the rack enclosure, and then reconnect all cables. 15.
HP NetRAID-4M Cluster Services Installation Guide Hardware, Drivers and Utilities 24. When the update is complete, select the option to exit then press E to exit to DOS. 25. Remove the floppy from the server floppy drive and power the server off.. 26. Repeat the previous steps 16 – 24 to update the firmware of the HP NetRAID-4M in Server B. Connect the NetRAID-4M SCSI Cables 27.
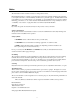
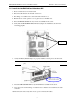
HP NetRAID-4M Cluster Services Installation Guide CAUTION Hardware, Drivers and Utilities Connecting to adjacent channels, i.e.: 0 and 1, or 2 and 3, on the HP NetRAID-4M requires SCSI offset cables. Do NOT try and force connecting any other SCSI cables to channels next to each other or the controller may become damaged. 30. As shown in the graphic above, using the appropriate SCSI cables, connect the Server A HP NetRAID-4M Channel-0 to an HP RackStorage/12 unit rear left SCSI card port. 31.
HP NetRAID-4M Cluster Services Installation Guide Hardware, Drivers and Utilities 2.3 Set NetRAID-4M BIOS Options Set Controller Configuration Options 1. Power on Server A. Do not power on Server B at this time. 2. During the boot process, press Ctrl-A at the HP NetRAID-4M configuration prompt. CAUTION DO NOT allow the server to boot to Windows NT Server at this point.
HP NetRAID-4M Cluster Services Installation Guide NOTE Hardware, Drivers and Utilities When the Domain Validation feature is enabled, the HP NetRAID-4M controller performs a series of Read/Write buffer tests to check bus integrity and has the option of reducing the transfer rate if necessary, until data integrity is ensured. 10. Press ESC and confirm to save changes by selecting Yes. 11. On the same server, repeat the preceding steps for any used channels, including SCSI Channel 1, 2 , and 3.
HP NetRAID-4M Cluster Services Installation Guide 6. Select the Drivers tab. 7. Click Add.
HP NetRAID-4M Cluster Services Installation Guide 8. Click Have Disk 9. Insert the NOS diskette and click Browse. 10. Double-click on the directory: Nraid4m and click Open. 11. Click OK to install the NetRAID-4M driver.
HP NetRAID-4M Cluster Services Installation Guide Hardware, Drivers and Utilities 12. Once the files are copied, click No to not reboot the server. Click OK at the SCSI Adapters screen. Continue on to the next section to configure the private LAN. HP 10/100BaseT LAN Adapter (D5013B) NIC Driver 13. From the Windows desktop, right-click the Network Neighborhood icon and select Properties. 14. Click on the Adapters tab. 15. Click Add, then Have disk. 16. Insert NOS drivers diskette #2 into the floppy drive.
HP NetRAID-4M Cluster Services Installation Guide Hardware, Drivers and Utilities 21. Select the Link Speed & Duplex option and then from the Value list select the 100 Mbps/Full Duplex option; click OK to continue. 22. Click Close and the Internet Protocol (TCP/IP) Properties windows will pop up. 23. Select the option to Use the following IP Address:. 24. Enter a private IP address. For example: Server A: 10.1.1.1 Server B: 10.1.1.2 Subnet Mask: 255.0.0.
HP NetRAID-4M Cluster Services Installation Guide Hardware, Drivers and Utilities 29. After clicking Next at the Welcome screen, fill out the name and company screen and click Next. Choose a path for the new folder and click Next, and Next again to accept the path. 30. Select the option to perform a Full Install. Accept all defaults of the installation program. 31.
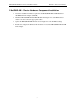
HP NetRAID-4M Cluster Services Installation Guide Cluster Software Components and Quorum 3 NetRAID-4M - Installing Windows NT 4.0 Cluster Services • Install Windows NT 4.0 Cluster Services on both cluster nodes • Install HP NetRAID-4M cluster add-on software on both cluster nodes • Use the HP NetRAID-4M FAST utility to configure and initialize shared storage space • Use the Windows NT 4.0 Disk Administrator utilities to create and initialize the shared quorum partition • Use the Windows NT 4.
HP NetRAID-4M Cluster Services Installation Guide Cluster Software Components and Quorum 3.1 Server A: Create Cluster Service User Account 1. Log on to the domain at Server A as an administrator. 2. Open the User Manager for Domains utility from the Administrative Tools Start menu. 3. Click once on Users in the toolbar. 4. Select New and then click New User. 5. Enter a username for this service (e.g.: MSCS) 6. Enter the Full Name: Cluster Services Account. 7.
HP NetRAID-4M Cluster Services Installation Guide Cluster Software Components and Quorum 11. Click OK, then in the User Properties window, click Add. 12. Close User Manager for Domains. 3.2 Server A: Install Cluster Services 1. On Server A, insert the component CD of Windows NT 4.0 Enterprise Server. 2.
HP NetRAID-4M Cluster Services Installation Guide Cluster Software Components and Quorum 3. To start installing cluster services, at the prompt, type: setup –localquorum 4. Click Next. 5. Click I Agree, then click Next. 6. Click Form new cluster, then Next.
HP NetRAID-4M Cluster Services Installation Guide Cluster Software Components and Quorum 7. Enter a name for the cluster. Click Next 8. 9. Click Next at the screen to accept the path the setup program will copy files to. Enter the domain user name and password established for the cluster service. (Example: MSCS password) 10. Click Next.
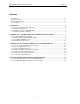
HP NetRAID-4M Cluster Services Installation Guide Cluster Software Components and Quorum 11. Click Next. 12. In the network connection screen (shown below) enter a name for the private network between the cluster nodes. (Example: Heartbeat). 13. Select the Enable this network for cluster use option, then select Use only for internal cluster communications only and then click Next. 14. On the next network connection screen, enter the public LAN name, (e.g.
HP NetRAID-4M Cluster Services Installation Guide Cluster Software Components and Quorum 15. Verify that the heartbeat network connection is listed at the top of the priority list. If it is not, use the up and down buttons on the right of the screen to move it to the top. Click Next.
HP NetRAID-4M Cluster Services Installation Guide Cluster Software Components and Quorum 16. Enter a Cluster IP Address and subnet mask that is accessible to the client (public) LAN. From the pulldown menu, select the public network name. Click Next to continue. 17. Click Finish to complete the installation of Cluster Services. 18. When prompted to reboot, click Cancel. 19. Exit the command prompt window.
HP NetRAID-4M Cluster Services Installation Guide Cluster Software Components and Quorum Server A: Install HP NetRAID-4M Cluster Add-on Software NOTE The HP NetRAID-4M cluster software contains a Hewlett-Packard extension to the Microsoft Cluster Administrator utility (provided with the Microsoft Cluster Service software).
HP NetRAID-4M Cluster Services Installation Guide Cluster Software Components and Quorum 25. Enter the name of the cluster and click Open. . 3.3 Server B: Install Cluster Services 1. Log onto Server B. 2. Insert the component CD of Windows NT 4.0 Enterprise Server into the CD-ROM drive. 3. Explore the CD and double-click the following: \\Ntse_comp\Mscs\cluster\i386\setup.exe. 4. Click Next at the Welcome screen. 5. Click I Agree, then Next.
HP NetRAID-4M Cluster Services Installation Guide Cluster Software Components and Quorum 6. Click Join an existing cluster, then click Next. 7. Enter the cluster name. (Example: Cluster1) 8. Click Next to accept the path for the file copy. 9. Enter the cluster user name and password and then click Next. 10. Click the Finish button to complete the installation on Server B. 11. Click Cancel to the prompt to reboot the server 12.
HP NetRAID-4M Cluster Services Installation Guide Cluster Software Components and Quorum Server B: Install HP NetRAID-4M Cluster Add-on software 13. Remove the Microsoft CD-ROM from the CD-ROM drive. 14. Insert the first NetRAID Software-NT/Win2000 Cluster Installation diskette in the floppy drive of Server B (or insert the Navigator CD-ROM). 15. Navigate to the A:\ directory and double-click on: setup.
HP NetRAID-4M Cluster Services Installation Guide Cluster Software Components and Quorum 3. After the service pack is installed, reboot the server. 4. Repeat steps 1 through 3 on the second node. 3.5 Configure the Cluster Shared Quorum Using the NetRAID-4M FAST Utility 1. On Server A, from the Windows Start button, start the NetRAID-4M FAST utility. 2. Verify that the Available Controllers window displays the local HP NetRAID-4M and click Open. 3. Expand the Controller View window.
HP NetRAID-4M Cluster Services Installation Guide NOTE Cluster Software Components and Quorum The Attached check box allows you to specify whether or not the diskset is attached immediately after it is created (thereby making container information on the member disks accessible to the controller).
HP NetRAID-4M Cluster Services Installation Guide Cluster Software Components and Quorum 16. Read the About Container Creation screen, then click OK. 17. From the View menu, select the Container (Logical) View option. 18. Verify that the quorum container is initializing in the Container View screen. NOTE It is generally a good practice to wait for the initialization process to complete before continuing.
HP NetRAID-4M Cluster Services Installation Guide Cluster Software Components and Quorum 25. Select the NTFS format option and enter the volume name (e.g.: Quorum). NOTE When formatting partitions for a container using the Disk Administrator utility, Quick Format is an option. The NetRAID-4M controller’s disk verify (with badblock repair) and container consistency check operations, which run in the background, will find (and repair) any bad blocks not detected during the quick format operation.
HP NetRAID-4M Cluster Services Installation Guide Cluster Software Components and Quorum 30. Click OK. Click Yes to continue. 31. Close Disk Administrator. CAUTION Do not shutdown or restart the server before completing the next step. Although Windows sees the container as a disk now, the NetRAID-4M will not allow access to the disk after a reboot, and it will not appear in the Disk Management window, unless a NetRAID-4M Diskset resource is associated with it. 3.
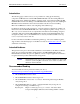
HP NetRAID-4M Cluster Services Installation Guide Cluster Software Components and Quorum 8. For the Group name select Cluster Group and click Next. 9. Change or confirm settings in the Possible Owners screen and then click Next. 10. Make no changes in the Dependencies windows and click Next. 11. Select the shared quorum diskset in the top box, as shown below, and then click Finish. 12. Click OK to the success dialog box. 13.
HP NetRAID-4M Cluster Services Installation Guide CAUTION Cluster Software Components and Quorum The Cluster Group SHOULD now be partially offline, and a red X appears next to Cluster Group. 14. Right-click on the quorum resource that is in an offline state. Select the Bring online option. Assign the Shared Quorum to the cluster object 15. In the left window panel, right-click the Clustername object. 16. Click on the Properties tab and then click on the Quorum tab. 17.
HP NetRAID-4M Cluster Services Installation Guide Cluster Software Components and Quorum 20. After the Local Quorum shows Off-line status, right-click the Local Quorum resource and select the Delete option. Click Yes to confirm the deletion. 21. Now delete the group Local Quorum. 22. Click Yes to confirm. 23. The Cluster Administrator window should now appear as shown on the next page.
HP NetRAID-4M Cluster Services Installation Guide Cluster Software Components and Quorum 3.7 Test the Shared Quorum Failover 1. In the Cluster Administrator left panel, click once on the Cluster Group and observe the current ownership of the individual resources. NOTE If not familiar with the default properties of the Cluster Group, right click the Cluster group and select Properties now. Note that by default, for example, Prevent Failback is checked. Properties extend to all resources within the group.
HP NetRAID-4M Cluster Services Installation Guide Cluster Software Components and Quorum 4. Move the Cluster Group back to Server A. Clearing the Local Quorum from Disk Administrator NOTE Because the local quorum disk has been deleted, if Windows NT 4.0 Disk Administrator is run before the nodes are rebooted, configuration information for the missing disk is retained and will display as an off-line disk. Restart each of the servers one at a time, allowing the cluster to failover, to clear this issue.
HP NetRAID-4M Cluster Services Installation Guide Creating Shared Disksets 4 Expand Shared Storage for Cluster Services • Create and initialize additional NetRAID-4M containers • Create Windows partitions and NetRAID-4M Diskset Resources to be managed by Cluster Services 38
HP NetRAID-4M Cluster Services Installation Guide Creating Shared Disksets 4.1 Create Shared Disksets, Containers and NTFS Partitions 1. On Server A, open the NetRAID-4M FAST utility and Open the NetRAID-4M controller connecting to shared storage. 2. From the Disk (Physical Drv) menu select Manage Diskset. 3. From the Non-Member Disks listing, select the Disk IDs to be included in the new array, then click the Create Diskset … >> button. 4. Enter the Diskset name from 1 to 32 characters.
HP NetRAID-4M Cluster Services Installation Guide Creating Shared Disksets 14. In the FAST Container View console you should see the new logical containers as they are being initialized, as shown below: 15. Wait for all disk initialization to complete before continuing. CAUTION DO NOT power off the server that the container initialization process was started from, until the initialization is complete. 16. Open the Windows Disk Administrator utility to assign drive letters and format partitions.
HP NetRAID-4M Cluster Services Installation Guide Creating Shared Disksets 4.2 Create NetRAID-4M Diskset Resources for Data Drives 1. From either server, open the Cluster Administrator utility 2. In the left panel click once on the Groups folder. 3. In the right panel, right-click on the Cluster Group. 4. Select the New option then click on Resource. 5. Enter the new shared data drive name, (e.g.: Shared_S) and then enter a description. (Example: Shared Data Drive S:) 6.