Microsoft Cluster Installation Documentation To assist you in installing your HP NetServer Microsoft Cluster, this file contains three separate documents combined into one pdf file. • Configuration Guide - This guide provides configuration information specific to your cluster configuration that you will need during installation of your cluster. • HP NetServer Microsoft Cluster Installation Guide - This is the first of two documents used to install the cluster.
Version History 10 October 1999 Updated the pdf to include the latest version of the HP NetServer Microsoft Cluster Installation Guide. This later version changes the product name from "AutoRAID 12H" to "SureStore E 12H" and the shared storage HBA model number from "A5252A" to "A5252B.
HP NetServer LXr Pro with A3700AB HP SureStore E 12H Disk Array Cluster Configuration Guide 10 October 1999 Introduction This document defines the supported HP NetServer LXr Pro and A3700AB HP SureStore E 12H Disk Array configurations for Microsoft Cluster Server. These configurations minimize single points of failure, provide maximum availability, and have been certified by Hewlett-Packard and Microsoft. This guide is prescriptive; it describes the configurations supported by HP.
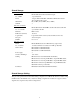
SPU Model Clock speed No. of CPUs BIOS version CPU cache RAM No. of power supplies Local storage I/O slots: HP NetServer LXr Pro Model 1 200 MHz. 2-4 (at least 2 are required) 1.00.08CD0L or later Any size 128 MB minimum. Must be HP. 3 Internal or external, using any controller. Must use HP disks. See Local Storage below. P6-P4 - Shared storage HBAs. See Shared Storage. P1 - Intra-cluster LAN P2 - Client LAN All others - Any other plug-in cards.
Shared Storage Host Bus Adapter Model No. of HBA Driver SPU I/O slot SCSI ID Disk Array Controller Model No. of controllers Firmware RAID level (internal) Logical disks Hot spare SCSI ID Disk Array Storage Model No. of cabinets Disk modules: Power supply SureStore E Manager Cabling Terminator HP A5252B Wide Differential SCSI Adapter. 1-3 per NetServer. “Adaptec AHA-294X/AHA-394X/AIC-78XX SCSI Controller” driver in NT 4.
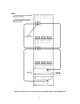
A5252B SCSI HBA A5252B SCSI HBA HP Microsoft Cluster Server with a single HP SureStore E 12H Disk Array 4
A5252B SCSI HBA HP Microsoft Cluster Server and two daisy-chained HP SureStore E 12H Disk Array 5
Version History 10 October 1999 Updated the shared storage model name from AutoRAID 12H to SureStore E 12H throughout, and changed the shared storage Host Bus Adapter model number from HP A5252A to A5252B.
HP NetServer Microsoft Cluster Installation Guide with Shared Storage System Supplement Rack Storage/12FC Rack Storage/12 Rack Storage/8 Storage System/6 HP SureStore E 12H Disk Array or HP A3661B Model 30/FC High Availability Disk Array 10 October 1999 (See Version History below)
This page intentionally left blank.
Notice The information in this document is subject to change without notice. Hewlett-Packard makes no warranty of any kind with regard to this material, including, but not limited to, the implied warranties of merchantability and fitness for a particular purpose. Hewlett-Packard shall not be liable for errors contained herein or for incidental or consequential damages in connection with the furnishing, performance, or use of this material.
Contents Some topics in this guide are applicable to all HP NetServer clusters while others are HP NetServer and shared storage specific. A complete installation guide consists of two documents: this document (common to all HP NetServers) and the supplement for your shared storage system. OVERVIEW ................................................................................................................................................... 5 VERSION HISTORY ...............................................
Overview HP NetServer clusters provide increased availability solutions for critical applications. The basic cluster consists of two HP NetServer systems coupled to shared storage units. The operating system files, application files, and other files local to each node are stored on fixed or hot swap disks. Local disks are usually located internally in the system. Both HP NetServers share external drives located in the shared storage unit(s).
A Graphical Overview to Setting Up the Cluster CAUTION Departing from the sequence shown here can cause unnecessary work and unpredictable results.
1 What’s Needed Before beginning the installation, make sure you have the following items prepared and tools and resources available. Some information in this part is shared storage specific. See part "1 What’s Needed" of the Shared Storage Supplement and the Configuration Guide for your cluster. Review the supplement, refer to the Configuration Guide as directed, then return to this part.
NOTE When performing this search on the Microsoft web site you may be prompted to register with Support Online. If prompted to register, you must first complete the questionnaire and then complete the search. • HP NetServer Navigator CD. HP recommends you use the latest version, however you may use an earlier version if it is specified in the Configuration Guide for your cluster. • Cluster Installation Test.
2 NetServer Hardware Setup When HP NetServers are shipped from the factory, they are configured for stand-alone operation. The first step in creating a cluster is to install additional hardware that allows the HP NetServers to: • Share data • Communicate with one another • Communicate with the LAN CAUTION Installing hardware requires opening the HP NetServers. HP therefore, recommends using a grounding kit. See part "1 What’s Needed" for details.
3 Shared Storage Hardware Setup part "3 Shared Storage Hardware Setup" in the Shared Storage Supplement HP NetServer Installation Guide 10
4 Cluster Cabling and Setup Setup Cluster Hardware Non-racked clusters - Follow the Site Preparation guidelines provided in the Planning Guide under Plan on the HP NetServers Clustering Solutions web site. Racked clusters - Follow the Road Map supplied with the system and instructions in the shared storage supplement. In addition you should have rack layouts of your system printed from the HP NetServers Rack Assistant program. If not, see HP NetServers web site to download this program.
5 NetServer Software Setup Follow the procedures in this part to configure the hardware and BIOS and to install Windows NT including the applicable Service Pack. Start Here In this part you will perform two major tasks. First you will configure the NetServer Hardware and BIOS and Install Windows NT following a procedure specific to your HP NetServer as listed below. Secondly, you will install the applicable Service Pack on the NetServer.
Install Windows NT 1. Remove the HP NetServer Navigator CD, insert the first CD of the Microsoft Windows NT Server, Enterprise Edition, and exit Navigator to reboot the server. 2. Select the following options when prompted: • Choose the unpartitioned space and install Windows NT. • Choose NTFS file system. • When prompted to search for a Network Adapter, load NIC drivers for both the intra-cluster and the client LAN.
Install Windows NT 1. Remove the HP NetServer Navigator CD, insert the first CD of the Microsoft Windows NT Server, Enterprise Edition, and exit Navigator to reboot the server. 2. Select the following options when prompted: • Choose the unpartitioned space and install Windows NT. • Choose NTFS file system. • When prompted to search for a Network Adapter, load NIC drivers for both the intra-cluster and the client LAN.
Install Windows NT 1. Remove the HP NetServer Navigator CD, insert the first CD of the Microsoft Windows NT Server, Enterprise Edition, and exit Navigator to reboot the server. 2. Select the following options when prompted: • Choose the unpartitioned space and install Windows NT. • Choose NTFS file system • When prompted to search for a Network Adapter, load NIC drivers for both the intra-cluster and the client LAN.
8. After the server reboots, return to the Navigator main menu by clicking the Back button twice on the displayed window. 9. From the Navigator main menu, install a utility partition on the local storage disk by choosing Configuration Assistant and Installation Assistant, then Custom, Microsoft, MS Windows NT 4.0 Enterprise Edition, and No for automated NOS installation. 10. Choose Install/Update Utility Partition. When finished, the system reboots and displays the Custom Configuration window. 11.
NOTE 4. The Client LAN IP addresses and Intra-cluster LAN IP addresses must be on different subnets. Once the NT installation is complete, the D5013A NIC drivers must be manually set to the correct LAN speed. Log on and from the start menu select: Settings, Control Panel, Network, and Adapters. For each D5013A adapter, select Properties then Settings and set the network speed to the appropriate setting (either 10 Mbps or 100 Mbps) for your network. The intra-cluster LAN should be set to 100 Mbps.
9. From the Navigator main menu select, Configuration Assistant, then Custom, Microsoft, MS Windows NT 4.0 Enterprise Edition, and No. Check the advisories in Configuration Advisor for IRQ conflicts and other problems. Click Continue. 10. Define the local storage RAID arrays. Select Configure Disk Array and use HP NetRAID Assistant to define the arrays. Be sure to define the arrays for the local storage adapter (Adapter_0), not the shared storage adapter (Adapter_1).
• When prompted to search for a Network Adapter, load NIC drivers for both the intra-cluster and the client LAN. Be sure to load the correct intra-cluster LAN driver version as specified in the Configuration Guide for your cluster. If you are using two HP D5013A NICs, load the driver twice, once for the intra-cluster NIC and once for the client NIC. • Make sure TCP/IP Protocol is selected. Other protocols may be selected in addition, but TCP/IP is required.
12. Select Update, then Execute. Follow screen prompts to update the BIOS. 13. After the server reboots, return to the Navigator main menu by clicking the Back button twice on the displayed window. 14. From the Navigator main menu, install a utility partition on the local storage disk by choosing Configuration Assistant and Installation Assistant, Custom, Microsoft, then either: • MS Windows NT4.0 Enterprise Edition Cluster Server if using Navigator if L.15.05 or later. • MS Windows NT 4.
• If you are using two HP D5013A NICs, when prompted for TCP/IP Properties: Make sure adapter [2] is highlighted and specify its IP address and subnet mask. This will be the LAN adapter for the intra-cluster LAN. Select adapter [1] and specify its IP address and subnet mask. This will be the LAN adapter for the client LAN. Set TCP/IP Properties for DNS, WINS Address, etc. at this time. NOTE The Client LAN IP addresses and Intra-cluster LAN IP addresses must be on different subnets. 21.
7. Choose Install/Update Utility Partition and Execute. When finished, the system reboots and displays the Custom Configuration window. 8. Make an NT 4.0 Drivers floppy disk by choosing Create Driver Diskette(s), Execute, and following the prompts. Label the floppy disk NT 4.0 Drivers. 9. Press the Back button three times to return the Navigator Main Menu. 10.
NOTE 4. The Client LAN IP addresses and Intra-cluster LAN IP addresses must be on different subnets. Once the NT installation is complete, the D5013A NIC drivers must be manually set to the correct LAN speed. Log on and from the start menu select: Settings, Control Panel, Network, and Adapters. For each D5013A adapter, select Properties then Settings and set the network speed to the appropriate setting (either 10 Mbps or 100 Mbps) for your network. The intra-cluster LAN should be set to 100 Mbps.
10. Make an NT 4.0 Drivers floppy disk by choosing Create Driver Diskette(s), Execute, and following the prompts. Label the floppy disk NT 4.0 Drivers. 11. Press the Back button three times to return the Navigator Main Menu. 12. Create a set of installation floppy disks for NetRAID Assistant by choosing NetServer Utilities | Diskette Library. Select NetRAID Assistant for WindowsNT and Windows95 from the list and then the Execute button.
NOTE 5. The Client LAN IP addresses and Intra-cluster LAN IP addresses must be on different subnets. Once the NT installation is complete, the D5013A NIC drivers must be manually set to the correct LAN speed. Log on and from the start menu select: Settings, Control Panel, Network, and Adapters. For each D5013A adapter, select Properties then Settings and set the network speed to the appropriate setting (either 10 Mbps or 100 Mbps) for your network. The intra-cluster LAN should be set to 100 Mbps.
• When prompted to search for a Network Adapter, load NIC drivers for both the intra-cluster and the client LAN. Be sure to load the correct intra-cluster LAN driver version as specified in the Configuration Guide for your cluster. If you are using two HP D5013A NICs, load the driver twice, once for the intra-cluster NIC and once for the client NIC. • Make sure TCP/IP Protocol is selected. Other protocols may be selected in addition, but TCP/IP is required.
Install Windows NT NOTE Windows NT must be installed from floppy disks, not the CD, so that the mass storage drivers will be loaded correctly. If you have not created a set of Windows NT boot floppy disks, see Software in part “1 What’s Needed” for additional information. 1. Insert the boot floppy disk for Windows NT4.0 and exit Diagnostic Assistant to reboot the server. 2. When Setup prompts to detect mass storage devices, skip detection and manually specify the mass storage drivers: 3.
LXr 8000 (with Fibre Channel) These procedures provide instructions for servers using Fibre Channel shared storage solutions (HP Rack Storage/12FC. Configure NetServer Hardware and BIOS 1. System A and System B can both be powered on. 2. Insert the HP NetServer Navigator CD in the CD-ROM drive and restart the server. 3. During reboot enter the Setup Utility by pressing F2. 4. Select User Preferences and then the LH4 Integrated NetRAID setting you want to use. 5.
3. • First, load the driver for the device you want to boot from. For drives in the LH 4 internal bays this will normally be the embedded SCSI Symbios driver or embedded NetRAID. • Secondly, load the IDE driver, since the CD drive is on the IDE bus. • Finally, load any other mass storage drivers you need. If you are using the Fibre Channel HBA for shared storage do not load the HP Fibre Channel driver at this time. It will be loaded later.
For Fibre Channel solutions using the Rack Storage/12FC simply reboot System B and repeat the procedures on Systems A. Both systems can be powered up.
6 Shared Storage Software Setup Use these procedures to install host bus adapter (interface) software, create the arrays and array file systems. Shared Storage Setup Part "6 Shared Storage Software Setup" in the Shared Storage Supplement. For Fibre Channel solutions go to Configure the Storage Devices using FCArray Assistant in the supplement Create the Array File Systems Use the instructions below and Windows NT Disk Administrator to partition, assign drive letters, and format the shared logical drives.
Disk Administrator, Scanned Logical Disks Create Full Disk Partitions for each Array 1. Click the disk box to select the shared array to be partitioned. Disk Administrator highlights the selected disk. 2. From Disk Administrator’s Partition menu, choose Create. A dialog appears indicating the maximum size of a single partition. NOTE 3. Don’t be misled by the displayed disk capacity for your arrays.
Disk Administrator, Partitioned Disk Array NOTE Do not partition a disk into separate drives. Microsoft Cluster Server Software will only manage one partition per disk. 4. Repeat steps 1 through 3 to create a partition for each disk array to be shared by the cluster. 5. From Disk Administrator’s Partition menu, choose Commit Changes Now, then choose Yes to save changes and OK when prompted.
Disk Administrator, All Disk Arrays Partitioned and Committed Assign Drive Letters Disk Administrator has assigned sequential and temporary drive letters to the disk arrays you partitioned. You must assign a permanent (static) drive letter to each drive you want to make available to both Systems A and B. NOTE When partitioning logical drives with Windows NT the logical drive letters are sequentially assigned in a predefined sequence.
Disk Administrator, Assigning Drive Letters 4. Repeat steps 1 through 3 to assign a drive letter for each array to be shared in the cluster. Format Logical Drives 1. Click a disk box to select one of the arrays that you just partitioned and assigned a drive letter. Disk Administrator highlights the selected disk. 2. From the Disk Administrator’s Tools menu, choose Format. A dialog appears with a list of formatting options. Disk Administrator, Formatting and Assigning Volume labels 3.
5. Select Quick Format in the Format Options field, and then Start to begin formatting the logical drive. NOTE 6. No action is necessary for the Capacity and Allocation Unit Size fields. Repeat steps 1 through 5 to format each drive to be shared in the cluster. The following example depicts both drives formatted with permanent drive letters assigned. Disk Administrator, Formatting and Assigning Volume labels 7. Exit Disk Administrator.
7 Microsoft Cluster Server Software Setup During installation of Microsoft Cluster Server Software (MSCS) at System A, you will create a Microsoft Cluster Server. Initially, it is a cluster with only one server (System A). Later, you will join System B to the cluster and thus create a standard two-server (node) cluster. If you need more information about the installation process outlined here, see the Microsoft Cluster Server Administrators Guide.
5. Setup prompts you for the location to store cluster files. Either accept the default or type a new location and click Next. 6. Setup prompts you for the cluster domain account. Provide a user name and password for an appropriate Microsoft Domain account for the cluster. Click Next. NOTE 7. If you are unsure of the correct MS Domain account, consult the Windows NT documentation supplied with your system. Setup presents a two-column list of Available unshared and Shared cluster disks.
NOTE • Use only for internal cluster communications Choose this option if you are configuring an intra-cluster LAN adapter. • Use only for client access Choose this option if you are configuring a client LAN adapter and System A and B reside on different IP subnets. In this example, the intra-cluster LAN is shown first with the Adapter Name and IP Address already filled in. However, your configuration may display the Client LAN first.
Microsoft Cluster Server Setup, Setting the LAN Priority 12. Follow the on-screen instructions to order the adapters so that the intra-cluster LAN adapter is identified first (at the top of the list). After you have ordered the adapters click Next. NOTE If you previously defined the client IP addresses of Systems A and B as residing on different subnets, the client LAN will be unable to assume responsibility for intra-cluster communication. 13. Setup prompts you for the Cluster IP address.
Install MSCS on System B While you have been configuring System A, System B has been idling at the Restart dialog. 1. Click Restart to reboot System B to Windows NT. 2. Insert the Component CD of Microsoft Windows NT Server (Enterprise Edition) in the CD-ROM drive of System B. 3. Run the Microsoft Cluster Server setup program. Setup.exe is located in the following folder on the Component CD: \mscs\cluster\i386. 4.
8 Cluster Testing There are two programs for testing the installed cluster. These programs are the Hardware Verification and Labeling Utility and the Cluster Installation Test. Hardware Verification and Labeling Utility The Hardware Verification and Labeling Utility scans the system and checks system integrity before you perform system configuration. It helps you simplify the assembly process that must be performed while trying to setup a new product.
HP SureStore E 12H Disk Array Supplement to HP NetServer Microsoft Cluster Installation Guide October 10, 1998 (See Version History below)
Notice The information contained in this document is subject to change without notice. Hewlett-Packard makes no warranty of any kind with regard to this material, including, but not limited to, the implied warranties of merchantability and fitness for a particular purpose. Hewlett-Packard shall not be liable for errors contained herein or for incidental or consequential damages in connection with the furnishing, performance, or use of this material.
Contents OVERVIEW ................................................................................................................................................................ 4 VERSION HISTORY .................................................................................................................................................... 4 1 WHAT’S NEEDED ..........................................................................................................................................
Overview This supplement describes the process for installing and configuring the HP SureStore E 12H Disk Array as shared storage in an HP NetServer cluster. This supplement is incomplete without the HP NetServer Cluster Installation Guide. When prompted in this supplement, return to the HP NetServer Cluster Installation Guide for more information on installing the other components of the cluster.
1 What’s Needed Software • HP SureStore E for Windows NT CD. This CD, which is included with the HP SureStore E 12H Disk Array, contains all the software you need to install the disk array. Need More Help? The following reference material may be useful when installing the HP SureStore E 12H Disk Array. These documents are included with the disk array.
2 NetServer Hardware Setup Installing the HP A5252B SCSI Host Bus Adapter The A5252B SCSI host adapter is the only host bus adapter (HBA) supported for use with the HP SureStore E 12H Disk Array in a Windows NT cluster. The A5252B is an AHA-2944UW HBA customized with the necessary SCSI settings for the disk array, thus ensuring proper operation in a Windows NT cluster. Disk arrays can be connected in a daisy chain fashion to each A5252B HBA.
3 Shared Storage Hardware Setup This section contains instructions for installing the hardware components of the HP SureStore E 12H Disk Array for use as shared storage on your NT cluster. NOTE Refer to the HP SureStore E 12H Disk Array User’s And Service Manual for instructions on rack mounting the disk array. Identify Controls and Connectors The various controls and connectors used during installation of the HP SureStore E 12H Disk Array are shown in Figure 1, Figure 2, and Figure 3.
1 – Controller X SCSI Connector 1 4 – Controller Y SCSI Connector 2 2 – Controller X SCSI Connector 2 5 – P1-P3 AC Power Connectors 3 – Controller Y SCSI Connector 1 Figure 2. Disk Array Rear Panel 1 – Power Module Status Light 5 – Control Panel Display 2 – Disk Module Status Light 6 – Control Panel Status Light 3 – Fan Module Status Light 7 – Controller Module Status Light 4 – Power/Standby Switch Figure 3.
Install Disk Modules NOTE CAUTION To improve enclosure cooling and balance the load on the internal SCSI buses, the disk modules should be installed from left to right and from top to bottom. Disk module SCSI addresses are automatically preset by the backplane inside the disk array enclosure upon insertion. The module lever must be pulled all the way out or the module will jam in the slot upon insertion.
Install Controller Batteries The two battery packs included with the controller module must be installed before the controller module is installed in the disk array. 1. Remove the battery cover latch and then remove the RFI shield (if necessary, you can use a flat-bladed screwdriver to remove the RFI shield). 2. Install both battery packs, and connect the cables as shown in panel 4 of Figure 5. 3. Reinstall the RFI shield and the battery cover latch.
Install Controller Modules CAUTION Before installing a controller module, ensure that all of the pins on the controller connector are straight. Bent pins will cause the controller module to fail, and the array will not function properly. Also, do not attempt to install the controller module upsidedown. 1. Pull the controller module levers all the way out. 2. Insert the controller module into the disk array, while pushing on both sides of the controller module. 3.
Connecting Disk Array Power Cords 1. Connect a power cord to each of the three power receptacles on the rear of the disk array. 2. Plug the other end of the power cords into the cabinet power strips as shown in Figure 7. NOTE The disk array cannot operate on a single power supply; consequently, the disk array will shutdown if power to two of the power supplies is lost.
Power Up the Disk Array 1. Lift the power/standby switch door up, then press the power/standby switch to the power on (in) position. 2. Wait for the control panel to display “Ready”, indicating that the disk array has successfully completed its initialization and is ready for use. NOTE If the controller batteries are fully discharged, it may take up seven minutes for the disk array to display “READY” status.
Step 1. Set the Controller SCSI ID NOTE If two controllers are connected to the same SCSI bus, they must each have unique SCSI IDs. SCSI ID 7 is reserved for use by the SCSI HBA. 1. Press Menu 2. Press + until Cntrl Changes appears in the display, then press Enter. 3. Press + until SCSI ID appears in the display, then press Enter. 4. Press + until For Cntrl X appears, then press Enter 5. Press + to select the desired SCSI ID, then press Enter. 6. When prompted to Reset OK?, press Enter . 7.
4 Cluster Cabling and Setup This section explains how to connect the disk array to the SCSI HBA installed in the server. It includes diagrams that illustrate connecting the SCSI cabling to ensure high availability. Cabling not restricted by the cluster configuration (video, keyboard, mouse, etc.) are not depicted in these diagrams. Refer to the HP NetServer Rack Assembly and Cabling Reference Guide for additional information on cabling routing and connections.
Figure 9.
Figure 10.
6 Shared Storage Software Setup SureStore E Manager is an online management tool that allows you to monitor and manage your HP SureStore E 12H Disk Array from a single network Windows client - either locally or remotely. Once the SureStore E Manager is installed, use it to create the required logical drive structure on the disk array. The NT Disk Administrator can then be used to create the array file systems. Power Up the Disk Array 1.
Set Up SureStore Manager After installing the software, a few steps must be performed before you can begin managing the disk arrays. This involves adding the disk arrays in the cluster to the Array List. 1. From the Start menu, select Programs|SureStore Manager|SureStore Manager. SureStore Manager begins looking for all SureStore E 12H disk arrays connected to the cluster. As disk arrays are identified, they are added to the Discovered Arrays in the Array List Edit dialog box.
Create Logical Drives You can now begin creating logical drives on the disk array. Creating logical drives makes array capacity available to the operating system. Each logical drive appears to the host as a physical disk device. Defining the necessary logical drive structure for the cluster should have been done as part of the shared storage planning process. 1. Select the disk array from the Array List window. 2. Click the Logical Drive button on the toolbar. 3. Click Create...