
HP Netserver LC 2000 Compaq Rack Install Guide


Chapter 3 Rack-Mounting the HP NetServer
15
"
#
"
#
#
#
#
#
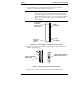
9th Hole
From Bottom
7th Hole
From Bottom
represents
the EIA unit
numbers on the
rack columns.
Bottom of
Compaq
Rack
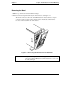
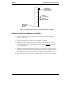
Figure 3-4. Cage Nut Locations on the Rack’s Rear Columns
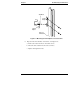
Attaching the Column Adapters and Slides
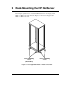
1. Make sure that anti-tip precautions have been taken before installing
servers in the rack.
2. Align the right column adapter to the right front column.
3. Match the column adapter holes (2nd & 14th) to the marks on the front
column and place the column adapter mounting holes behind the column
face. See Figure 3-5.
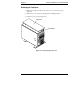
4. With the column adapter held in position, insert the two screws with the
large washer (included in the non HP rack-mount kit) through the holes in
the column into the captive nuts on the column adapter. See Figure 3-5.
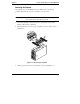
5. Repeat Steps 2 through 4 for the column adapter on the left front column.