
HP Netserver LC 2000 Compaq Rack Install Guide


Chapter 3 Rack-Mounting the HP NetServer
26
Attaching the Cable Management Arm
Use this procedure to mount the Cable Management Arm on the
HP NetServer LC 2000r when mounted in the HP System/E or System /U racks.
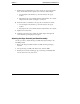
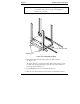
The HP NetServer LC 2000r’s Cable Management Arm allows the cables,
including the power cord, to move in and out with the HP NetServer chassis
without any damage or being accidentally disconnected. See Figure 3-16.
WARNING Before sliding out the HP NetServer LC 2000r, ensure the
anti-tip foot is still extended from the front of the rack. A
tip-over hazard exists, so never slide more than one
component out of the rack at a time.
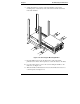
1. Ensure the HP NetServer LC 2000r is pushed all the way into the rack.
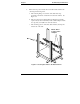
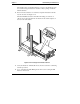
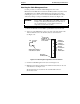
2. At the rear of the HP NetServer, place cage nuts on the left column in the
12th and 14th holes above the baseline (bottom) of the NetServer.
See Figure 3-15.
"
#
"
9th Hole
from Bottom
7th Hole
from Bottom
represents
the EIA unit
numbers on the
rack columns.
12th Hole
from Bottom
Left
Rear of
Rack
Attach nuts to this face
of the left rear column.
Bottom of
HP NetServer
#
#
#
#
#
14th Hole
from Bottom
Figure 3-15. Attaching the Cage Nuts to the Left Column
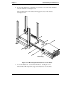
3. Orient the Cable Management Arm as shown in Figure 3-16.
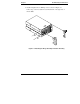
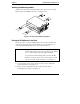
4. Match the inner flange mounting holes with the threaded holes in the rear
of the NetServer. See Figure 3-15.
The threaded holes are located near the external SCSI Connector
(knockout) location.