HP NetServer LT 6000r Installation Guide for Third-Party Racks HP Part Number 5969-5914 Printed in January 2000
Notice The information contained in this document is subject to change without notice. Hewlett-Packard makes no warranty of any kind with regard to this material, including, but not limited to, the implied warranties of merchantability and fitness for a particular purpose. Hewlett-Packard shall not be liable for errors contained herein or for incidental or consequential damages in connection with the furnishing, performance, or use of this material.
Contents 1 Introduction ................................................................................................. 1 Installation Basics – Safety Precautions ........................................................ 1 HP Net Server Rack-Mount Parts List............................................................ 2 Definition of Terms........................................................................................ 2 2 Prepare the HP NetServer for Rack Mounting ...................................
1 Introduction This document describes how to mount an HP NetServer LT 6000r into third-party racks. Refer to the HP NetServer LT 6000r User Guide that came with the HP NetServer for instructions on adding accessories to, and configuring the HP NetServer. If you have an HP Rack System/E, HP Rack System /U or an older HP Rack System, See Chapter 8 and Chapter 13 of the HP NetServer LT 6000r Installation Guide for alternative rack mount instructions.
Chapter 1 Rack Mounting the HP NetServer • Maintain reliable grounding of rack-mounted equipment. Pay particular attention to supply connections that are not direct connections to the branch circuit (for example: power strips). HP Net Server Rack-Mount Parts List Make sure that the rack-mount kit that comes with your HP NetServer LT 6000r contains with the following parts. Quantity Part 2 Slides 1 Template Definition of Terms Terms used in this document are defined in the table below.
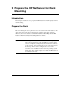
2 Prepare the HP NetServer for Rack Mounting Introduction This chapter describes how to prepare the HP NetServer and third-party rack for rack mounting. Prepare the Rack Before mounting the server, plan the server’s location in the rack relative to the other rack components. Proper placement is vital for safety and operating efficiency. For more details, see the Rack Installation Road Map and the HP NetServer Rack Assembly and Cabling Reference Guide.
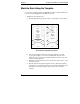
Chapter 2 Prepare the HP NetServer for Rack Mounting Mark the Rack Using the Template Use the rack-mounting template (for HP Rack System/E) to mark four EIA units for positioning the HP NetServer LT 6000r in the rack. 1. Mark the front mounting holes. a) Hold the template along side the front face of the left-front rack column. The LT6000 Rack Mounting Template b) Line up the template with the same rack space that the server will occupy.
Chapter 2 Prepare the HP NetServer for Rack Mounting # WKH (,$ XQLW QXPEHUV RQ WKH UDFN FROXPQV # WKH GLYLVLRQ EHWZHHQ # ´ µ UHSUHVHQWV WKH # WK +ROH 1HW6HUYHU # %RWWRP RI IURP %RWWRP QG +ROH IURP %RWWRP Location Marks on the Rack’s Front Columns 2. Repeat steps 1 through 3 for the left and right rear columns.
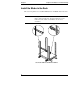
Chapter 2 Prepare the HP NetServer for Rack Mounting Install the Slides in the Rack This section explains how to install the HP NetServer LT 6000r slides in the rack. NOTE The right slide is embossed with an R on the outside. The left slide is embossed with an L. Upward pointing arrows are embossed on the outside of each slide to show correct orientation.
Chapter 2 Prepare the HP NetServer for Rack Mounting 1. Loosen the adjustment knob on one side, insert the rear rack pins into the holes you marked on the outside rear column, and hold them in position. 2. While holding the slide in the rack, pull out the front bracket to the outside front column using the grip on the slide; insert the front pins into the marked hole. 3. With both sets of rack pins in position, release the slide so that the tension spring seats the slide in the rack.
Chapter 2 Prepare the HP NetServer for Rack Mounting Control Panel Cable Clip Control Panel Cable Right Bezel Adapter Remove the Bezel Remove the Right Bezel Adapter Remove the right bezel adapter from the bezel. 1. Push in the tab on the adapter with a screwdriver. 2. Pull the adapter away from the bezel.
Chapter 2 Prepare the HP NetServer for Rack Mounting Remove the Left Bezel Adapter Remove the left bezel adapter from the HP NetServer. 1. Pull the adapter top upward to pull it free of the slot on the HP NetServer. 2. Pull out the tab at the middle of the adapter with a small screwdriver. 3. Pull the adapter away from the HP NetServer. Tabs Remove the Left Adapter 4. Re-install the bezel on the front of the server. a. Position the holes in the hinge bracket over the hinges. b.
Chapter 2 Prepare the HP NetServer for Rack Mounting To prevent the rack from rolling while you mount the HP NetServer LT 6000r, make sure that the leveler screws (if any) on the rack’s lower four corners are in firm contact with the floor. 1. Fully extend each of the slide members. The slides lock into position. You cannot push the slides back in the rack without pressing each slide’s release latch. Slide Members Mount the Server 10 2.
Chapter 2 Prepare the HP NetServer for Rack Mounting WARNING The HP NetServer LT 6000r weighs up to 100 pounds. At least two people must be on hand to lift the server into position. Failure to observe this warning could result in serious injury to you or to the HP NetServer LT 6000r. 4. Lower the server onto the slide members. Ensure that the mounting hooks have been properly seated inside the chassis. 5.
Chapter 2 Prepare the HP NetServer for Rack Mounting 7. Release the slide locks and push the mounted server into the rack. The server will lock into place. Push the server to the second notch on the blue rack-latch position closest to the bezel. The first latch position is used when mounting the HP NetServer LT 6000r in a HP rack. 8. Open the bezel, and turn the key lock on the right side of the HP NetServer LT 6000r front panel to prevent the server from coming out of the rack. 9. Close the bezel.
Chapter 2 Prepare the HP NetServer for Rack Mounting Chassis Nuts Chassis Bracket Attach the Cable Management Arm 3. Extend the HP NetServer out of the rack to ensure the Cable Management Arm moves along with the chassis without binding. NOTE Refer to the HP NetServer LT 6000r Cabling Reference Guide, for information about cable dressing and routing. 4. If the Cable Management Arm moves with the chassis and the rack installation appears to be successful, slide the HP NetServer into the rack. 5.
3 Warranty and Support The hardware warranty below applies to components purchased as accessories. If your component was factory installed as part of an HP NetServer model, refer to the HP NetServer Warranty and Service/Support Booklet provided with your system documentation for the warranty limitations, customer responsibilities, and other terms and conditions.
Chapter 3 Warranty and Support HP Repair and Telephone Support Refer to the HP NetServer Warranty and Service/Support Booklet supplied with your HP NetServer system documentation for instructions on how to obtain HP repair and telephone support.
Index C R Cable management arm, attaching, 16 Rack Mounting Template, 8 Rack-Mount Parts List, 6 D Definition of Terms, 6 S Install the Slides, 10 Safety Precautions, 5 service, 20 support, 20 P W Prepare the Rack for Mounting, 7 warranty, 19 I 17