
HP Netserver LXr 8000 Installation Guide

Chapter 8 Mounting the Server in the Rack
80
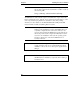
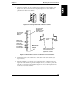
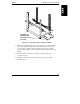
Bottom of
Server
Attach nuts to this face
of the rear columns
Left
Right
Rear of
Rack
#
#
#
#
#
Fourth Hole
From Bottom
Sixth Hole
From Bottom
"#" represents
the EIA unit
numbers on the
rack co
lumns
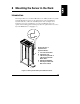
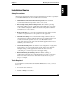
Figure 8-4. Rack Nut Locations on the Rack’s Rear Columns
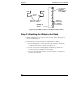
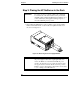
Step 2: Attaching the Slides to the Rack
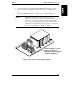
1. Pull the stabilizing foot forward out of the bottom of the rack. Figure 8-5
shows the stablizing foot.
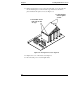
2. Hold a slide in position inside the two left-hand rack columns:
a. The mounting flange on each end must wrap around the outside face
of both the front and rear columns. See Figure 8-5.
b. The two holes in the mounting flange should line up with the two
lowest rack nuts you installed on each column.
c. The end of the slide that extends -- the slide member -- should point
forward out of the rack.