HP NetServer LXr 8000 to LXr 8500 Upgrade Guide HP Part Number 5967-6669 Printed in September 1999
Notice The information contained in this document is subject to change without notice. Hewlett-Packard makes no warranty of any kind with regard to this material, including, but not limited to, the implied warranties of merchantability and fitness for a particular purpose. Hewlett-Packard shall not be liable for errors contained herein or for incidental or consequential damages in connection with the furnishing, performance, or use of this material.
Contents 1 Introduction ................................................................................................. 1 A Brand-new Server ...................................................................................... 1 Verify NOS Versions Supported by the LXr 8500 ........................................... 1 Determine Which Accessories You Need ....................................................... 2 Memory ......................................................................................
Contents Remove the Fans and Fan Cage ................................................................. 25 Remove Processor Tray .............................................................................. 27 Remove I/O Tray ......................................................................................... 28 Remove Midplane Board and Center Support .............................................. 30 Apply Gaskets to Chassis ...........................................................................
Contents Run the Basic System Test...................................................................... 79 Create Support Ticket.............................................................................. 80 Use the Error Code Viewer to Review Corrective Actions......................... 80 Use HP DiagTools to Burn in the NetServer............................................. 81 Exit HP DiagTools and Take Corrective Action if Necessary..................... 81 Reinstall Your NOS ..........................
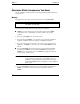
1 Introduction A Brand-New Server When you use this kit to upgrade your HP NetServer LXr 8000 to an LXr 8500, you end up with a brand-new server. It retains the original serial and model numbers, but your upgraded server will have many new boards with new capabilities. Reinstalling your network operating system (NOS) is an essential part of this upgrade. Reinstalling the NOS ensures that you can use all of the new features of the NetServer LXr 8500.
Chapter 1 Introduction Determine Which Accessories You Need Use the guidelines described in this section when purchasing additional memory and processors. Memory The upgrade kit comes with one memory board and one 256-MB DIMM. WARNING You cannot move the EDO DIMMs that came with the LXr 8000 to the LXr 8500. You can purchase additional memory following these guidelines: l DIMM sizes can be mixed per board, and can be placed in any DIMM socket.
Chapter 1 Introduction • Using two memory boards, your maximum capacity with 256-MB DIMMs is 8 GB. NOTE Consult your NOS documentation to determine the maximum amount of memory supported by your NOS. For example, Microsoft Windows NT 4.0 and Novell NetWare 5 can address a maximum of 4 GB of memory. Processors The upgrade kit comes with seven terminators to be used as needed. All processors from the LXr 8000 can be moved into the LXr 8500.
Chapter 1 Introduction Call for Installation If you desire, Hewlett-Packard will install your upgrade kit at no charge if you are located within 100 miles of a Hewlett-Packard Primary Service Office. In other locations, you will be charged for travel. Please call HP at one of the following numbers to schedule this service.
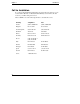
Chapter 1 Introduction Overview of the Upgrade During this upgrade, you will remove and replace components as listed in the following table.
Chapter 1 Introduction Purpose of This Guide This guide describes the steps you need to perform to convert the HP NetServer LXr 8000 to the HP NetServer LXr 8500. This guide includes the following topics: • Chapter 1, "Introduction," explains what accessories you might need before you begin the upgrade, and identifies related documentation you might need.
Chapter 1 Introduction Related Documentation The following documents describe the HP NetServer LXr 8500: • The HP NetServer LXr 8500 Installation Guide • HP NetServer LXr 8500 Technical Reference Card • HP NetServer Online Documentation CD-ROM Precautions Follow the procedures listed below to ensure safe handling of components and to prevent harm to yourself and the NetServer.
2 Preparing for the Upgrade This chapter explains the steps to take before you begin the upgrade. l Gather the tools you need. l Back up your data. l Check the internal event log. l Set up your work area. l Open the boxes and verify their contents. Tools You Need To install this accessory you need the following tools: • An anti-static service kit (3M 8501/8502/8503 or equivalent). This kit includes a static-dissipating work surface, a chassis clip lead, and a wrist strap.
Chapter 2 Preparing for the Upgrade Check the System Event Log Be sure to check the system event log before you disassemble the LXr 8000. NOTE This is not the Windows NT Event Log. 1. Close all applications, log off all users, and shut down the operating system. 2. Find the new HP NetServer Navigator CD-ROM shipped with this upgrade kit and insert it into the CD-ROM drive. 3. Turn on power to the NetServer. 4. From the Navigator Main Menu, select "NetServer Utilities" then "More NetServer Utilities." 5.
Chapter 2 Preparing for the Upgrade Open the Boxes and Verify Contents CAUTION Components of this accessory kit are sensitive to static electricity and can be easily damaged by improper handling. Read the following information carefully before you handle the accessory components: • Leave the components in the anti-static container until you are ready to install them. • Use an anti-static wrist strap and a grounding mat. Read and follow the instructions included with the wrist strap and mat.
Chapter 2 Preparing for the Upgrade Documentation and Miscellaneous Parts The following items are included with the documentation set: l HP NetServer LXr 8000 to LXr 8500 Upgrade Guide (this guide) l Complete documentation for the HP NetServer LXr 8500, including the Installation Guide and Rack Assembly and Cabling Reference Guide l HP NetServer Navigator CD-ROM l HP NetServer Online Documentation CD-ROM l five labels to be applied to your NetServer LXr 8500 l miscellaneous parts as shown in Figure 2-1 l
Chapter 2 Preparing for the Upgrade Processor Box Processor Tray with 7 Terminators Figure 2-2. Contents of Processor Box I/O Box Figure 2-3.
Chapter 2 Preparing for the Upgrade Power Supply Box Figure 2-4. Contents of Power Supply Box Memory Board Box Figure 2-5.
Chapter 2 Preparing for the Upgrade Midplane Box Figure 2-6. Contents of Midplane Box Bezel Box Bezel Hinge Front Bezel Tie-down Kit Figure 2-7. Contents of Bezel Box NOTE The tie-down kit is not necessary for the upgrade and is used only to prepare a NetServer for shipment in a rack.
Chapter 2 Preparing for the Upgrade Top Cover Box Top Cover Figure 2-8. Contents of Top Cover Box Sheet Metal Box Embedded I/O Cover Center Support Figure 2-9.
Chapter 2 Preparing for the Upgrade Cable Management Arm Box Cable Management Arm Figure 2-10.
3 Disassembling the LXr 8000 This chapter describes how to complete the following steps to disassemble the LXr 8000. • Disconnect cables, remove power supplies, and extend rack. • Remove bezel, control panel, and covers. • Remove memory boards. • Remove fans and fan cage. • Remove processor tray. • Remove I/O tray. • Remove midplane board and center support. l Apply gaskets to chassis. CAUTION Do not proceed until you have followed the instructions in Chapter 2 to back up your data.
Chapter 3 Disassembling the LXr 8000 6. Pull down on each power supply latch and remove. Figure 3-1. Remove All Three Power Supplies 6. Remove all three power supply modules by pulling down on the latches. (See Figure 3-1.) Place the power supply modules on the table of items that will not be reused in the NetServer LXr 8500. CAUTION Three new power supplies have been provided because some of the older power supplies shipped with the LXr 8000 will not work with the LXr 8500.
Chapter 3 Disassembling the LXr 8000 Remove Bezel, Control Panel, & Covers 10. Remove control panel. 9. Unscrew front bezel hinge. 8. Remove front bezel. Figure 3-2. Remove Bezel, Bezel Hinge, and Control Panel 8. Remove the front bezel from the NetServer. Pull it straight out off the chassis. (See Figure 3-2.) Place the front bezel on the table of items that will not be reused in the NetServer LXr 8500. 9. Detach the front bezel hinge from the chassis.
Chapter 3 Disassembling the LXr 8000 11. Unscrew two screws and remove top cover. Figure 3-3. Remove Top Cover 11. Take off the top cover by removing the two screws that attach the cover to the fan cage, sliding the top cover back, and lifting it up. (See Figure 3-3.) Place this cover on the table of items that will not be reused in the NetServer LXr 8500.
Chapter 3 Disassembling the LXr 8000 Remove Memory Boards 12. Lift LCD handle. 13. Loosen three thumbscrews and remove memory bay cover. Figure 3-4. Remove Memory Bay Cover 12. Lift the LCD handle. 13. Unscrew the three thumbscrews and remove the memory bay cover. (See Figure 3-4.) The memory bay cover will be reused in the LXr 8500.
Chapter 3 Disassembling the LXr 8000 14. Open the latches to disengage both memory boards and remove. Figure 3-5. Remove Memory Boards 14. Disengage each memory board by pulling the latches toward the edges of the board, then remove. (See Figure 3-5.) Place the memory boards on an anti-static mat. The memory boards and their EDO DIMMs will not be reused in the LXr 8500. WARNING 24 Do not move the EDO DIMMs from the LXr 8000 into the memory boards for the LXr 8500.
Chapter 3 Disassembling the LXr 8000 Remove the Fans and Fan Cage 15. Remove fan cover. 16. Remove all six fans. Figure 3-6. Remove Fan Cover and Six Fans 15. Remove the fan cover by unscrewing one screw, pulling the fan cover toward you, lifting the front of the cover, and then disengaging the tabs. (See Figure 3-6.) This item will be reused in the NetServer LXr 8500. 16. Remove all six fans by pulling them straight up. All fans will be reused in the NetServer LXr 8500.
Chapter 3 Disassembling the LXr 8000 18. Remove air baffle. 17. Unscrew five screws and remove fan cage. Figure 3-7. Remove Fan Cage and Air Baffle 17. Remove the fan cage as follows (see Figure 3-7): a. Remove the five screws (three in front and one on each side) that attach the fan cage to the chassis. b. Tilt the fan cage forward and remove. Be careful of the light pipes at the bottom of the fan cage. The fan cage will be reused in the NetServer LXr 8500. 18.
Chapter 3 Disassembling the LXr 8000 Remove Processor Tray 19. Remove three screws that attach the processor tray to the chassis. 20. Pull levers forward to disengage the processor tray. 21. Remove processor tray. Figure 3-8. Remove Processor Tray 19. Remove the three screws attaching the processor tray to the chassis. Looking at the front of the NetServer, there are two screws on the right and one on the left. (See Figure 3-8.) 20.
Chapter 3 Disassembling the LXr 8000 Remove I/O Tray 22. Remove embedded I/O cover. Note: SCSI extender cable (not shown) connects here. It is not necessary to disconnect this cable. 23. Disconnect three peripheral bay ribbon cables. 24. Remove all boards from the I/O tray. Figure 3-9. Remove Embedded I/O Cover, Disconnect Peripheral Bay Cables, and Remove I/O Boards 22. Remove the embedded I/O cover from the I/O tray. (See Figure 3-9.
Chapter 3 Disassembling the LXr 8000 27. Lift straight up to remove. 26. Disengage the I/O tray by opening the latches. 25. Remove three screws. Figure 3-10. Remove I/O Tray 25. Remove the three screws connecting the I/O tray to the chassis. (See Figure 3-10.) From the back of the NetServer, there are two screws on the right and one on the left. 26. Disengage the I/O tray from the midplane board by opening the latches. 27. Remove the I/O tray by lifting it up and out of the chassis.
Chapter 3 Disassembling the LXr 8000 Remove Midplane Board and Center Support 28. Remove center support. Figure 3-11. Remove Center Support 28. Remove the center support. (See Figure 3-11.) There are three screws that connect the center support to the chassis. Place the center support with the items that will not be reused in the NetServer LXr 8500.
Chapter 3 Disassembling the LXr 8000 29. Disconnect peripheral bay power connector. Figure 3-12. Disconnect Peripheral Bay Power Connector 29. Disconnect the peripheral bay power connector from the midplane board. (See Figure 3-12.
Chapter 3 Disassembling the LXr 8000 30. Remove four screws, tilt midplane board, and remove. Figure 3-13. Remove Midplane Board 30. Remove the midplane board as follows (see Figure 3-13): a. Remove the four screws that attach the midplane board to the chassis. b. Tilt the midplane board away from the sheet metal and lift. Place the midplane board on the table of items that will not be reused in the NetServer LXr 8500.
Chapter 3 Disassembling the LXr 8000 Apply Gaskets to Chassis 32. Remove adhesive strip covering from 2 short folded foam gaskets and apply to bottom corners of chassis. 31. Remove 4 screws and slide out peripheral bay. 33. Reinsert the peripheral bay and secure all 4 screws. Figure 3-14. Remove Peripheral Bay and Apply Foam Gaskets 31. Remove the four screws that secure the peripheral bay to the chassis and slide out the peripheral bay. (See Figure 3-14.
4 Preparing to Assemble the LXr 8500 This chapter describes how to put together the following NetServer LXr 8500 subassemblies: • processor tray l memory board Prepare the LXr 8500 Processor Tray NOTE Processors from the LXr 8000 are reused, and this upgrade kit does not include any additional processors. However, this upgrade kit comes with two processor carrier boards and supports a maximum of eight processors. Additional processors can be purchased separately. 1.
Chapter 4 2. Preparing to Assemble the LXr 8500 Place the processor tray for the LXr 8000 on a table next to the LXr 8500. NOTE Placing the two processor trays next to each other will reduce the chance of damaging a processor due to static electricity when you move the processor from the old tray to the new tray. 3. Open and remove the processor cage covers on both the LXr 8000 and the LXr 8500 processor cages. Loosen the captive screws that hold down the cover of each processor cage.
Chapter 4 Preparing to Assemble the LXr 8500 Remove just one processor from the LXr 8000, turn it 180 degrees, and insert it in the LXr 8500. (Later you will move the remaining processors.) LXr 8000 Processor Cage LXr 8500 Processor Cage Figure 4-2. Install One Processor in the LXr 8500 5. Replace each processor cage cover. Insert the tabs on the back of the cover into the matching slots on the rim of the cage. Lower the cover into place and fasten the captive screws.
Chapter 4 Preparing to Assemble the LXr 8500 J6A1 Figure 4-3. Jumper Location on the Processor Baseboard 6. Configure the jumpers on J6A1 for the correct processor speed (see Figure 4-4). Jumper Block J6A1 9 7 5 3 1 16 14 12 10 8 6 4 2 15 13 11 9 7 5 3 1 16 14 12 10 8 6 4 2 15 13 11 9 7 5 3 1 16 14 12 10 8 6 4 2 15 13 11 7 5 3 1 15 13 11 9 7 5 3 1 16 14 12 10 8 6 4 2 16 14 12 10 8 6 4 2 550 MHz Store unused jumpers like this.
Chapter 4 Preparing to Assemble the LXr 8500 Prepare the LXr 8500 Memory Board(s) Figure 4-5. Install DIMMs in LXr 8500 Memory Board 1. Install the 256-MB SDRAM DIMM that came with this upgrade kit on the LXr 8500 memory board. (See Figure 4-5.) CAUTION You cannot transfer the EDO DIMMs from the LXr 8000 memory board to the LXr 8500 memory board. DIMMs from the LXr 8000 are not compatible with the LXr 8500. NOTE This upgrade kit comes with only one memory board and one 256-MB SDRAM DIMM.
5 Assembling the LXr 8500 This chapter describes the following steps of assembling the NetServer LXr 8500. • Install the midplane board and center support. • Install the I/O baseboard and tray. • Check I/O configuration switches. • Install the I/O riser board and remote control card. • Install the processor tray. • Install the memory board. • Install the fan cage and fans. • Apply labels and gaskets, and install the power supplies and cables.
Chapter 5 Assembling the LXr 8500 Install the Midplane Board and Center Support 1b. Orient the midplane board so that: - the notches point down - the peripheral bay power connector faces the front of the NetServer 1c. Angle the midplane as you insert it, then fasten all four screws. Figure 5-1. Install Midplane 1. Locate the LXr 8500 midplane board and install it as follows (see Figure 5-1): a. Move the peripheral bay cables out of the way. b.
Chapter 5 Assembling the LXr 8500 Figure 5-2. Plug in the Peripheral Bay Power Cable 2. Plug the peripheral bay power cable into the midplane board. You will hear it click. (See Figure 5-2.) NOTE Do not route the peripheral bay power cable such that it rests against the power supply AC cable.
Chapter 5 Assembling the LXr 8500 3a. Orient the center support so the plastic PCI board guides face the back of the NetServer. 3b. Place the center support on top of the midplane. 3c. Fasten three screws. Figure 5-3. Install Center Support 3. Locate the LXr 8500 center support and install it as follows (see Figure 5-3): a. Orient the center support so the plastic PCI board guides face the back of the NetServer where you will reinstall the I/O tray. b.
Chapter 5 Assembling the LXr 8500 4. Use the cable sheath to cover the peripheral bay ribbon cables. Figure 5-4. Attach Cable Sheath to Peripheral Bay Ribbon Cables 4. Attach the new cable sheath to the peripheral bay ribbon cables. This cable sheath protects the cables from being pinched during installation and removal of components. (See Figure 5-4.
Chapter 5 Assembling the LXr 8500 Figure 5-5. Route Ribbon Cables 5. Route the peripheral bay ribbon cables through the midplane cable guide. Align the cable sheath with the offset edge of the chassis. (See Figure 5-5.) NOTE 46 The peripheral bay ribbon cables must be close to the side of the chassis, or you will not be able to fully insert the I/O tray.
Chapter 5 Assembling the LXr 8500 Install the I/O Baseboard and Tray 6a. Lower the I/O tray into place. 6b. Press the latches back. 6c. Fasten all three screws. Figure 5-6. Install I/O Baseboard and Tray 6. Install the LXr 8500 I/O tray as follows (see Figure 5-6): a. Set the I/O tray into place. b. Press the latches back to engage the connectors. c. Fasten all three screws.
Chapter 5 Assembling the LXr 8500 7. Connect three peripheral bay ribbon cables to I/O baseboard. Figure 5-7. Connect Ribbon Cables 7. Connect the three peripheral bay ribbon cables to the I/O baseboard. Each cable has a different shape connector. (See Figure 5-7.
Chapter 5 Assembling the LXr 8500 Check I/O Configuration Switches I/O Configuration Switches SCSI A IDE (CD-ROM) SCSI B Floppy Disk Drive J1F1 (use with cable for Remote Control card) PCI LED Cable 10 9 8 6 7 Slots 9 & 10 Slots 7 & 8 +3.3 VDC +3.3 VDC 66/33 MHz 66/33 MHz Bus 3 Bus 2 5 4 Slots 3 - 6 +5 VDC 33 MHz Bus 1 3 2 I/O Riser Slot 1 Slots 1 & 2 +5 VDC 33 MHz Bus 0 Remote Control card must be in Slot 2. Figure 5-8.
Chapter 5 8. Assembling the LXr 8500 Check the I/O configuration switches on the I/O baseboard. By default all of the switches are set in the "Open" (or "Off") position, and normally do not have to be changed. See Figure 5-9.
Chapter 5 Assembling the LXr 8500 Install I/O Riser Board and Remote Control Card 9. Install the I/O Riser board in the I/O Riser slot of the I/O baseboard. 10. Secure the I/O Riser board with a screw. Figure 5-10. Install the I/O Riser Board 9. Install the I/O riser board in the embedded I/O area of the I/O baseboard. (See Figure 5-10.) Refer to Figure 5-8 to locate the I/O riser slot. 10. Secure the I/O riser board with a screw.
Chapter 5 Assembling the LXr 8500 11. Press the center of the PCI hold-down latch in Slot 2. Then swing it back out of the way. Figure 5-11. Open the PCI Hold-down Latch in Slot 2 11. Locate Slot 2 on the I/O baseboard (see Figure 5-8) and open the PCI hold-down latch. (See Figure 5-11.) 12. Install the Remote Control card in Slot 2. 13. The Remote Control card cable passes over the top of the slot dividers and connects to J1F1 on the I/O baseboard. Figure 5-12. Install the Remote Control Card 12.
Chapter 5 Assembling the LXr 8500 Install the Processor Tray 14a. Align processor tray and slide it in. 14b. Check that the peripheral bay ribbon cables are out of the way. 14c. Press processor tray levers into the vertical position. 14d. Secure all eleven screws. Figure 5-13. Install Processor Tray 14. Install the processor tray as follows (see Figure 5-13): a. Align the tray on the center and side rails and push it in. b.
Chapter 5 Assembling the LXr 8500 Install the Memory Board 15a. Lift LCD handle up. 15b. Insert one or two memory boards (component-side down). 15c. Close memory board latches. Figure 5-14. Insert Memory Board 15. Insert the LXr 8500 memory board(s) into the chassis. (See Figure 5-14.) a. Lift the LCD handle up until it stops. b. Locate the memory board guides, and insert the board(s) with the component-side down.
Chapter 5 Assembling the LXr 8500 17. Lower the LCD handle. 16. Install the memory bay cover. Figure 5-15. Install Memory Bay Cover 16. Install the memory bay cover, and fasten the three thumbscrews. (See Figure 5-15.) The copper flanges are on the bottom of the cover. 17. Lower the LCD handle.
Chapter 5 Assembling the LXr 8500 Install the Fan Cage and Fans 18. Angle the fan cage as you lower it into place. Figure 5-16. Install Fan Cage 18. Angle the fan cage and install it in the chassis. (See Figure 5-16.) a. The six tabs on the chassis fit inside the six slots on the fan cage. b. Secure all screws (three in front and one on each side). CAUTION Make sure you have removed the fan cage air baffle before you attempt to install the fan cage.
Chapter 5 Assembling the LXr 8500 20. Install fan cover. 19. Insert all six fans. Figure 5-17. Install Fans and Fan Cover 19. Insert all six fans.(See Figure 5-17.) Orient each fan so that the connector on the bottom of the fan is located on the left side. The arrow on the fans point to the rear of the NetServer. 20. Install the fan cover. a. Set the fan cover tabs in place, pull the cover toward you, then push the cover back into place. b. Secure the screw in the center-front of the fan cover.
Chapter 5 Assembling the LXr 8500 Apply Labels, Gaskets and Install Power Supplies 21a. Apply UPGRADED TO LXr 8500 label to chassis below serial number label. 21b. Apply second UPGRADED label to pull-out card. Figure 5-18. Apply Labels to Side of Chassis 21. Locate the two "UPGRADED TO LXr 8500" labels shipped in the Documentation and Miscellaneous kit, and apply them as follows (see Figure 5-18): a. Apply one label just below the serial number on the chassis. b.
Chapter 5 Assembling the LXr 8500 Locate 3 Long Folded-Foam Gaskets for Top of Power Supply Bays Locate 3 Medium Folded-Foam Gaskets for Bottom of Power Supply Bays Locate Open Tab of Metal Gasket Locate 6 Metal Gaskets for Sides of Power Supply Bays Figure 5-19. Locate Gaskets 22. Locate the remaining gaskets shipped with other miscellaneous parts. Each gasket has an adhesive strip to secure it to the NetServer. (See Figure 5-19.
Chapter 5 Assembling the LXr 8500 Open tabs of metal gaskets 24d. Center long gaskets on point to center of NetServer. top edge of each power supply bay. 24a. Place medium-length gasket about 1 inch (25mm) in from edge of chassis. 24b. Place “CAUTION” label behind gasket on floor of power supply bay. 24c. Place metal gaskets on both sides of each power supply bay. Figure 5-20. Apply Gaskets to All Three Power Supply Bays 24.
Chapter 5 Assembling the LXr 8500 c. Apply one long folded-foam gasket on the top of each power supply bay. Center this gasket at the edge of the power supply bay. d. Apply one metal gasket to each side of each power supply bay as follows: ∗ The open tab of each gasket points toward the center of the NetServer. ∗ For the two metal gaskets that must be secured to the sides of the chassis, place the two gasket holes over the two metal inserts in the chassis.
Chapter 5 Assembling the LXr 8500 25. Slide each power supply module into place and press each lever into the upright position. Figure 5-21. Install All Three Power Supply Modules 26. Reconnect the power, monitor, keyboard, and mouse cables. Once power is connected, but not turned on, the LCD will be lit. In the next chapter, you will perform a preliminary hardware verification. Do not install all of your accessory boards into the I/O tray at the point.
6 Preliminary Hardware Verification In this chapter, you will perform some basic checks on your newly upgraded NetServer before you finish the installation and secure it to the rack. You will: l Check the hardware. l Power on the NetServer. l Resolve common installation problems. l Start the HP NetServer Navigator CD-ROM and update the BIOS and firmware. Hardware Checklist Before starting the NetServer, check your hardware.
Chapter 6 Preliminary Hardware Verification ◊ If the control panel LCD is dark, check the following: ∗ The power supply LEDs are blinking green. ∗ The AC power cable is plugged in correctly to a 200-240V AC outlet. ∗ The data and power cables that run from the LCD to the front panel board on the processor tray are connected properly. Power On the NetServer Turn on power to the NetServer and look for the following: l The fans turn on.
Chapter 6 Preliminary Hardware Verification l Verify that the speed and number of your processors, the cache size of the processors, and the amount of memory matches your hardware. l Make sure the system recognizes your hard drives and tape drive if you have one. Detected devices are listed on the monitor. Common Installation Problems For further information about any of these troubleshooting tips, see the HP NetServer LXr 8500 Installation Guide.
Chapter 6 Preliminary Hardware Verification The NetServer Power is On, but There is No Display on the Monitor Check the following: 1. Make sure the monitor cable is connected to the VGA connector at the rear of the NetServer. 2. If no messages appear on the control panel LCD, or if the LCD message stays at System Power is On, then do the following: a. Turn off the NetServer and disconnect the AC power cord. b. Check that your processor and terminators are installed correctly.
Chapter 6 Preliminary Hardware Verification l If the processors do not match: a. Make sure the cache coherency filters are seated securely. b. Follow the instructions in "Run Setup Utility" in Chapter 8 to change the Processor Retest Option to Yes. c. Power on the NetServer again and check to see if the problem has been corrected. If not, turn off power, disconnect the AC power cord, and reseat the processor.
Chapter 6 Preliminary Hardware Verification 5. Follow the instructions on the screen to begin the update. When the BIOS update is complete, the NetServer restarts. 6. As the NetServer restarts, note any POST errors and refer to the HP NetServer LXr 8500 Installation Guide as necessary. 7. Once the BIOS and firm has been updated, and your NetServer starts successfully, turn off power to the NetServer and disconnect the power cord. Finish the assembly as instructed in the next chapter.
7 Finishing the Assembly Now that you know the NetServer LXr 8500 boots, you can finish the assembly. This chapter provides instructions on: l Adding the remaining processors l Installing accessory boards on the I/O baseboard l Installing the top cover and bezel. NOTE If you removed the NetServer from the rack, see the HP NetServer LXr 8500 Installation Guide for instructions on reinstalling it in the rack.
Chapter 7 Finishing the Assembly processor modules in the second processor cage. Do not spread the processors across the two processor carrier boards evenly. f. All unused processor slots must be occupied by terminators. NOTE The NetServer LXr 8500 has built-in voltage regulator modules on the processor baseboard. Therefore, you don’t need to install voltage regulator modules in the LXr 8500. 3. Replace each processor cage cover on the LXr 8500.
Chapter 7 Finishing the Assembly NOTE 5V and 3.3V PCI boards are keyed such that it is not possible to insert them into the wrong voltage slots. Universal boards are keyed such that they can be placed in any slot. Refer to the HP NetServer LXr 8500 Installation Guide for more complete information on adding accessory boards. Install Accessory Boards in the I/O Baseboard 5. Install each accessory board in the I/O tray as follows: 5a. Press the center of the PCI hold-down latch to disengage it.
Chapter 7 Finishing the Assembly 5b. Remove the PCI slot cover. Figure 7-2. Remove PCI Slot Cover b. Remove the PCI slot cover. (See Figure 7-2.) c. Insert the accessory board. CAUTION 72 Do not bend the accessory board to install it into the slot. If the PCI board is full-length, the PCI board guide at the rear of the PCI slot is used to hold the board in place. The PCI board guide latch prevents the board from moving when attaching cables to the board externally.
Chapter 7 Finishing the Assembly 5d. Close the PCI board guide latch after installing each full-length accessory board. Figure 7-3. PCI Board Guide Latch d. Close the PCI board guide latch after installing each full-length accessory board. (See Figure 7-3.) 6. For all unused PCI slots, make sure that the PCI hold-down latches are in the closed position. These latches must be closed even if the slots are empty. Only slots whose PCI hold-down latches are closed will be powered on.
Chapter 7 Finishing the Assembly 7. Install embedded I/O cover. Figure 7-4. Install the Embedded I/O Cover 7. Install the embedded I/O cover over the right side of the I/O tray. (See Figure 7-4.
Chapter 7 Finishing the Assembly Install the Top Cover, Bezel, and Cables Figure 7-5. Replace Top Cover 8. Install the new top cover. This top cover has the new Technical Reference Label for the NetServer LXr 8500. (See Figure 7-5.
Chapter 7 Finishing the Assembly 9. Install control panel cover. 10. Secure the bezel hinge. 11. Install the front bezel. Figure 7-6. Install Control Panel, Bezel Hinge, and Front Bezel 9. Install the plastic control panel cover by aligning the two outside latches with the holes in the chassis, depressing the latches, and pressing firmly. (See Figure 7-6.) 10. Install the three screws to attach the bezel hinge to the chassis. 11. Install the new plastic front panel bezel. 12.
8 Reinstalling Your NOS When you use this kit to upgrade your NetServer LXr 8000 to an LXr 8500, you end up with a brand-new server. Reinstalling your NOS is an essential part of this upgrade. Reinstalling the NOS ensures that you can use all of the new features of the NetServer LXr 8500 including support for eight processors and resource mapping.
Chapter 8 Reinstalling Your NOS Run the HP DiagTools Utility HP DiagTools is an offline diagnostic program that validates hardware and helps distinguish hardware problems from software or configuration issues. It is recommended that you run DiagTools now and test your NetServer LXr 8500 before you reinstall your NOS. To run DiagTools you will: l Create two DiagTools diskettes. l Run the Basic System Test. l Create a Support Ticket to view your test results, or print them and keep a permanent copy.
Chapter 8 Reinstalling Your NOS NOTE HP DiagTools Diskette #1 contains a readme file of release notes. View the readme file to look for the most recent information about DiagTools. Run the Basic System Test Running the Basic System Test has two parts: l In Configuration Detection, DiagTools identifies all installed components. l The Basic System Test gives pass/fail results on each detected component. To run the Basic System Test: 1.
Chapter 8 Reinstalling Your NOS ◊ If any of your tests failed, view or print your results by following the instructions in the section "Create a Support Ticket" then look up the error codes by following the instructions in the section "Error Code Viewer." Create Support Ticket The Support Ticket lets you save the results to a file so you can either view or print them. 1. Press F4 (Ticket) from the Basic System Test Results screen. 2. Press F4 (Ticket) again to continue.
Chapter 8 Reinstalling Your NOS 3. Insert HP DiagTools Diskette #2, when prompted, and press F2. The Advanced System Tests menu appears. After various tests are initialized, the System Test submenu appears. NOTE Use the keyboard with the Advanced System Tests menus. They do not support a mouse. 4. Use the right arrow key to select Misc. from the Main menu. 5. Use the down arrow key to select Error Code Viewer and press Enter. You are prompted for the error code. 6.
Chapter 8 Reinstalling Your NOS Prepare Your Boot Drive Before you reinstall your NOS, you must repartition your boot drive or, if your boot drive is on a HP NetRAID logical drive, you must reinitialize your boot logical drive. If Your Boot Drive is Connected to a SCSI Controller If your boot drive is connected to a SCSI controller, and is not on a NetRAID logical drive, you should clear your boot drive as follows: 1. Delete all partitions on your boot drive. 2. Repartition the drive.
Chapter 8 Reinstalling Your NOS b. If you have more than one NetRAID adapter, choose Adapter from the Objects menu and select the adapter that contains your boot drive. c. Choose Logical Drive from the Objects menu. d. Choose Initialize from the Logical Drive menu. e. Select your boot logical drive to reinitialize. 4. Exit HP NetRAID Express Tools. The NetServer restarts. Install Your NOS and Configure the NetServer 1. Insert the HP NetServer Navigator CD-ROM and restart the NetServer. 2.
9 Warranty and Support The hardware warranty below applies to components purchased as accessories. If your component was factory installed as part of an HP NetServer model, refer to the HP NetServer Warranty and Service/Support Booklet provided with your NetServer documentation for the warranty limitations, customer responsibilities, and other terms and conditions.
Chapter 9 Warranty and Support HP Repair and Telephone Support Refer to the HP NetServer Warranty and Service/Support Booklet supplied with your HP NetServer documentation for instructions on how to obtain HP repair and telephone support.
10 Regulatory Information For regulatory information pertaining to this HP accessory, please refer to the regulatory section of the HP NetServer LXr 8500 Installation Guide.
Index A accessories memory, 2 PCI boards, 3 processors, 3 accessory boards guidelines for installing, 70 installing in the LXr 8500, 71 anti-static service kit, 19 B back up data, 9 bezel installing on the LXr 8500, 76 picture, 15 removing from LXr 8000, 21 bezel hinge installing on the LXr 8500, 76 picture, 15 removing from LXr 8000, 21 C cable management arm installing on the LXr 8500, 76 picture, 17 cable sheath installing on LXr 8500, 45 picture, 12 cache coherency filters, 35 Caution operating NetServe
Index setting in LXr 8500, 50 I/O riser board installing in LXr 8500, 51 I/O tray installing in LXr 8500, 47 picture, 13 removing from LXr 8000, 29 installation help, 4 J jumpers configuring for processor speed, 38 L labels applying to LXr 8500, 58, 60 labels to apply, 12 M memory guidelines, 2, 24 installing DIMMs, 39 second memory board, 2 memory bay cover installing in LXr 8500, 55 memory board installing in LXr 8500, 54 picture, 14 removing from LXr 8000, 23 midplane board installing in LXr 8500, 42 pi
Index S serial number, 1 service calling for, 1 Setup utility, 77 static-dissipating work surface, 7 system event log, 10 T tools needed, 9 top cover installing on the LXr 8500, 75 picture, 16 removing from LXr 8000, 22 U update BIOS, 67 update firmware, 67 W warranty hardware accessories limited, 85 Warranty information for hardware, 85 91