HP NetServer Remote Administrator Guide Configuring and Using Your Integrated Remote Assistant October 2000
Notice The information contained in this document is subject to change without notice. Hewlett-Packard makes no warranty of any kind with regard to this material, including, but not limited to, the implied warranties of merchantability and fitness for a particular purpose. Hewlett-Packard shall not be liable for errors contained herein or for incidental or consequential damages in connection with the furnishing, performance, or use of this material.
Contents 1 Quick Start........................................................................................................ 1 2 Remote Administration Using the HP Integrated Remote Assistant .......... 5 Integrated RA in Action.................................................................................. 6 Documentation................................................................................................... 7 Integrated RA Features and Functions..............................................
Contents 5 Setting Up the Remote Client ....................................................................... 47 Setting Up Terminal Emulation........................................................................ 47 Option 1: Managing a Server Remotely Using pcAnywhere ....................... 48 Option 2: Managing a Server Using a Dedicated Terminal ......................... 52 6 Using Integrated RA to Manage Server Operations ...................................
1 Quick Start This chapter provides a quick overview of the steps required to set up and use your HP Integrated Remote Assistant. If you have experience setting up computer hardware and software, you can use the following section as a brief installation guide. Before you begin, refer to the "Integrated RA System Requirements" section in Chapter 2. 1.
Chapter 1 Quick Start 3. Install console redirection software on the server (optional, see Chapter 4 for detailed instructions) For Microsoft Windows NT and 2000 servers, your server is ready for a remote or direct connection. However, if you also want to redirect the Windows console to a remote PC you must install pcAnywhere.
Chapter 1 Quick Start 1. Start pcAnywhere at the remote PC client from the Integrated RA program group. 2. From the pcAnywhere action button bar, click Call Online Service. Enter the server phone number. 3. Right click on the "RAClient" connection item, click Properties and make sure the remote client's modem baud rate matches the rate set at the server. 4. Close Properties and return to the pcAnywhere Main menu. 5. Double-click the connection item you set up to call your server. 6.
Chapter 1 Refer to Chapter 6 for more information.
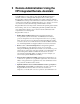
2 Remote Administration Using the HP Integrated Remote Assistant Your HP NetServer comes with a product called the HP Integrated Remote Assistant (referred to as Integrated RA throughout the rest of this guide). Integrated RA combines intelligent hardware and software (firmware) built into your HP NetServer that provides administrators with instant notification of server operations and events.
Chapter 2 Remote Administration Using the HP Integrated Remote Assistant also use any ANSI terminal emulator or a dedicated terminal to communicate with the server and run the management application.) • SNMP NetServer Agents. SNMP agents enable in-band (across the network) gathering of information and alert generation to an SNMP-based management client. See Chapter 6 for details on how to manage server operations using Integrated RA.
Chapter 2 Remote Administration Using the HP Integrated Remote Assistant • if the server is still running, send an SNMP alert to a management client connected to the network. The management client logs an alert from the server. Regardless of location, an administrator can log in to the server and use Integrated RA to help identify and correct the server problem or problems.
Chapter 2 Remote Administration Using the HP Integrated Remote Assistant allowing start-up messages to be viewed at a remote site. An administrator can also remotely power off (and on) the server if, as an example, the server is to be shut down for the weekend. Remote configuration. An administrator at a remote client can reconfigure Integrated RA without having to be at the server.
Chapter 2 Remote Administration Using the HP Integrated Remote Assistant Event notification. Integrated RA will page administrators when an event occurs that has been specified for notification. With notification, valuable administrator time is freed from constant surveillance of the server and server down-time is kept to a minimum. An administrator can enable or disable paging for event categories with the Configuration Utility or from the remote client.
Chapter 2 Remote Administration Using the HP Integrated Remote Assistant • An HP NetServer Navigator Utility Partition, or 32 MB of disk space available in a bootable DOS Partition installed on the hard disk (required for DOS file transfers, and running HP DiagTools diagnostic software). • An HP NetServer Navigator CD-ROM Version L.18.20 or later. (Check the version number printed on the CD-ROM opposite the HP logo.) • Window NT and 2000 only: 16 MB of disk space for pcAnywhere.
Chapter 2 Remote Administration Using the HP Integrated Remote Assistant Remote Client Installation Requirements For the remote client, you can use any ANSI X3.64 compatible terminal or terminal emulator with a modem or RS-232 connection. For best results, use an ANSI color terminal that supports 25-line mode and IBM PC character set, the configuration supported by the pcAnywhere terminal software.
3 Integrated RA Setup and Configuration This chapter provides instructions for setting up your HP NetServer's Integrated RA to enable remote management of the server. (See Chapter 4 for information on installing Integrated RA software.) To install and configure Integrated RA you must also either set up a modem or configure a direct (null modem) connection.
Chapter 3 Integrated RA Setup and Configuration Setting Up the Remote Connection You first need to set up a remote connection that enables the server to communicate with a remote client. There are three possible options for setting up the server for remote connection.
Chapter 3 Integrated RA Setup and Configuration Figure 3-1. Remote Connection Through an External Modem Using a Direct Serial Connection Instead of setting up modem communications, you can use a null modem cable to connect the server directly to a terminal through each computer's Management Port. You can use this type of connection when you want to communicate with the server through the Integrated RA at the same site as the server.
Chapter 3 Integrated RA Setup and Configuration Figure 3-2. Direct Connection with a Null Modem Cable Configuring a Null Modem Cable In a direct connection, the null modem cable has key signals crossed to make the terminal appear as if it were a modem. The figure below illustrates the cable configuration required for making a direct connection to the Integrated RA. Figure 3-3.
Chapter 3 Integrated RA Setup and Configuration Figure 3-4. Minimal Null Modem Cable Configuration When Integrated RA enables the Management Port by asserting DTR, it automatically recognizes that DCD, DSR, and CTS are enabled and establishes the connection. Using Integrated RA With Terminal Servers Although the Integrated RA may be used with dial-in phone lines, in high security environments this may not be an option.
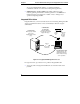
Chapter 3 Integrated RA Setup and Configuration Central Management Site LAN Remote Site LAN Management Client Clients WAN NetServers Terminal Server RS-232 RS-232 Figure 3-5. Using Integrated RA with a Terminal Server For more information, see the "Using HP Remote Assistant with Terminal Servers" application note under the Support section of the HP NetServer Web page at www.hp.com/go/netserver.
Chapter 3 Integrated RA Setup and Configuration Configuring Integrated RA During the initial server setup, you run the Integrated RA Configuration Utility to configure server management operations including: • Verify Management Port settings • Set up an administrator list for system access and pager notification • Configure event management operations, including the enabling of paging • Test Integrated RA functions • Configure communications for the external modem or direct serial connection • Specify a
Chapter 3 Integrated RA Setup and Configuration Parameter Setting Status Enabled Base IO address 2F8 Interrupt IRQ3 This sets the Management Port to COM2. You can change these settings to resolve a resource conflict with another device installed in your server. If you choose to set Management Port to "Disabled," pcAnywhere Host and DOS file-transfer capabilities are rendered non-functional. However, all other port features will still function.
Chapter 3 Integrated RA Setup and Configuration Replication Setup 3. Click either Guided or Custom Setup, then select the NOS to be installed on your HP NetServer. If you select: Guided Setup, the installation proceeds automatically until it's time to configure the Integrated RA. Run the Remote Management Controller Configuration utility. Custom Setup, click the Remote Management Controller Configuration utility.
Chapter 3 Integrated RA Setup and Configuration • Administrator information, including login names, passwords, dial-back numbers, and pager configuration • Server identification data including server name and ID. You can also select keyboard mapping options. • Events that will initiate a page. Events can be categorized by severity. • Version information for Integrated RA utilities. NOTE Before closing any of the utility's windows you are prompted to save the changes you have made.
Chapter 3 Integrated RA Setup and Configuration Configuring Communications/Modem For Integrated RA to perform notifications and interact with administrators at remote clients, you must configure it for communications by identifying the type of data link, and, in the case of modem communications, you need to specify modem and speed settings. Figure 3-7. Connection Mode Window To configure a data link: 1. Choose Configure Communications/Modem. The Connection Mode Window appears providing two options.
Chapter 3 Integrated RA Setup and Configuration Figure 3-8. Configuring Communications Window 1. Identify the modem you will be using for remote connections. Highlight the "Select Modem" field and press Enter. A Modem List window appears providing you with a list of modems supported by HP (also listed in Appendix B). Figure 3-9. Select a Modem Window 2. Choose one of the supported modems listed by highlighting it and press Enter.
Chapter 3 Integrated RA Setup and Configuration (which you may modify). If the modem you are using does not appear on the modem list, select Generic Hayes-Compatible and refer to your modem documentation for an appropriate initialization string. 3. After setting up your modem, click OK. You are prompted to save the settings. Choose Yes. Modem selection and configuration is complete.
Chapter 3 Integrated RA Setup and Configuration Table 3-1.
Chapter 3 Integrated RA Setup and Configuration Figure 3-10. Administrator Settings Window You will need to supply a name that identifies the administrator, a password that the administrator can use to log in and, if you choose, a dial-back telephone number. If the administrator will be using a pager, you need to list a telephone number for event notifications, and specify the type of pager to be used.
Chapter 3 Integrated RA Setup and Configuration Figure 3-11. Edit Administrators Window Changing the Password Select the " Password" field and press Enter to set a new password. The Configuration Utility displays the Set Password window which you can use to specify a new password. Note that there is a five-character minimum length for your password. Entering a Dial-back Number Enter a dial-back number to allow Integrated RA to call back to the remote client.
Chapter 3 Integrated RA Setup and Configuration with Integrated RA) use the default setting , PC Code Page. If your terminal or terminal emulator does not support 25 lines or the extended PC character set, select "24 lines" or "ISO Latin 1". For terminal mode, you can specify either 24, 25, or 50-line displays. If you will use the pcAnywhere application provided with Integrated RA, choose the default Terminal Settings.
Chapter 3 Integrated RA Setup and Configuration Server with Integrated RA "Server Error" event occurs Paging software with access # TAP Message Modem TAP Pager Server Error Server Error Service Provider receives TAP message, then transmits TAP or SMS Tower Mobile Phone with SMS Figure 3-12. Event Notification Via TAP-based Alphanumeric Paging Entering a Numeric Pager Number After setting pager mode to Numeric, tab to the "Modify Pager Settings" field and then press Enter.
Chapter 3 Integrated RA Setup and Configuration XXXXX YYYYY XXXXX = a five digit number identifying the server on which the event occurred (you set this using the Server Identification command) YYYYY = a five digit number identifying the event. When an event tagged for paging occurs, Integrated RA dials the specified numeric pager number(s) and sends the appropriate codes for the server and the event. (See Appendix A for a description of event codes.
Chapter 3 Integrated RA Setup and Configuration Entering a TAP Pager Number After setting pager mode to TAP, tab to the "Modify Pager Settings" field and then press Enter. The TAP Pager Settings dialog box appears: Figure 3-13. TAP Pager Settings Pager Phone Number Enter the service provider's TAP pager phone number. (TAP pagers require only a phone number for the service. There is no need to enter confirmation codes or commas.
Chapter 3 Integrated RA Setup and Configuration Modem Dial Prefix Enter a custom prefix or tab to the second option in this field and press Enter for a list of default prefixes. The Modem Dial Prefix is the initialization string that configures the modem specifically for TAP paging. The modem initialization string specifically resets the modem for relatively slow TAP paging operations which normally operate at 300 baud.
Chapter 3 NOTE Integrated RA Setup and Configuration Before testing Integrated RA's paging feature, be sure to inform the qualified administrator of the test page code and ask him or her to contact you directly upon its receipt. When the paging is complete, the Configuration Utility displays a dialog box informing you that the page was sent.
Chapter 3 Integrated RA Setup and Configuration Selecting Keyboard Layouts If you are using a keyboard other than a standard U.S. keyboard on the host server, you can use the Change Keymap option to select a keyboard layout that matches the keyboard driver being used by the server's operating system. This allows you to use Integrated RA's Remote client feature without having to reconfigure the server keyboard driver.
Chapter 3 Integrated RA Setup and Configuration Figure 3-16. Configuring Page Events Window NOTE All Integrated RA Events can also generate traps on an SNMP Management client. Also note that Event Management parameters can be configured from a remote client. For more information on alarms and on configuring settings remotely, see Chapter 5. The Configure Paging Events window allows you to specify which categories of events will initiate pages to administrators who have paging enabled.
Chapter 3 Integrated RA Setup and Configuration • Security • System Status • Disk Drives & Controllers • Network Interface Controllers • Other For a descriptive list of page-supported events organized by category, see Appendix A. An event is also classified as a "warning" or "critical" depending on whether it has exceeded the warning or critical thresholds set by HP. Warning events will not disable system operations. Critical events may cause the server to stop functioning and require immediate attention.
Chapter 3 Integrated RA Setup and Configuration . Figure 3-17. Version Information Window The Version Information window displays information that the Configuration Utility found after checking the installation. Display fields include: • Integrated RA Software Version number • Integrated RA Firmware Version number • HP Copyright information Exit When you choose the File menu, the utility displays a menu that you can use to save and restore Integrated RA configuration parameters in a DOS file.
Chapter 3 Integrated RA Setup and Configuration NetServer Navigator Utility Partition that will store a range of utilities that will allow you to: • Update the system BIOS • Run DiagTools diagnostic software • Integrated RA utilities • Run troubleshooting utility • Run HP Disk Array utilities The Navigator program remembers where you left off and returns you to either the Guided or Custom Setup configuration screen. NOTE Utility Partition installation or updating is disabled in the SCO UNIX environment.
Chapter 3 Integrated RA Setup and Configuration 1. Boot your HP NetServer to DOS. 2. Use the DOS mkdir command to create a subdirectory called HPRA. At the DOS prompt, type: c:\mkdir hpra DOS creates the subdirectory HPRA. 3. Copy the following files from HP NetServer Navigator CD-ROM directory \server model\RA to the HPRA subdirectory you just created. Server model is your NetServer model name such as LC2 or LH3. raxfer.exe fxferus.cat 4. Add the path C:\HPRA to your path environment. Open autoexec.
4 Setting Up Console Redirection for Microsoft Windows Servers This chapter describes how to set up your Microsoft Windows NT or 2000 server and remote client for server management. Once you've installed the Integrated RA software on your Windows server and configured it, you need to install communications software at both the server and the remote client. HP recommends use of the pcAnywhere that is included with your NetServer.
Chapter 4 Setting Up Console Redirection on MS Windows NT Servers Installing pcAnywhere on the Server For Microsoft Windows NT and 2000, to allow for console redirection (the ability to redirect what's graphically displayed on your server) over the modem, you must install the host software, included with your system, on your server. NOTE Remember that Integrated RA's software license authorizes a single administrator for each copy of software (including Symantec's ).
Chapter 4 Setting Up Console Redirection on MS Windows NT Servers For Windows NT, copy the files to: C:\Winnt\Profiles\All Users\Application Data\Symantec\pcAnywhere For Windows 2000, copy the files to: C:\Documents and Settings\All Users\Application Data\Symantec\pcAnywhere NOTE If Windows is not installed on drive "C", substitute "C" for the drive where windows is installed. 6. Change the attribute of this file from read only to read and write. Now you can launch pcAnywhere. 7.
Chapter 4 Setting Up Console Redirection on MS Windows NT Servers Figure 4-1. pcAnywhere Server Side Toolbar You will see a "Add Be a Host" item and a connection item labeled "RAServer". 9. Right-click the "RAServer" item to display the item's drop-down menu. 10. Click Properties. pcAnywhere displays the parameters currently stored for the connection item. 11. Click the "COM2" checkbox. NOTE 44 If you are running NT 4.
Chapter 4 Setting Up Console Redirection on MS Windows NT Servers 12. Click Details and verify that the COM port speed matches the speed you entered in the Integrated RA Configuration Utility. This will make the COM port behave like a direct connection. 13. Click the Settings tab, and click the checkbox "Launch Host at Startup". 14. Click OK to return to the main program window. 15.
5 Setting Up the Remote Client This chapter describes how to set up a remote client to communicate with the Integrated RA accessory integrated into your HP NetServer. Installing the remote client software is the second part of the installation process. After you have set up your remote management client, you can begin managing your server as described in Chapter 6.
Chapter 5 Setting Up the Remote Client Option 1: Managing a Server Remotely Using pcAnywhere If you will be managing your server from a Windows NT 4.0, or Windows 95, 98 or 2000 PC client, install pcAnywhere. pcAnywhere allows terminal emulation and, for Windows NT and 2000 servers, graphics console redirection. NOTE Remember that the software license authorizes the installation of pcAnywhere on one remote client and one HP NetServer.
Chapter 5 Setting Up the Remote Client 2. Type: x:\util\pca32\us\disk1\setup where x: is the driver letter of the CD-ROM. 3. Choose "Typical" install and follow the on-screen instructions to complete installation of pcAnywhere. 4. Go to \UTIL\PCA32\US\HPEXTN directory on the HP NetServer Navigator CD and double click on the file "HPPCA.REG". This will create three new registry entries under the OnlineService Key under pcANYWHERE\CurrentVersion. 5.
Chapter 5 Setting Up the Remote Client 8. The first time you start pcAnywhere, the Smart Setup Wizard helps you configure your system by prompting you for basic information such as COM port and modem specifications. 9. After running the Smart Setup Wizard, the pcAnywhere main program window appears. Figure 5-1. pcAnywhere Main Screen 10. Go to Tools | Scripts and browse to the directory to which you copied the files from the Navigator CD.
Chapter 5 Setting Up the Remote Client à Go to Tools | Application Options... à Click the Button Bars tab à Check the "Call online service" option 2. At the main program window action bar, click Call Online Service. You will see an "Add Online Service" item and a connection item labeled "RAClient" created for you by the Smart Setup Wizard (see figure below). Figure 5-2. pcAnywhere Screen with Call Online Service Button Added 3.
Chapter 5 Setting Up the Remote Client 6. Click the Session tab. Check the "Use macro key file" option and browse the directory that you copied the HP Navigator CD files to and select Extnd.mk7. This enables redirection of simple keystrokes such as F12, Alt-F, and Page Up. 7. Click OK to return to the main program window. 8. If you wish to rename the connection item to something other than "RAClient," right-click the connection item and then click Rename. Type in the new name. 9.
Chapter 5 Setting Up the Remote Client • If you are using an HP-UX workstation as a remote client, see the section "Connecting to Integrated RA from an HP-UX Workstation," later in this chapter. The remote client display will more closely resemble the actual server display if you use a PC-based color ANSI terminal emulator that supports 25 lines and the PC character set. The tables below provide the terminal settings and parameters you should configure for using the Integrated RA. Table 5-1.
Chapter 5 Setting Up the Remote Client strings; if this is not possible on your terminal you will need to send strings manually. See Appendix D for a list of character strings you can use to emulate special keys on the server keyboard. Connecting to Integrated RA from an HP-UX Workstation If an HP-UX workstation running HP Visual User Environment (HP VUE) will serve as your remote management client, you can connect to Integrated RA and start a communications session using the xterm terminal emulator.
6 Using Integrated RA to Manage Server Operations Once pcAnywhere (or a third-party terminal emulation program) is running on the remote client, a qualified administrator (configured in the Integrated RA Configuration Utility) can log into the server and begin using Integrated RA to observe server operations and otherwise configure or manage the server.
Chapter 6 Using Integrated RA to Manage Server Operations pcAnywhere, you perform this operation by right-clicking the connection item. Select the option "Wait for Connection.") The Integrated RA will call back in about 15 seconds. When call-back occurs, press Enter to display the main menu. MAIN MENU Server Name: HP NetServer, Server ID: 001, RA Firmware: A.00.01 1. 2. 3. 4. 5. 6. 7. 8. 0.
Chapter 6 Using Integrated RA to Manage Server Operations EVENT LOG Event Total Entries 212 Displaying Entries 197...
Chapter 6 Using Integrated RA to Manage Server Operations • (,) for older events. Page down for older events . • (.) for newer events. Page up for newer events . • (0) Return to the Main menu. Returns you to the Integrated RA Main menu. NOTE If the modem is occupied by a remote connection and the message "ALERT PENDING" appears in the Main menu, an event has occurred for which Integrated RA will not send a pager notification. However, the event will appear in the log of events as having been paged.
Chapter 6 Using Integrated RA to Manage Server Operations 2. Show Status When you choose Show Status from the Main Menu, Integrated RA displays information about the current status of the server. For example: STATUS Date: 03/11/98 21:40:44 Management Port: COM2, Base I/O Address 2F8, IRQ 3 Server Voltage Levels Sys Bd +5V 5.022 V Sys Bd +12V 12.02 V Sys Bd +3.3V 3.
Chapter 6 Using Integrated RA to Manage Server Operations long as pcAnywhere is also installed on your server. Using these two methods you can accomplish many of the tasks you normally perform at your server. Additional tasks may be performed using the Management Port Passthru option explained later in this chapter.
Chapter 6 Using Integrated RA to Manage Server Operations Switching to Text Mode in OS/2 If your server is running IBM OS/2, you can create a hot key to invoke an OS/2 full screen session. Using the hot key, you send a series of keystroke combinations from the remote client which then invokes a full screen session. To create the hot key: 1. In OS/2 right-click the desktop to display the primary Desktop menu. 2. Click the Open arrow. (Skip this step if you are using OS/2 Warp.) 3. Click Settings. 4.
Chapter 6 Using Integrated RA to Manage Server Operations Table 6-1. OS/2 Full Screen Keystroke Combinations Local Remote 1. Alt Esc Ctrl-A Esc Esc 2. Ctrl Esc Ctrl-D Esc Esc 3. Home Esc [ H 4. Enter Enter 5. Ctrl-\ Ctrl-D \ 6. Shift F10 Ctrl-F a Ctrl-F 0 7. {hot key} {hot key} Windows Graphics Console Redirection You can use Integrated RA to redirect the entire console including mouse control and all graphic screen elements to a remote terminal.
Chapter 6 Using Integrated RA to Manage Server Operations 3. When you are ready to disconnect, click the End Session button. Windows displays the End Session Window 4. In the End Session Window, do not disable the "Host Accepts Another Call" checkbox. Use the default option for the checkbox which is enable. Note that ending a Windows Console Redirection session ends your remote connection. To re-initiate a remote connection to your server, rerun pcAnywhere and log back into the server.
Chapter 6 Using Integrated RA to Manage Server Operations directed to the remote client. To quit console redirection, at the remote client, press [Ctrl-B]. • Power Cycle. Use this option to fully reinitialize all server hardware. This option turns the server off for about 15 seconds and then cycles it back on. All server hardware is reinitialized and the operating system reboots. • Power Up. This option powers on the server. • Power Down. This option powers off the server. • Graceful Reboot.
Chapter 6 NOTE Using Integrated RA to Manage Server Operations The Shutdown Agent is not supported on the OS/2 and Banyan operating systems. If the Shutdown Agent is not running, Graceful Reboot is equivalent to Hard Reset, and Graceful Shutdown is equivalent to Power Down with a timeout of a few minutes. Type a reset option number to begin the operation.
Chapter 6 Using Integrated RA to Manage Server Operations 6. Event Management Configuration Integrated RA provides a menu of server events that Integrated RA can monitor and manage if you so choose. NOTE The event management settings listed below can also be configured by running the Integrated RA Configuration Utility at the server on which Integrated RA is incorporated. For more information on using the Integrated RA Configuration Utility, see Chapter 3.
Chapter 6 Using Integrated RA to Manage Server Operations If the Integrated RA SNMP agents are loaded, server events can also generate SNMP traps on the above events to a management client connected to the network. For more information on using the Integrated RA SNMP agent, see the section, "Using SNMP Server Management Applications with Integrated RA" later in this chapter. 7.
Chapter 6 Using Integrated RA to Manage Server Operations Changing Administrator Data (Add, Delete, Modify) If you enter the number of an administrator record to modify, Integrated RA prompts you for the password for that user. You will then see a list of administrator details to modify. (You can add a new administrator by overwriting the data for an existing user, or by entering a number in an empty record.) To delete an administrator record, type the number of the administrator. Enter the password.
Chapter 6 Using Integrated RA to Manage Server Operations ADMINISTRATOR MODIFICATION Administrator Number: 3 (1) Name: Bob (2) Password: ******** (3) Dial-back Number: 555-1872 (4) Terminal Lines: 24 (5) Terminal Color: C (6) Terminal Charset: PC Code Page 850 [Native PC] (7) Pager Number: 555-8765 (8) Pager Type: TAP Alphanumeric Paging Configuration (a) TAP Pager ID: 3342 (b) TAP Password: (c) TAP Language: English (d) TAP Charset: ASCII (e) TAP Modem Init: (f) TAP Frame: 7/e/1 [default] (-) Delete thi
Chapter 6 Using Integrated RA to Manage Server Operations 3. At the remote client, exit pcAnywhere and start the client application (this should be done without disconnecting the client modem; set up the modem so that it does not disconnect on dropped DTR (AT&D0) and set up the client application to use a direct serial connection, not a modem). 4. Your client and server application can now interact as if over a direct serial connection.
7 Troubleshooting This chapter provides some guidelines for troubleshooting Integrated RA. Modem The external modem is not responding to Integrated RA. Make sure you are using the proper cable to connect the Integrated RA to the modem. For more information, see the section "Connecting through an External Modem," in Chapter 3 of this document. My external modem is not on the tested list.
Chapter 7 Troubleshooting 1. The modem is not connected to the Management Port.. 2. The modem is not turned on.. 3. Either the Modem Init string or the TAP Dial string contains an invalid command for your modem . 20202: No Connection Event code 20201 occurs when one of the following conditions is detected: 1. The paging service is busy and thus was unable to connect. 2. Your modem is not plugged into the phone line. 3. The paging service may be inactive.
Chapter 7 Troubleshooting 1. The TAP ID may be incorrect. Call your service provider and ask them to send you a test message. This can help determine if the problem lies with your service provider, or if you are using an invalid Pager ID number. 2. The message is too long. To make it shorter, try shortening the server name to less than 16 characters (for services that support 80 character messages). 3. Your service is currently not accepting messages. Try to send your message later.
Chapter 7 Troubleshooting While using console redirection, I start up Microsoft Windows but do not see any graphics. Windows graphics console redirection is managed via pcAnywhere. Select "NT Graphics Console Redirection" from the Console Redirection menu. When connected to Integrated RA, I am logged off after several minutes of inactivity. Integrated RA automatically terminates a connection after five minutes of inactivity. This is a security feature that protects server access by unauthorized users.
Chapter 7 Troubleshooting I successfully sent a file to the server but don't know where it is stored. If you chose the XModem option, the file is in the path and under the filename you specified. If you did not provide a path or used the ZModem option, the file is stored in the current server directory. If you transferred a file to the Utility Partition, it is stored in the directory of the utility you selected.
A Event Codes The table below describes the event codes that can be sent via pager or listed in the event log. When Integrated RA sends a page about a server event, it includes the server identifying number and a five-digit code identifying the event. (If you have a TAP pager, you will receive the server name and some descriptive text as well.) Note that NetServer Agents software will need to be loaded on your server in order to receive an event notification for most of the events listed below.
Appendix A Pager Code Server Event range. A fan sensor in the server has gone far outside the factory specified 004XX range. 004XX Fan sensor crossed lower non-recoverable threshold 004XX Fan sensor crossed upper non-critical threshold 004XX Fan sensor crossed upper critical threshold 004XX Fan sensor crossed upper non-recoverable threshold Two or more of the fans in the Processor/PCI Fan Tray have stopped 004XX or have been removed. 004XX Fan problem in Processor/PCI Fan Tray has been corrected.
Appendix A Pager Code 00823 00824 00825 00826 00900 00901 00902 00904 00905 00906 01070 01107 01109 01111 01200 01201 01201 01202 01203 01300 01301 01320 01321 01322 01323 01400 01520 01600 01601 01602 01620 01700 01701 01702 01703 01704 01705 01706 01800 01801 01900 01901 01902 01903 01904 01905 01906 01907 Event Codes Server Event A power supply's 3.3 volt supply has gone bad. A power supply's 5 volt supply has gone bad. A power supply's 12 volt supply has gone bad.
Appendix A Pager Code 01908 01916 02100 02101 02502 02516 0274X 0274X 0274X 02840 02841 03300 03300 03305 03305 03406 19900 19901 19902 20000 20001 20002 20003 20004 20005 20006 20100 20101 20102 20103 20104 20105 20106 20107 20108 20201 20202 20203 20204 20205 20206 20300 20301 20302 20303 20400 20401 20402 20403 80 Event Codes Server Event Uncorrectable Bus Error IPMB Protocol Error SCSI Duplex Board has been removed SCSI Duplex Board has been inserted Cache Protocol and Parity error ACPI hardware fai
Appendix A Pager Code 20404 20405 20406 20902 20903 20905 20906 21001 21002 21008 21112 21113 21114 21115 21100 21101 21107 21108 21109 21110 21111 21116 21117 21118 21119 21120 21121 21122 21123 21124 21125 21126 21130 21131 21138 21139 21140 21141 21142 21143 21144 21145 21146 21147 Event Codes Server Event Remote Control Card battery disconnected Remote Control Card configuration reset to defaults Remote Control Card: DHCP has assigned a new IP address Primary Hot Swap Cage Controller firmware updated
Appendix A Pager Code 21202 21203 21204 21205 21206 21207 21208 21209 21210 21211 21212 21213 21214 21215 21201 21216 21217 21218 21219 21220 21221 21222 21232 21233 21234 21235 21236 21237 21238 21239 21240 21241 21242 21301 21320 21321 21322 21323 21324 21325 21326 21327 82 Event Codes Server Event NetRAID: Change in state of physical drive NetRAID: Change in state of logical drive NetRAID: Logical drive initialization Started NetRAID: Logical drive initialization completed NetRAID: Logical drive init
Appendix A Pager Code Server Event The LAN adapter has detected a network fault. Data transmission 21328 was stopped. The LAN adapter has detected a busy network. 21329 The LAN adapter has detected a performance problem associated 21330 with an inadequate number of receive buffers. The LAN adapter has detected a performance problem associated 21331 with an inadequate number of receive buffers.
Appendix A Pager Code Server Event The LAN adapter has detected a network fault. Data transmission 21368 was stopped. The LAN adapter has detected a busy network. 21369 The LAN adapter has detected a performance problem associated 21370 with an inadequate number of receive buffers. The LAN adapter has detected a performance problem associated 21371 with an inadequate number of receive buffers.
Appendix A Pager Code 21445 21446 21450 21451 21452 21453 21454 21455 21456 21457 21458 21459 21460 21461 21462 21463 21464 21465 21466 21467 21468 21469 21470 21471 21472 21473 21474 21501 21502 21503 21504 21505 21506 21507 21508 21509 21510 21511 21513 21517 21518 21519 Event Codes Server Event Autoloader Cannot Operate Without Magazine Autoloader Predicted to Fail - Call Helpline Library Has Drive Communications Fault Library Has Changer Mechanism Fault Library Has Hardware Fault - Reset Library Libr
Appendix A Pager Code Server Event Uninterrupted Power Supply: UPS is on bypass due to hardware 21520 failure Uninterrupted Power Supply: UPS put on bypass via software or 21521 front panel Uninterrupted Power Supply: UPS put on bypass via rear UPS switch 21522 Uninterrupted Power Supply: UPS has returned from bypass mode 21523 Uninterrupted Power Supply: Base module bypass power supply 21524 needs repair Uninterrupted Power Supply: Base module fan needs repair 21525 Uninterrupted Power Supply: Communicati
Appendix A Pager Code 21917 21918 21919 21920 21921 21922 21923 21924 21925 21926 21927 21928 21929 21930 21931 21932 21933 21934 21935 21936 21937 21938 21939 21940 21941 21942 21943 21944 21945 21946 21947 21957 21958 21959 21960 21961 21962 21963 21948 21949 21950 21951 21952 21953 21954 21955 21956 21964 21965 Event Codes Server Event FCArray: Expand capacity failed. FCArray:Command to physical device timed out. FCArray:Physical device command aborted. FCArray:Command was retried.
Appendix A Pager Code 21966 21967 21968 21969 21970 21971 21972 21973 21974 21975 21976 21977 21978 21979 21980 21981 21982 21983 21984 21985 21986 22300 22301 22302 22303 22304 22305 22306 22307 22308 22309 22310 22311 22312 22313 22314 22315 22316 22317 22318 22319 22320 22321 22322 22323 22324 22325 22326 22327 88 Event Codes Server Event FCArray: Battery Backup Unit power is OK. FCArray: Controller has been powered off. FCArray: Controller has been powered on. FCArray: Controller Online.
Appendix A Pager Code 22328 22331 22332 22333 22334 22335 22336 22337 22338 22339 22340 22341 Event Codes Server Event NETRAID: Failover disk changed NETRAID: File System changed NETRAID: Disk failure NETRAID: Normal I/O Resumed NETRAID: SNMP Agent Started NETRAID: Battery Charge Improving NETRAID: Battery charge is adequate NETRAID: Normal I/O Operations paused NETRAID: New Container Created NETRAID: Container Deleted NETRAID: Failure prediction tested NETRAID: Failure prediction threshold changed Seve
B Tested Modems The following chart lists modems tested by HP at the time this document was printed for use with Integrated RA. HP recommends that you use the same model (or at least the same brand) of modem at the remote client that you use at the server. Table B-1. Tested Modems Modem Model Initialization String (for PPP and Numeric Paging) Generic Hayes Compatible ATQ0V1X4S0=3&C1&D2 Diamond SupraExpress 56e SP (K56Flex) ATQ0V1X4S0=3&K3&C1\N2%C3+MS=V34 Hayes Optima 33.
C Keyboard Layouts Through the Configuration Utility (HPRAUTIL), Integrated RA allows an administrator to select a keyboard layout that matches the server keyboard. With the proper keyboard layout, Integrated RA is able to correctly interpret keystrokes sent to the server keyboard. Integrated RA includes support for France, Italy, Germany, Spain, United Kingdom, and United States keyboards. The graphics below provide layouts for each of the keyboards supported by Integrated RA.
Appendix C 94 Keyboard Layouts
D Keyboard Mapping When keyboard commands are redirected to the server keyboard from a remote client, keystrokes on a generic terminal emulation keyboard may not control all PC keyboard keys. Because there is no direct mapping between a generic terminal keyboard and a PC's keyboard, most special keys on the PC keyboard must be emulated using character strings.
E Software License, Warranty, and Support HP Software License Agreement ATTENTION: USE OF THE SOFTWARE IS SUBJECT TO THE HP SOFTWARE LICENSE TERMS SET FORTH BELOW. USING THE SOFTWARE INDICATES YOUR ACCEPTANCE OF THESE LICENSE TERMS. IF YOU DO NOT ACCEPT THESE LICENSE TERMS, YOU MAY RETURN THE SOFTWARE FOR A FULL REFUND. IF THE SOFTWARE IS BUNDLED WITH ANOTHER PRODUCT, YOU MAY RETURN THE ENTIRE UNUSED PRODUCT FOR A FULL REFUND.
Appendix E Software License, Warranty, and Support Copies and Adaptations. You may only make copies or adaptations of the Software for archival purposes or when copying or adaptation is an essential step in the authorized Use of the Software. You must reproduce all copyright notices in the original Software on all copies or adaptations. You may not copy the Software onto any public network. No Disassembly or Decryption.
Index Confirmation code, 31 A Administrator information configuring, 35, 68 editing, 27, 69 enabling/disabling pagers, 69 pager status, 29 Administrator list window, Configuration Utility, 27 ASR, viewing the last saved screen before ASR event, 58 Automatic Server Restart, about, 9 D Diagnostic commands Test Paging, 33 Dial Back Number option, 28 Direct connection communications parameters, 53 Direct serial connection, 15 Direct serial connection configuration, 25 disconnecting from the server, 71 Document
Index Quick Start steps, 1 Remote Client, 47 server software for Windows NT, 42 Windows, 41 Integrated RA configuring, 20, 38 feature overview, 8 setting up, 13 SNMP agents, 71 troubleshooting, 73 Integrated RA Configuration Utility, 19 Configuration Summary window, 38 Connection mode, 23 navigating, 22 Using, 21 Integrated RA features about the on-board processor, 8 automatic server restart, 9 console redirection, 8 diagnostic software, 10 DOS file transfer, 10 logging server events, 9 remote environmenta
Index P Pager numbers, entering a TAP pager frame setting, 33 Pager numbers, entering a TAP pager modem dial prefix, 33 Pager numbers, entering a TAP pager number, 32 Pager numbers, entering a TAP pager password, 33 Pager numbers, entering confirmation code, 31 Pager numbers, entering ID code or PIN, 32 Pager numbers, setting, 30 Paging enabling Aphanumeric paging, 32 enabling numeric paging, 29 Troubleshooting, 73 Password, changing, 28 pcAnywhere documentation, 7 pcAnywhere server installation, 42 Power
Index TAP paging, entering the pager password, 33 TAP paging, entering the pager phone number, 32 TAP paging, using with SMS, 29 Technical support, 101 Terminal Emulation, 47 Terminal emulation settings, 53 Terminal emulation, using a third party emulator, 47 Troubleshooting, 73 modem, 73 Notification, 73 remote client, 75, 76 TAP paging, 74 U Utility partition, accessing the server, 66 102 V Version information for Integrated RA, 38 Viewing the last saved screen before ASR event, 58 W Warranty informati