
HP Netserver Remote Administrator Guide


1
1 Quick Start
This chapter provides a quick overview of the steps required to set up and use your
HP Integrated Remote Assistant. If you have experience setting up computer
hardware and software, you can use the following section as a brief installation
guide. Before you begin, refer to the "Integrated RA System Requirements"
section in Chapter 2.
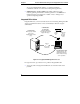
1. Install and set up hardware (see Chapter 3 for detailed instructions)
• Set up the modem or direct connection:
à To use an external modem: At the server, connect a serial modem
cable (not provided) to the Management Port and connect the other end
to the external modem (not provided). At the remote client, set up your
internal or external modem. Connect the server and remote client
modems to a phone line.
à To use a direct serial connection: Connect a null-modem cable (not
provided) to the Management Port and connect the other end to the
terminal.
2. Configure the server for remote access (see Chapter 3 for detailed instructions)
• Run the server's BIOS setup program by pressing [F2] when prompted
during boot up. Confirm that the Management Port is set to COM 2 (IRQ3,
Address 2F8h).
• Insert the HP NetServer Navigator CD-ROM into the server's CD-ROM
drive and reset the server.
• Choose Configure the Server from the Navigator Main Menu to setup:
modem type (or direct), administrator access (required), and paging
notification.
à If you use Guided Setup, you will be prompted to enter Integrated
Remote Assistant information.
à If you use Custom Setup, be sure to click Remote Management
Controller Configuration at the Custom Setup menu.
à Install the HP Utility Partition (or a DOS bootable partition for SCO
UNIX). If you do not, you will need to install a bootable DOS partition
later in order to run DOS-based server utilities remotely.