HP NetServer Ultra Hot Swap Hard Disk Drive and Tray HP Part Number 5969-5925 Printed in February 2000
Notice The information contained in this document is subject to change without notice. Hewlett-Packard makes no warranty of any kind with regard to this material, including, but not limited to, the implied warranties of merchantability and fitness for a particular purpose. Hewlett-Packard shall not be liable for errors contained herein or for incidental or consequential damages in connection with the furnishing, performance, or use of this material.
Contents 1 Installation Procedure................................................................................. 1 Installing the Hot Swap Hard Disk Drive in a Tray (optional) .......................... 1 Unpacking and Shipping................................................................................ 2 Installing the Hot Swap Hard Disk Drive ........................................................ 3 Removing the Hot Swap Hard Disk Drive ......................................................
1 Installation Procedure This guide describes how to attach an Ultra hot swap hard disk drive to a hot swap tray and install the hard disk drive in your computer. Additionally, this guide provides the cautions and instructions for removing and storing the hard disk drive. Installing the Hot Swap Hard Disk Drive in a Tray (optional) If you purchase a hot swap tray accessory (D3349B) separately from the hot swap hard disk drive, follow these steps to attach the tray accessory: 1.
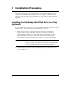
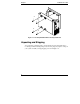
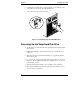
Chapter 1 Installation Procedure 2 3 1 4 Figure 1-1. Hot Swap Hard Disk Drive and Tray Installation Unpacking and Shipping Your system has a shipping plug to ensure that the hot swap hard disk drive is not damaged while it is being transported. Save this plug. If you plan to transport your system, reinstall your shipping plug as shown in Figure 1-2.
Chapter 1 Installation Procedure Figure 1-2. Shipping Plug Installing the Hot Swap Hard Disk Drive CAUTION Use one of the six (6) vertical shelves in the system. Do not attempt to install the hot swap hard disk drive in the horizontal shelves. Protect the hot swap hard disk drive from static electricity by leaving it in its antistatic bag until you are ready to install it. Before handling the hard disk drive, touch any unpainted metal surface to discharge static electricity.
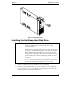
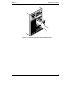
Chapter 1 Installation Procedure 3. Holding the hard disk drive as shown in Figure 1-3, slide the hot swap hard disk drive slowly into the shelf until it stops. 4. Press the lever down as far as it will go. Figure 1-3. Installing the Hot Swap Hard Disk Drive Removing the Hot Swap Hard Disk Drive 1. To unlock the hot swap hard disk drive, push the tab down and then lift the front lever. 2. Pull the hard disk drive out about an inch (2.5 cm) to break the power connection. 3.
Chapter 1 Installation Procedure Figure 1-4.
2 Disk Drive Characteristics The proper settings for the following items will depend on the operating system (NetWare, MS-DOS, OS/2, Windows NT, UNIX, or Banyan Vines) and corresponding version number: • Extended Translation setting for the controller • Partitions, logical drives or divisions for the hot swap hard disk drive For non-UNIX systems, partition and logical hot swap hard disk drive sizes also depend on: • Partition type (Bootable or Non-bootable) • File system (FAT, HPFS, NTFS) To determine the a
Chapter 2 Disk Drive Characteristics OS/2 and Windows NT NOTE Configure the controller with “Extended Translation for Drives > 1 GB ” enabled. Table 2-2. Partitioning Information for OS/2 and Windows NT 8 Maximum Bootable Partition Maximum Non-bootable Drive Operating System FAT or HPFS NTFS FAT HPFS NTFS OS/2 2.X 2 GB N/A 2 GB 64 GB N/A OS/2 Warp Family 2 GB N/A 2 GB 64 GB N/A Windows NT 3.1 2 GB 2 GB 2 GB Disk capacity Disk capacity Windows NT 3.
Chapter 2 Disk Drive Characteristics UNIX and Banyan Vines Table 2-3. Partitioning Information for UNIX Maximum Size Operating System Extended Translation for > 1 GB Drive Partition Maximum Number File system (division) Partitions on Disk Divisions in Partition 1 GB (root) 4 7 SCO UNIX 3.2.4.2 and ODT/OS 3.0 Disabled SCO UNIX 3.2v5.0 and OS 5.0.X Disabled Disk capacity 1 TB 4 7 UnixWare 1.1 Disabled Disk capacity 2 GB 4 16 slices UnixWare 2.0.
3 Application Alerts D4903A Cooling Requirements The D4903A mass storage device is the first of a family of high performance 10K RPM drives. Adequate cooling is very important. The D4903A drive is currently supported in the LH Plus, LH Pro, LD Pro, LX Pro, LXe Pro, and Storage System/6. The drive is not supported in the LH and LS. D3604A/B Storage System/6 using Ultra SCSI Drives Ultra SCSI is an industry standard for transferring data.
A Warranty and Support The hardware warranty below applies to components purchased as accessories. If your component was factory installed as part of a HP NetServer model, refer to the Warranty Statement provided with your system documentation. Hardware Warranty This HP NetServer accessory is covered by a limited hardware warranty for a period of one year from receipt by the original end-user purchaser.
B Regulatory Information DECLARATION OF CONFORMITY according to ISO/IEC Guide 22 and EN 45014 Manufacturer’s Name: Address: Hewlett-Packard Company 10955 Tantau Avenue Cupertino, CA 95052 declares, that the product Product Name: Hot Swap Hard Disk Drives Model Number(s): D3581A, D3582A, D3582C, D3583A, D3583C, D4289A D5039A, D6019A, D7050A Product Options: N/A conforms to the following Product Specifications: Safety: EMC: IEC 950:1991 + A1, A2 / EN 60950 (1992) + A1, A2 CISPR 22:1993 / EN 55022 (1