
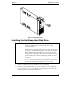
Ultra Hot Swap Hard Disk Drive and Tray


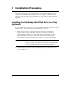


Chapter 1 Installation Procedure
3
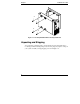
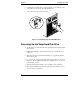
Figure 1-2. Shipping Plug
Installing the Hot Swap Hard Disk Drive
CAUTION Use one of the six (6) vertical shelves in the system. Do not
attempt to install the hot swap hard disk drive in the
horizontal shelves.
Protect the hot swap hard disk drive from static electricity by
leaving it in its antistatic bag until you are ready to install it.
Before handling the hard disk drive, touch any unpainted
metal surface to discharge static electricity. When you remove
the hard disk drive from the antistatic bag, handle it only by
the frame.
Do not touch the electrical components. Place the hard disk
drive on the antistatic bag whenever you set it down.
1. If there is a filler panel in the disk shelf, remove that panel.
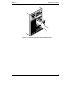
2. On the hot swap hard disk drive, press the locking tab down, and lift the
lever up as far as it can go. (See Figure 1-3.) Lifting the lever retracts the
locking pin at the top of the hard disk drive.