
Adding or Replacing PCI Hot Plug Boards


1
Hot Addition and Replacement of Hot Plug PCI Boards
For the PCI Hot Plug hardware included on the LH 3000, LH 6000, and LT 6000r, HP supplies a
PCI Hot Plug utility and services that run on Windows NT which you use to do Hot
Add/Replacements replacement of PCI Hot Plug boards, but in order to do this, each board must
have a Windows NT hot plug compliant driver. The Hot Plug Utility is used to turn power off/on to
the PCI slot, while the HP NetServer continues to operate normally.
NOTE These instructions apply to the PCI Hot Plug utility for the LH 3000, LH 6000,
and LT 6000. The LXr 8000 and 8500 use a different PCI Hot Plug utility.
Installing the PCI Hot Plug Software
Complete instructions for installing and using the HP-supplied PCI Hot Plug utility and services are
contained in the online help located on the HP NetServer Navigator CD-ROM under the
ha\nt40\php-2 directory. The software itself may be found in the Diskette Library on the HP
NetServer Navigator CD-ROM.
CAUTION Hot Removal or online deletion of an adapter board and deconfiguring of that
adapter from the NetServer is not supported.
Online Addition (Hot Add) of a PCI Hot Plug Board
To Hot Add a new PCI Adapter board:
1. Log on to Windows NT 4.0 as a user within the Administrator Group.
2. Open the NetServer chassis in order to access the hot plug PCI slots.
3. Locate an empty hot plug PCI slot. Be aware that some PCI slots are 3.3v slots which
accommodate only 3.3v or universal PCI boards.
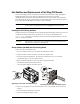
4. Rotate the purple locking lever next to the slot (see illustration below).
5. Lift the black retainer (see illustration below).
The green power LED next to the slot turns off.
Retainer
Locking
Lever
Opening the PCI Latch and Retainer (LH)
Opening the PCI Latch and Retainer (LT)
6. Remove the expansion slot cover. Retain the slot cover in case of future removal of the PCI
Adapter.
7. Insert the adapter board firmly into the slot.
8. Connect any applicable adapter cables.