
HP Netserver LP 2000r User Guide


Chapter 6 Installing an Additional Processor
50
Installing the Heatsink
After installing a new processor, you need to install a heatsink on top of the
processor. The thermal patch on the bottom of the heatsink provides thermal
bonding between the two components. The patch must be replaced if the heatsink
is removed (even temporarily) from the processor.
1. Remove the heatsink from the shipping container.
2. Inspect the thermal patch. Replace the patch if it is damaged:
a. Ensure that you are grounded with a static-dissipating wrist strap.
b. Remove the damaged patch. If you are reinstalling a heatsink on a
processor, use a lint-free cloth to remove any thermal material
remaining on top of the processor chip.
c. To install a new thermal patch, peel off the backing, and place the patch
in the area marked at the center of the heatsink.
CAUTION Heatsinks are not reusable unless the thermal patch is
replaced each time the heat sink is removed, even if it is
temporarily removed and reinstalled on the same
processor.
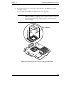
3. Install the heatsink:
a. Orient the heatsink with the tool latch is facing left, as shown in
Figure 6-4 and Figure 6-5. Then lower the heatsink squarely onto the
processor.
CAUTION Ensure the heatsink is seated properly on the processor.
If the heatsink is offset, there will be insufficient thermal
contact with the processor, which may result in
overheating, data corruption, and permanent damage to
the processor.
b. Hold the heatsink steady with one hand and press the hook latch down
to connect it to the tab. Then insert a flat-head screwdriver into the tool
latch and press the latch down to connect it to the tab.
See Figure 6-5.
4. Replace the air flow guide. Refer to Chapter 2, "Opening and Closing the
HP Netserver."