
HP Netserver LP 2000r User Guide


Chapter 8 Rack Mounting the HP Netserver (2-Post)
71
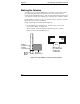
Preparing the HP Netserver
Before the HP Netserver can be mounted in the rack, you need to remove the
factory-installed chassis slides from the Netserver and install the flush-mount or
center-mount brackets.
1. Lay the HP Netserver on a flat surface.
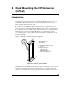
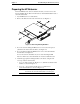
2. Remove the slides from the sides of the chassis. See Figure 8-3.
Figure 8-3. Removing Existing Hardware
3. If you are center-mounting the HP Netserver, remove the center spacers
(attached to the chassis under the slides). See Figure 8-3.
4. If you are flush-mounting the HP Netserver, remove front bezel and the
front brackets. See Figure 8-3.
Do not remove the front brackets if you are center-mounting the HP
Netserver. In this case, the front brackets are needed to attach the bezel.
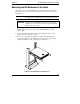
5. Attach the appropriate mounting brackets to the chassis, using the four
screws provided for each bracket:
◊ If you are flush-mounting the HP Netserver, attach the two flush-mount
brackets, as shown in Figure 8-4.
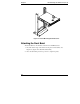
◊ If you are center-mounting the HP Netserver, attach the two
center-mount brackets, as shown in Figure 8-5.
NOTE The flush-mount brackets have pins for connecting the
front bezel; the center-mount brackets do not have pins.