
HP Netserver LT 6000r Installation Guide
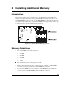


Chapter 5 Installing Additional Memory
47
2. Power off the NetServer according to instruction in Chapter 2, Controls,
Indicators, and Ports.
WARNING The power supply will continue to provide standby current to
the NetServer.
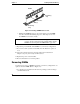
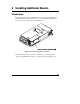
3. Slide out the server from the rack.
CAUTION The power supply will continue to provide standby current to
the NetServer.
4. Disconnect the power cords and cables and, if necessary, label each one to
support reassembly.
5. Slide out the NetServer from the rack.
6. Open the system board access panel. See Chapter 3, Opening and Closing
the HP NetServer.
NOTE While you can add memory with the system board assembly
installed in the chassis, it is recommended that you remove the
assembly to install memory in DIMM sockets A1 through A4.
WARNING Always disconnect the power cords before opening the system
board access panel to avoid exposure to high energy levels
that might damage equipment or cause personal injury.
Disconnect any telephone cables to avoid exposure to shock
hazard from telephone ringing voltages.
7. Open the retaining clips just enough so that you can lift the top edge of the
DIMM away from the clips.
8. Lift the DIMM completely away from the socket.
9. Place the DIMM in its anti-static container.
10. Repeat Steps 7 through 10 for as many DIMMs as you need to remove.