
HP Netserver LT 6000r Installation Guide

Chapter 6 Installing Additional Boards
58
Case 1: The accessory board can be installed in the tray while the NetServer is
mounted in the rack.
Case 2: The accessory board can only be installed in the tray while the NetServer
is not mounted in the rack.
Case 3: The accessory board is not installed in the tray, and the NetServer is not
mounted in the rack.
CAUTION * There is no support in Slot 1 for the "free" or hanging end
of the accessory board. Remove the accessory board when
shipping or relocating the NetServer.
** Damage might be incurred to the I/O board or I/O
baseboard when installing or removing an accessory board
from the tray.
Accessory Board Installation Instructions
1. Log off users and shut down the NetServer according to your NOS
instructions.
2. Power off the NetServer.
3. Disconnect the power cords and cables and, if necessary, label each one to
support re-assembly.
NOTE The power supply modules will continue to provide standby
current to the NetServer until the power cords are
disconnected.
4. Slide out the NetServer from the rack and open the accessory board access
panel.
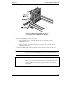
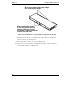
5. Release the PCI locking lever and open the retainer. The lever and retainer
are used to keep the accessory board in place and to activate the PCI slot
power switch and PCI LED on the rear panel.
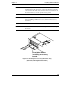
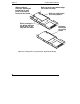
6. Remove the PCI slot cover from the NetServer’s rear panel before the
installing the accessory board.
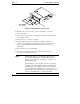
7. Seat the accessory board in the tray as shown in Figures 6-5 through 6-8.