HP NetServer LH 3000/3000r and LH 6000/6000r Power Supply Upgrade Guide HP Part Number 5969-2160 Printed in November 1999
Notice The information contained in this document is subject to change without notice. Hewlett-Packard makes no warranty of any kind with regard to this material, including, but not limited to, the implied warranties of merchantability and fitness for a particular purpose. Hewlett-Packard shall not be liable for errors contained herein or for incidental or consequential damages in connection with the furnishing, performance, or use of this material.
Contents 1 Introduction ................................................................................................. 1 Accessory Kit Contents.................................................................................. 1 Tools and Related Documentation ................................................................. 2 Contents of This Guide .................................................................................. 2 Precautions .............................................................
1 Introduction This guide describes how to install a power supply upgrade kit, HP Product Number D8551A, in an HP NetServer LH 3000/3000r or an HP NetServer LH 6000/LH 6000r. The power supply upgrade kit provides a redundant power supply that allows the NetServer to keep operating should one of the original power supplies fail.
Chapter 1 Introduction Tools and Related Documentation To install a redundant power supply, you need an anti-static service kit (3M 8501/8502/8503 or equivalent). This kit includes a static-dissipating mat.
Chapter 1 Introduction WARNING Before removing the cover, always disconnect the power cord and unplug telephone cables. Disconnect the power cord to avoid exposure to high energy levels that may cause burns when parts are short-circuited by metal objects, such as tools or jewelry. Disconnect telephone cables to avoid exposure to shock hazard from telephone ringing voltages. WARNING The power switch does not turn off the standby power. Disconnect the power cord to turn off standby power.
2 HP NetServer LH 3000/3000r: Installing a Power Supply and Fan To install a redundant power supply into an HP NetServer LH 3000/3000r, you will follow these steps: l Remove NetServer covers. l Install power supply fan module. l Install power supply. l Finish the installation. NOTE For instructions on installing a power supply and fan into an HP NetServer LH 6000/6000r, see Chapter 3. Remove NetServer Covers 1. Close all applications, log off all users, and power down the NetServer. 2.
Chapter 2 HP NetServer LH 3000/3000r: Installing a Power Supply and Fan 4. From the front of the NetServer, pull the NetServer forward until you hear the locking device engage with a click. 5. Remove the top cover by loosening the thumbscrew and lifting the cover away from the NetServer. Install Power Supply Fan Module The redundant power supply fan module allows the NetServer to keep operating in case the original fan fails. 1.
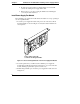
Chapter 2 HP NetServer LH 3000/3000r: Installing a Power Supply and Fan 4. Press the power supply fan module into the connector and swing down the hinged handle to lock the fan module into place. Open the hinge of the fan module, insert the fan, and close the hinge. Hinged panel rotates up as you insert the fan module. Figure 2-2. Install Redundant Power Supply Fan Module 5. If you have the rack-mounted version of the NetServer, slide the NetServer back into the rack chassis and secure it to the rack.
Chapter 2 HP NetServer LH 3000/3000r: Installing a Power Supply and Fan Install Power Supply 1. From the back of the NetServer, loosen the thumbscrews and remove a filler panel from the power supply bay. See Figure 2-3. NOTE You can install the redundant power supply in either of the open power supply bays. Thumbscrews Figure 2-3.
Chapter 2 HP NetServer LH 3000/3000r: Installing a Power Supply and Fan 2. Set the new power supply module in the open bay. See Figure 2-4. CAUTION When lifting a power supply module, be prepared to support its weight. Hold the power supply module with two hands. 3. Push in the power supply module, seat it firmly, and tighten the thumbscrews. Figure 2-4.
Chapter 2 HP NetServer LH 3000/3000r: Installing a Power Supply and Fan Finishing the Installation To finish the installation, do the following: 1. Replace the covers and bezel. 2. Replace all power, telephone, and I/O cables that you disconnected earlier. 3. Install the new power cord shipped with this upgrade kit. This power cord connects to the cage that holds power supplies 3 and 4. 4. Turn on power to the NetServer and check the LEDs on each power supply.
3 HP NetServer LH 6000/6000r: Installing a Power Supply and Fan To install a redundant power supply, you will follow these steps: l Remove NetServer covers. l Install power supply fan module. l Install power supply. l Finish the installation. Remove NetServer Covers 1. Close all applications, log off all users, and power down the NetServer. 2. Disconnect all power and telephone cords. WARNING Before removing the cover, always disconnect both power cords and unplug telephone cables. 3.
Chapter 3 HP NetServer LH 6000/6000r: Installing a Power Supply and Fan Install Power Supply Fan Module The redundant power supply fan module allows the NetServer to keep operating in case the original fan fails. 1. Locate the power supply fan module, and press down on the tab to unlock the hinged handle. As shown in Figure 3-1, this tab locks the handle in the closed position. Press down on the tab to unlock the hinged handle. Figure 3-1. Unlock the Hinged Handle on the Power Supply Fan Module 2.
Chapter 3 HP NetServer LH 6000/6000r: Installing a Power Supply and Fan Open the hinge of the fan module, insert the fan, and close the hinge. Hinged panel rotates up as you insert the fan module. Figure 3-2. Install Redundant Power Supply Fan Module 5. If you have the rack-mounted version of the NetServer, slide the NetServer back into the rack chassis and secure it to the rack.
Chapter 3 HP NetServer LH 6000/6000r: Installing a Power Supply and Fan Install Power Supply 1. From the back of the NetServer, loosen the thumbscrews and remove the filler panel from the power supply bay. See Figure 3-3. Thumbscrews Figure 3-3.
Chapter 3 HP NetServer LH 6000/6000r: Installing a Power Supply and Fan 2. Set the new power supply module in the open bay. CAUTION When lifting a power supply module, be prepared to support its weight. Hold the power supply module with two hands. 3. Push in the power supply module, seat it firmly, and tighten the thumbscrews. See Figure 3-4. Figure 3-4.
Chapter 3 HP NetServer LH 6000/6000r: Installing a Power Supply and Fan Finishing the Installation After installing the power supply and power supply fan module, do the following: 1. Replace the covers and bezel. 2. Replace all power, telephone, and I/O cables that you disconnected earlier. 3. Turn on power to the NetServer and check the LEDs on each power supply. When a power supply is operating correctly, its LED glows steady green.
4 Warranty and Support This HP NetServer accessory is covered by a limited hardware warranty for a period of one year from receipt by the original end-user purchaser. Once installed in an HP NetServer, this accessory may carry the longer of either a one-year warranty or the remainder of the warranty period for the NetServer in which it is installed. This accessory may be serviced through expedited part shipments.
5 Regulatory Information For regulatory information pertaining to this HP accessory, please refer to the regulatory section of your NetServer’s Installation Guide.
Index A accessory kit contents, 1 C Caution static electricity, 2 F filler panel removing from LH 3000, 8 removing from LH 6000, 14 I install power supply LH 3000, 8 LH 6000, 14 install power supply fan module LH 3000, 6 LH 6000, 12 P power supply installing in LH 3000, 8 installing in LH 6000, 14 power supply fan module installing in LH 3000, 6 installing in LH 6000, 12 Precautions static protection, 2 R regulatory information, 19 remove filler panel LH 3000, 8 LH 6000, 14 remove NetServer covers LH 3000,