
HP Netserver LP 1000r User Guide


Chapter 4 Installing Additional Memory
31
9. Remove a DIMM from its container, handling the module by its edges.
If not ready to install it, lay it on an anti-static surface until you are ready.
CAUTION Use only HP PC133 (133 MHz) buffered SDRAM DIMMs.
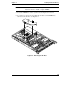
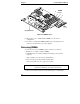
10. Align the notches on the DIMM with the keys on the slot. See Figure 4-3.
Retaining Latches (2)
DIMM Slot
Keys
Notches
Figure 4-3. DIMM to Slot Alignment
WARNING Ensure you hold the DIMM tightly as you push it into the slot.
It is possible to turn or bend the DIMM slightly while
inserting it, which would damage or break the DIMM socket.
If a DIMM socket is damaged, you must use another DIMM
slot or replace the entire HP Netserver, since this Netserver is
not repairable in the field.
11. Holding the DIMM at approximately 30° to the system board, press the
DIMM fully into the slot until the retaining latches close. See Figure 4-4.
If the latches do not close, the DIMM is not inserted correctly.
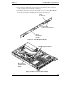
NOTE The system board is shown removed from the Netserver for
clarity.