
HP Netserver LP 1000r User Guide


Chapter 4 Installing Additional Memory
33
Refer to the appropriate chapter (Chapters 7, 8, or 13) for instructions.
4. Remove the top cover.
Refer to Chapter 2, "Opening and Closing the HP Netserver."
NOTE You do not need to remove the system board from the
Netserver chassis to install or replace DIMMs.
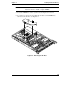
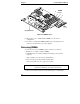
5. Locate the DIMM slots on the system board. See Figures 4-1 and 4-2.
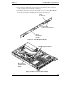
6. Loosen the two captive screws holding the air duct, which covers the
DIMM slots, and remove the air duct. See Figure 4-1.
7. Open the retaining latches.
8. Lift the DIMM completely away from the slot.
9. Place the DIMM in its anti-static container.
10. Repeat Steps 6-9 for as many DIMMs as you need to remove.
NOTE If there are no DIMMs installed when you power up the
Netserver, you will not get a display on the monitor, but you
will hear beep codes.