
HP Netserver LP 1000r User Guide


Chapter 7 Rack Mounting the HP Netserver (2-Post)
67
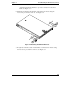
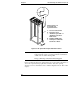
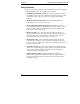
Figure 7-6. Flush Mounting in the Rack
3. Position the Netserver’s two flush mount brackets over the holes (1st &
3rd) on the face of the two columns. See Figure 7-6.
The masking tape or marking pen (marker) should provide the location of
the holes on the two columns. See Figure 7-2.
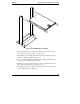
4. Insert one screw through each bracket into the column, preferably the top
or 1st hole on the column below the marker.
5. Turn the two screws enough with the Torx driver to hold the Netserver in
place, while you insert the two remaining screws.
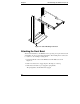
6. If mounting the Netserver with the center mounts, follow Steps 1-5 for the
center mount brackets. See Figure 7-7.