
HP Netserver LP 1000r User Guide

Chapter 8 Rack Mounting the HP Netserver (4-Post)
76
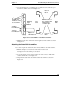
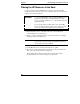
Release
Spring
Assembly
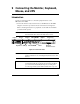
3/4 CCW
1/4 CW
Figure 8-2. Releasing Spring Assembly
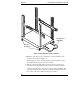
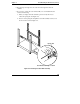
Marking the Columns
Use this section to mark the front and rear columns of the HP System/E or HP
System/U rack. The outer-rails mount to the face of the front columns and the
inside face of the rear columns. The masking tape (or marking pen) is used to
identify and mark the locations on the columns.
CAUTION If other rack components are to be mounted in the rack below
the HP Netserver, install those components before starting to
mount the Netserver.
NOTE Use the HP Rack Configuration Tools to determine where in
the rack to mount the HP Netserver. The tools are available at:
http://www.hp.com/netserver/support
1. Find the EIA unit markings on the rack and the location for the Netserver.
The screw holes cover a span of only one EIA unit, which is the height
requirement of the HP Netserver.
NOTE The Netserver can only be mounted into both holes of one EIA
Unit, but cannot be mounted across two EIA units. You cannot
use a hole in one EIA unit and a hole in another EIA unit.