Microsoft Cluster Installation Documentation To assist you in installing your HP NetServer Microsoft Cluster, this file contains three separate documents combined into one pdf file. • Configuration Guide - This guide provides configuration information specific to your cluster configuration that you will need during the installation of your cluster. • HP NetServer Microsoft Cluster Installation Guide - Use this document to install the cluster.
Version History 18 November 1998 Revised the Configuration Guide to add, “6 maximum per NetRAID adapter” to Logical Disks in Shared Storage.
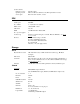
HP NetServer LXr Pro with NetRAID (HP Rack Storage/8) Cluster Configuration Guide 18 November 1998 Introduction This document defines the supported HP NetServer LXr Pro configurations for Microsoft Cluster Server. These configurations minimize single points of failure, provide maximum availability, and have been certified by Hewlett-Packard and Microsoft. This guide is prescriptive; it describes the HP NetServer LXr Pro configurations supported by HP.
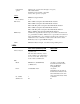
System software: Navigator version Operating System Service pack G.01.00 or later Microsoft Windows NT Server 4.0, Enterprise Edition or later SP3 and hotfix "clusfixi", or later SPU Model Clock speed No. of CPUs BIOS version CPU cache RAM No. of power supplies Local storage I/O slots: HP NetServer LXr Pro Model 1 200 MHz. 2 – 4 (at least 2 are required) 1.00.09CD0L or later Any size 128 MB minimum. Must be HP. 3 Internal or external, using any controller. Must use HP disks. See Local Storage below.
Configuration options: Cabinet Model No. of cabinets Disk drives: RAID arrays Cables Cluster mode on (cache write-through, no hot spare) Ultra SCSI disabled Termination: wide channel or automatic Set any other options as you prefer HP Rack Storage/8 D4902A 1-4 HP 2.1 GB Hot-Swap Ultra SCSI Disk Module D3582C HP 4.2 GB Hot-Swap Ultra SCSI Disk Module D3583C HP 4.2 GB 10K rpm Hot-Swap Ultra SCSI Disk Module D4903A HP 9.1 GB Hot-Swap Ultra SCSI Disk Module D4289A HP 9.
Shared Storage Cabling This part of the guide defines the allowable cabling configurations for clusters using the HP NetServer LXr Pro and HP Rack Storage/8s. Only these cabling configurations and cables are supported.
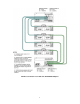
HP Microsoft Cluster Server with Two HP NetRAID Adapters 5
This page intentionally left blank.
HP NetServer LXr Pro Microsoft Cluster Installation Guide 18 February 1998
Notice The information contained in this document is subject to change without notice. Hewlett-Packard makes no warranty of any kind with regard to this material, including, but not limited to, the implied warranties of merchantability and fitness for a particular purpose. Hewlett-Packard shall not be liable for errors contained herein or for incidental or consequential damages in connection with the furnishing, performance, or use of this material.
Contents An Overview to Installing the Cluster 1 Introduction 1 Why Use This Guide? 1 Who Needs This Information? 1 A Graphical Overview to Setting Up the Cluster 2 What’s Needed? 3 Get the Latest Updates! 4 Need More Help? 4 Part 1 - Installing Additional Hardware Components 5 Part 2 - Setting Up the HP Rack Storage/8 and Rack-Mounting Cluster Devices 7 Setting up the HP Rack Storage/8 7 Rack-Mounting the Cluster Hardware 8 Part 3 - Configuring the HP NetRAID Adapter 9 Part 4 - Installing Microsoft Windows
An Overview to Installing the Cluster Introduction A HP NetServer LXr Pro cluster provides a reliable rack-mounted, increased availability solution for critical applications. The basic cluster consists of two HP NetServer LXr Pro systems coupled to HP Rack Storage/8 units. In the HP NetServer LXr Pro cluster, the operating system files, application files, and other files local to each node are stored using fixed or hot swap disks. Disks are located internally in the system.
A Graphical Overview to Setting Up the Cluster There are 8 major steps required to setting up a HP NetServer LXr Pro Microsoft Cluster Server. These steps are Getting Started and Parts 1-7. The Installation Work Flow diagram below provides a graphical overview of the tasks to be performed. As you proceed through these instructions, pay close attention to the order in which components are installed and configured and systems are powered up, powered down and rebooted.
What’s Needed? Addresses/Names During the course of cluster installation, be prepared to supply the following: • Minimum of three external IP addresses: one for each System (A and B) and one for the HP NetServer cluster client LAN. • Two internal IP addresses for the Intra-cluster LAN. One for System A and one for System B. (May use "hidden" or "intranet" addresses. See the MSCS Administrator’s Guide for a discussion of IP addressing.
Get the Latest Updates! To ensure that you have the latest technical information and the latest software refer to the HP web site for HP NetServer Clustering Solutions at: http://www.hp.com/netserver/products/cluster/ Need More Help? HP provides online documentation to ensure you have all the documentation you need. HP Information Assistant provides extensive support information and is available on the HP NetServer Navigator CD-ROM.
Part 1 - Installing Additional Hardware Components When HP NetServer LXr Pros are shipped from the factory, they are configured for stand-alone operation. The first step in creating a cluster is to install additional hardware that will allow the HP NetServer LXr Pros to share data and to communicate with one another and with the LAN. CAUTION NOTE Because these procedures involve opening the servers, HP recommends that you use a Portable Field Service Grounding Kit (3M part number 8505, or the equivalent).
3. Install the following types of components as provided using the instructions with each component. If necessary refer to HP Information Assistant for additional instructions: • Processors. Standard HP NetServer LXr Pros are equipped with either one or two Pentium Pro 200 MHz main processors. To operate a Microsoft Server Cluster, both HP NetServers must be equipped with dual Pentium Pro processors. • Main Memory.
Part 2 - Setting Up the HP Rack Storage/8 and RackMounting Cluster Devices In this step you will both setup the HP Rack Storage/8 units and install them and other cluster devices in the rack. Setting up the HP Rack Storage/8 Your HP Rack Storage/8 units will be used for shared storage in the cluster and must be set up for single bus operation. Although the HP Rack Storage/8 are shipped from the factory configured for single bus operations. Check their setup as outlined below and change them as necessary.
Rack-Mounting the Cluster Hardware At this point the cluster hardware is assembled and setup (including hardware enhancements to the HP NetServer LXr Pros) and ready to be mounted in the rack. Supported cluster hardware configurations have a specific number of devices and are cabled in a specific manner. Make sure you follow the documents specified in this section. To install the cluster hardware in the rack: 1.
Part 3 - Configuring the HP NetRAID Adapter In Parts 1 and 2 you installed additional hardware in your HP NetServers, setup both the HP NetServers and the Rack Storage/8 units for use in the cluster, and rack mounted the cluster hardware. In this part, you will configure the HP NetRAID Adapters you installed in Systems A and B. Configuring Your Systems NetRAID Adapter NOTE 1. Ensure that no SCSI cables are connected between Systems A and B (LXr Pros) and the Rack Storage 8 cabinets.
11. Repeatedly press the Esc key to exit the NetRAID Express Tools utility. When prompted to exit, choose Yes. 12. Press Enter to reboot System A, then repeat the above procedure for System B. 13. To save a reboot cycle of System B, in Part 4 insert the HP NetServer Navigator CD into the CD-ROM drive for System B at this time. 14. Reboot System B, and go to Part 4 - Installing Microsoft Windows NT, and NetRAID Software. The utility reboots to enable the changes you have made.
Part 4 - Installing Microsoft Windows NT and NetRAID Software After you have configured the HP NetRAID Adapter, you are ready to install Microsoft Windows NT Server, Enterprise Edition. Prior to Windows NT installation you will use the HP EISA Configuration Utility to configure the hardware for use with the network operating system. NOTE The procedures in this part must be performed on both Systems A and B. You will start with System B and then repeat the procedure on System A.
9. Before exiting Diagnostic Assistant, remove the HP NetServer Navigator CD from the CD-ROM drive NOTE Because your servers are not yet joined to the cluster, this is a good time to run all the tests including the SCSI Device Tests. Disregard any cautionary notes that discourage testing at this point. Installing and Configuring NOS on the Servers Install Windows NT Install Windows NT 4.0 on the system’s local storage (which is normally internal). The Windows NT 4.
Install Service Pack 3 Install Microsoft Service Pack 3 from the first CD of the Microsoft Windows NT Server, Enterprise Edition. Installing HP NetRAID Software and Configuring the Disk Arrays Install the NT NetRAID driver and NetRAID Assistant software to prepare the server for installation of the Microsoft Cluster Server software: Installing the NT NetRAID Driver To install the NT NetRAID driver: 1. At the Windows NT’s Control Panel start the SCSI Adapters utility. 2.
Updating HP NetServer BIOS Only perform this procedure if you were prompted that the BIOS on your server is an earlier version than the version on the HP NetServer Navigator CD. To update the HP NetServer BIOS: 1. When the server prompts you that the BIOS version is outdated, skip the Hardware Verification & Labeling Utility. 2. Choose Configuration Assistant, then select Custom. 3. Select Microsoft as your NOS and NT 4.0 as the version. 4.
Part 5 - Connecting Shared Storage and LAN Adapters Connecting the Shared Storage To cable the HP Rack Storage/8 cabinets to the LXr Pro NetServers: 1. If not already done, shutdown Windows NT, and power down Systems A and B. 2. If not already done, insert the hot swap disks into the HP Rack Storage/8 cabinets, but do not slide them all the way in so that they are operational. 3. For HP Rack Storage/8s to be used for shared storage, make sure that they are configured for single bus operation.
Part 6 - Configuring the Disk Arrays In this part you will connect operating power, power up the storage cabinets, and then configure the arrays. Powering Up the HP Rack Storage/8 To power up the HP Rack Storage/8s: 1. Check that power is connected to the HP Rack Storage/8s and that the two power cords for each HP Rack Storage/8s are on a separate circuit thereby supplying redundant power. 2. Turn on power for all the HP Rack Storage/8 cabinet(s).
Creating the Array File Systems Use the instructions below and Windows NT Disk Administrator to partition, assign drive letters, and format the shared logical drives. Reboot System A Reboot System A so that Windows NT can recognize the logical drives you just created in Defining RAID Arrays. The system boots and loads Windows NT on System A. CAUTION You must reboot System A to get accurate information about your shared disks, before you run Disk Administrator.
Creating Full Disk Partitions for each Array To create a partition for each shared array: 1. Click the disk box to select the shared array to be partitioned. Disk Administrator highlights the selected disk. 2. From Disk Administrator’s Partition menu, choose Create. A dialog appears indicating the maximum size of a single partition. NOTE 3. Don’t be mislead by the displayed disk capacity for your arrays.
4. Repeat the steps of this procedure to create a partition for each disk array to be shared by the cluster. 5. From Disk Administrator’s Partition menu, choose Commit Changes Now, then choose Yes to save changes and OK when prompted. At this point, all configurations are enabled by the network operating system. As shown in the example, Disk 2 has been partitioned and Disk Administrator assigned the next sequential letter to the disk array.
Disk Administrator, Assigning Drive Letters 4. Repeat the above steps of this procedure to assign a drive letter for each array to be shared in the cluster. Formatting Logical Drives To format a disk to be shared by the cluster: 1. Click a disk box to select one of the arrays that you just partitioned and assigned a drive letter. Disk Administrator highlights the selected disk. 2. From the Disk Administrator’s Tools menu, choose Format. A dialog appears with a list of formatting options.
5. Select Quick Format in the Format Options field, and then Start to begin formatting the logical drive. NOTE 6. No action is necessary for the Capacity and Allocation Unit Size fields. Repeat the above steps to format each drive to be shared in the cluster. The following example depicts both drives formatted and permanent drive letters assigned. Disk Administrator, Formatting and Assigning Volume labels 7. Exit Disk Administrator and go to the next procedure, Matching Drive Letter Assignments.
Reboot System B System B has been on hold at the loader prompt. Reboot System B. The HP NetRAID Express Tools displays its Management Menu. Checking and Assigning Cluster Drive Letters To check and assign drive letters at System B: 1. From the Windows NT Start menu, choose Programs|Administrative Tools|Disk Administrator. Windows NT Disk Administrator scans the disk array and displays the shared disks you initialized using System A.
NOTE To ensure that you are assigning drive letters to the correct disks compare the Volume Labels (names) you assigned using System A (for example, "Shared Drive X" in the above example). 5. Repeat the above steps of this procedure to make permanent drive letter assignments for each array initialized with System A. 6. When done, close Disk Administrator. The arrays are now fully configured for use by the cluster. 7.
Part 7 - Installing and Testing Microsoft Cluster Server (MSCS) Software During installation of MSCS software at System B, you will create a Microsoft Cluster Server. Initially, it is a cluster with only one server (System B). Later, you will join System A to the cluster and thus create a standard two-server (node) cluster. If you need more information about the installation process outlined here, see the Microsoft Cluster Server Administrators Guide.
4. Enter a name for the cluster. Make note of the name you enter here. You will need to provide the identical name during Microsoft Cluster Server software setup at System A. Click Next. 5. Setup prompts you for user and domain information. In the spaces provided in the dialog, provide a user name and password of your choosing, and identify an appropriate Microsoft Domain name for the cluster. Click Next.
• Use only for client access Choose this option if you are configuring a client LAN adapter and System A and B reside on different IP subnets. Microsoft Cluster Server Setup, Assigning a Network Name to the Intra-cluster LAN 9. Repeat the previous step for each LAN adapter. After you have configured all LAN adapters, click Next. 10. Setup lists your LAN adapters and asks you to prioritize them with reference to the cluster’s internal LAN. See the example dialog below.
11. Follow the on screen instructions to order the adapters so that the Intra-cluster LAN adapter is identified first (at the top of the list). After you have ordered the adapters, click Next. NOTE If you previously defined Systems A and B as residing on different subnets, the client LAN will be unable to assume responsibility for intra-cluster communication. 12. Setup prompts you for the Cluster IP address. Input the proper IP address and subnet mask for the CLUSTER.
Install HotFix Install the Microsoft hotfix clusfixi.exe on System A and System B. If you have not already downloaded clusfixi.exe, see Appendix E for instructions on downloading this hotfix file from the worldwide web. At this point, your cluster is operational. You are now ready to go to Testing the Cluster Installation to ensure that your cluster is fully operational. Testing the Cluster Installation There are two programs that can be used to test the installed cluster.
Hardware Verification and Labeling Utility The Hardware Verification & Labeling Utility scans the system and checks system integrity before you perform system configuration and will help you simplify the assembly process that must be performed while trying to setup a new Racks product.
APPENDIX A - Obtaining HP NetRAID Utilities To get updated versions of the HP NetRAID utilities that contain firmware, drivers and the HP NetRAID Assistant program, you must download, extract, and then copy nr_clust.exe, a special version of the HP NetRAID utilities optimized for cluster installations. To obtain NetRAID firmware, you need to download nr_clust.exe (release 1.0) from the HP’s FTP site. ftp://ftp.hp.com/pub/servers/software Once you have downloaded nr_clust.
APPENDIX B - Updating HP NetRAID Firmware What’s Needed The following items are needed to update the firmware: • HP NetRAID utilities disk labeled NR Firmware & Driver (see Appendix A) to upgrade the adapter firmware on both systems. • Current version of MSDOS in bootable 3-1/2" floppy disk format Updating the Firmware To flash the NetRAID adapter firmware: 1. Shut down the system (A or B) and boot to DOS. 2.
APPENDIX C - RAID Array Configurations This appendix provides instructions for using HP NetRAID Assistant to setup your HP NetServer cluster RAID levels. Using these instructions you can setup your RAID arrays for RAID 1 or RAID 5 or any combination of these levels. NOTE After you have finished defining and configuring the cluster’s arrays using HP NetRAID Assistant, you will need to return to Defining RAID Arrays in Part 6 and finish configuring the array using the Windows NT Disk Administrator utility.
The state... Indicates the drive is... Onln Online, functioning normally, and part of a configured array. Rdy or READY Functioning normally, but not part of a configured logical drive nor configured as a hot spare HOTSP Configured as a hot spare, powered up and ready for use (not Cluster supported). FAILED Out of service because a fault occurred. REBUILDING Rebuilding and salvaging data recovered from a failed drive.
Define an Array RAID arrays are defined using the Configuration Wizard. To define a RAID 1 array: 1. On the NetRAID Assistant’s menu bar click Configuration, then Wizard. 2. Select Custom in the dialog and click Next. The Configuration Wizard displays its Array Definition window. HP NetRAID Array Definition 3. In the Array Definition window define an array by selecting the two physical drives in the Physical Devices pane that will compose the array.
4. If you: • want to define another array, click Back and repeat the steps listed above starting with step 3 in Define an Array. • have identified all your arrays, click Next, Finish, and then OK. NetRAID Assistant saves the array configuration and prompts that the array configuration has changed. Click OK. Initialize the Array After you have defined the cluster’s arrays, you need to initialize the arrays you defined. HP NetRAID Assistant initializes all arrays you have defined at the same time.
Define the Array RAID arrays are defined using the Configuration Wizard. To define a RAID 5 array: 1. On the NetRAID Assistant’s menu bar click Configuration, then Wizard. 2. Select Custom in the dialog and click Next. The Configuration Wizard displays its Array Definition window. HP NetRAID Array Definition 3. In the Array Definition window define an array by selecting the three or more physical drives in the Physical Devices pane that will compose the array.
4. If you: • want to define another array, click Back and repeat the steps listed above starting with step 3 in Define an Array. • have identified all your arrays, click Next, Finish, and then OK. NetRAID Assistant saves the array configuration and prompts that the array configuration has changed. Click OK. Initialize the Array After you have defined the cluster’s arrays, you need to initialize the arrays you defined. HP NetRAID Assistant initializes all arrays you have defined at the same time.
APPENDIX D - Cluster Cabling There are two factors associated with cabling a Microsoft NetServer Cluster. • The first is that cables bundled with a clustered system dictate the stacking or arrangement of devices in the rack. When defining your cluster using HP Rack Assistant a rack layout should have been printed.
Shared Storage Cabling for HP Microsoft Cluster Server with One NetRAID Adapter 39
Shared Storage Cabling for HP Microsoft Cluster Server with Two NetRAID Adapters 40
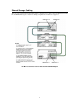
Power Cabling for HP Microsoft Cluster Server with One NetRAID Adapter 41
Power Cabling for HP Microsoft Cluster Server with Two NetRAID Adapters 42
APPENDIX E - Downloading the clusfixi.exe Hotfix The clusfixi.exe hotfix is downloaded from the Microsoft Corporation web site. Follow the instructions below to obtain this Hotfix. 1. Access the Microsoft web site at: http://www.microsoft.com. 2. On the site navigator bar, select SEARCH, then search for Q147222 in the Support Online category. 3. On the Search Results page, select Group of Hotfixes for Exchange 5.5 and IIS 4.0, then follow the ftp path to download the "clusfixi.exe" file.