HP Netserver Ultra3 SCSI Host Bus Adapter Installation and Configuration Guide HP Part Number 5971-0821 Printed in November 2000
Notice The information contained in this document is subject to change without notice. Hewlett-Packard makes no warranty of any kind with regard to this material, including, but not limited to, the implied warranties of merchantability and fitness for a particular purpose. Hewlett-Packard shall not be liable for errors contained herein or for incidental or consequential damages in connection with the furnishing, performance, or use of this material.
Contents 1 Installation and Setup ............................................................... 1 Bus Segments on the HP Ultra3 SCSI Host Adapter ........................................... 2 Installing the HP Ultra3 SCSI Host Bus Adapter .................................................. 3 Setting Up SCSI Devices.................................................................................. 5 Choosing SCSI Cables .....................................................................................
Removing a Host Adapter in Windows NT 4.0 ............................................... 31 Troubleshooting ................................................................................................. 31 Problems and Solutions .................................................................................. 31 Error Messages .............................................................................................. 32 adpu160m.sys Error Messages ....................................................
6 SCO OpenServer Installation ................................................. 67 Installing the Driver When Installing SCO OpenServer ...................................... 67 Installing SCO OpenServer 5.0.x .................................................................... 67 Installing the Driver When SCO OpenServer is Already Installed ...................... 68 Using SCO OpenServer and the Host Adapter .................................................. 73 Using Multiple Host Adapters ................
Troubleshooting Checklist ................................................................................ 101 Common Error Messages ................................................................................. 101 C Regulatory Information ........................................................ 103 Regulatory Notices - Electromagnetic Compliance .......................................... 103 Notice for United States (Federal Communications Commission) ..................................................
1 Installation and Setup The HP Ultra3 Single Channel SCSI Host Bus Adapter enables you to connect up to 15 SCSI devices—such as hard disk drives, scanners, and CD-ROM drives—to HP Netservers with 32-bit or 64-bit PCI expansion slots. You can connect newer Ultra3 and Ultra2 SCSI devices to the two 68-pin Low Voltage Differential/Single-Ended (LVD/SE) connectors. You can also connect legacy SCSI devices to the 68-pin and 50-pin internal Single-Ended (SE) connectors.
Bus Segments on the HP Ultra3 SCSI Host Adapter The HP Ultra3 SCSI host bus adapter features technology that ensures you get the best performance from your Ultra3 and Ultra2 SCSI devices by electronically isolating the primary LVD/SE segment from the secondary SE segment on the SCSI bus.
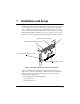
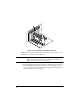
Installing the HP Ultra3 SCSI Host Bus Adapter 1. Discharge any static electricity build-up before handling the SCSI host bus adapter by touching a grounded metal object (like the exposed metal parts on the back of your HP Netserver). WARNING Turn OFF power to the HP Netserver and disconnect the power cord. 2. After you turn off your HP Netserver and unplug the power cord, remove the cover from the Netserver. 32-bit PCI Slot 64-bit PCI Slot Figure 1-3. 32-bit and 64-bit Expansion Slots 3.
Figure 1-4. Host Bus Adapter Installed in 64-bit Slot HP Netservers may have vertical or horizontal expansion slots. Refer to your HP Netserver manual to locate the PCI slots. NOTE Be careful when inserting the HP Ultra3 SCSI host bus adapter in a PCI slot. Some 32-bit slots will not accommodate it, and the host adapter may break if you force it into the slot. 4.
Setting Up SCSI Devices There are several things you may need to do to your SCSI devices before you connect them to the HP Ultra3 SCSI host bus adapter: • Check the SCSI IDs • Set the termination • Connect the power cables. Since setup can vary from device to device, always refer to the device’s documentation for specific instructions. Below are some guidelines for setting SCSI IDs and termination on your devices.
Table 1-1. Netserver SCSI Cables HP Netserver SCSI Devices Interface Cable Product Number All Models HP Netserver Rack Storage/12 (RS/12) External D3636C - HDTS68 to HDTS68, 2.5m All Models HP SureStore H/A TapeArray 5500 External D3637C - HDTS68 to VHDC1, 2.5m All Models HP SureStore DLT80e/80k & DAT 40e/40k External C5666A – HDTS68 to HDTS68, 0.9m C5667A – HDTS68 to HDTS68, 1.5m C5699A – HDTS68 to HDTS68, 2.5m E 800 LVD non-hot-swap Device Internal P3469A – 47.
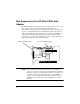
Connecting SCSI Devices You can connect up to 15 SCSI devices to the HP Ultra3 SCSI host bus adapter. Before connecting devices, be sure to review Setting Up SCSI Devices on page 5. Connecting the SCSI Host Adapter to the Common Tray Connect internal Ultra3 and Ultra2 SCSI devices to the internal LVD/SE connector on the HP Ultra3 SCSI host bus adapter. To do this, see Table 1-1 to determine the correct cable for your HP Netserver.
3. Plug the internal Ultra2 or Ultra3 SCSI devices to the other cable connectors, starting with the connector at the terminated end of the cable. Terminated LVD SCSI Twisted-Pair Cable Terminator Figure 1-6. Common Tray Cable Connection NOTE Internal Ultra2 and Ultra3 SCSI devices come from the factory with termination disabled and cannot be changed. Proper SCSI bus termination is provided by the terminator at the end of the LVD SCSI cable. 4.
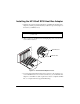
Point-to-Point LVD Twisted-Pair SCSI Cable Figure 1-7. Hot-Plug Cage Cable Connections Connecting Ultra/Fast Wide SCSI Devices Connect internal Ultra/Fast Wide SCSI devices to the 68-pin internal SE Wide SCSI connector. To do this, use a flat 68-pin Wide SCSI cable. Follow these steps to connect the devices: 1. Plug one end of the cable to the Ultra/Fast Wide SCSI connector on the HP Ultra3 SCSI host bus adapter.
68-pin flat SCSI cable Figure 1-8. Connecting Ultra/Fast Wide SCSI Devices 2. Plug the other end of the cable to a terminated Ultra/Fast Wide SCSI device. 3. If you have other Ultra/Fast Wide SCSI devices, attach them to the connectors between the two ends of the cable. Be sure these other devices are unterminated. 4. Connect a power cable from your HP Netserver’s internal power supply to each internal device.
50-pin SE Narrow SCSI cable Figure 1-9. Connecting Ultra/Fast Narrow Devices 2. Plug the other end of the cable to a terminated Ultra/Fast Narrow SCSI device. 3. If you have other Ultra/Fast Narrow SCSI devices, attach them to the connectors between the two ends of the cable. Be sure these other devices are unterminated. 4. Connect a power cable from your HP Netserver’s internal power supply to each internal device.
NOTE We recommend that you connect only Ultra3 and Ultra2 SCSI devices to the external SCSI connector. If you also attach older Ultra SCSI devices, the data transfer speed of the Ultra3 and Ultra2 SCSI devices will drop to the speed of the older devices. (See Bus Segments on the HP Ultra3 SCSI Host Adapter on page 2.) Follow these steps to connect the external devices: 1. Connect one end of the external LVD SCSI cable to the external LVD/SE connector on the HP Ultra3 SCSI host bus adapter.
Figure 1-11. Terminating the Last External SCSI Device 4. Terminate only the device at the end of the chain. (Use of an external multi-mode SCSI terminator is required.) 5. Connect power cables to all external devices and to the HP Netserver. HP Ultra3 SCSI Host Adapter Driver Software NOTE To use the HP Ultra3 SCSI host bus adapter, driver software must be installed for your operating system.
Troubleshooting If you have any problems while installing the HP Ultra3 SCSI host bus adapter, check the following items first: • Are all SCSI devices powered on? • Are all SCSI cables and power cables properly connected? • Does each device on the SCSI bus have a unique SCSI ID? • Does the total SCSI cable length exceed the maximum allowable length? (The maximum cable length for the Ultra3 SCSI host adapter cannot exceed 12 meters.
2 Configuration with SCSISelect SCSISelect, included with the HP Ultra3 SCSI Host Bus Adapter, enables you to change SCSI settings without opening the computer or handling the host bus adapter. SCSISelect also enables you to low-level format or verify the disk media of your SCSI hard disk drives. The following table lists the available and default settings for each SCSISelect option. NOTE The default settings are appropriate for most systems.
SCSISelect Options Available Settings Default Setting Initiate Wide Negotiation Yes, No Yes (Enabled) Enable Disconnection Yes, No Yes (Enabled) Send Start Unit Command Yes, No Yes (Enabled) N/C (No Change) Yes, No N/C (No Change) BIOS Multiple LUN Support2 Yes, No No (Disabled) Include in BIOS Scan2 Yes, No Yes (Enabled) Reset SCSI Bus at IC Initialization Enabled, Disabled Enabled Display Messages during BIOS Initialization Enabled, Disabled Enabled Extended BIOS Trans
During the startup process, pay careful attention to the messages that appear on your screen. 2. When the following message appears on your screen, press the Ctrl-A keys simultaneously (this message appears for only a few seconds): Press for SCSISelect (TM) Utility! 3. From the menu that appears, use the arrow keys to move the cursor to the option you want to select, then press Enter. NOTE If you have difficulty viewing the display, press F5 to toggle between color and monochrome modes.
gives it the highest priority on the SCSI bus. We recommend that you do not change this setting. • SCSI Parity Checking—(Default: Enabled) When set to Enabled, verifies the accuracy of data transfer on the SCSI bus. Leave this setting enabled unless any SCSI device connected to the Ultra3 SCSI Host Bus Adapter does not support SCSI parity. • Host Adapter SCSI Termination—(Default: Automatic) Determines the termination setting for the SCSI host bus adapter.
set to No, the SCSI host bus adapter uses 8-bit data transfer unless the SCSI device requests wide negotiation. NOTE Set Initiate Wide Negotiation to No if you are using an 8-bit SCSI device that hangs or exhibits other performance problems with 16-bit data transfer rate enabled. • Enable Disconnection—(Default: Yes) When set to Yes, allows the SCSI device to disconnect from the SCSI bus. Leave the setting at Yes if two or more SCSI devices are connected to the SCSI host bus adapter.
• Reset SCSI Bus at IC Initialization—(Default: Enabled) When set to Enabled, the SCSI host bus adapter generates a SCSI bus reset during its power-on initialization and after a hard reset. • Display Messages during BIOS Initialization—(Default: Enabled) When set to Enabled, the SCSI host bus adapter BIOS displays the Press for SCSISelect (TM) Utility! message on your screen during system bootup.
The following four options have no effect when the SCSI host bus adapter BIOS is disabled. (The SCSI host bus adapter BIOS is normally enabled by default.) • Domain Validation—(Default: Enabled) Determines the kinds of SCSI devices connected and reduces data transfer speed when legacy SCSI devices are detected. Displays the resulting data transfer rate.
Using SCSI Disk Utilities To access the SCSI disk utilities, follow these steps: 1. Select the SCSI Disk Utilities option from the menu that appears after starting SCSISelect. SCSISelect scans the SCSI bus (to determine the devices installed) and displays a list of all SCSI IDs and the devices assigned to each ID. 2. Use the arrow keys to move the cursor to a specific ID and device, then press Enter. 3. A small menu appears, displaying the options Format Disk and Verify Disk Media.
3 Microsoft Windows NT Installation This chapter explains how to install the HP Ultra3 Family Manager Set driver adpu160m.sys for Windows NT. If you are performing a first time Windows NT installation, see “Installing the Driver When Installing Windows NT” in the next section. If Windows NT is already installed in your system, see “Installing the Driver When Windows NT is Already Installed” on page 24. Installing the Driver When Installing Windows NT The adpu160m.
8. Press Enter to continue with the Windows NT operating system setup. Follow the instructions on-screen and in the Windows NT documentation to complete the installation. Completing a Fresh Windows NT 4.0 Installation From CD-ROM 1. Insert the Windows NT 4.0 CD into the CD-ROM drive. 2. Start your system. Press the F6 key when you see the following message: “Setup is inspecting your computer’s hardware configuration...” 3. If you do not see this message, your system may not be setup to boot from a CD-ROM.
Updating Windows NT 4.0 1. Start Windows NT. 2. Click the Start button on the Windows NT task bar, and then point to Settings. 3. Click the Control Panel. 4. Double-click the SCSI Adapters icon. 5. Click the Drivers tab, and then click the Add button. 6. In the Install Driver window, click the Have Disk button. 7. Insert the HP Ultra3 Family Manager Set disk for Windows NT into drive A. 8. From the Copy Manufacturer’s File From text box, type a:\nt4, and click OK. 9. In the Install Driver window, Click OK.
Using Windows NT SCSI Parameters Follow the instructions below to enter the registry values that affect how the Windows NT SCSI manager interprets the generic configuration information of SCSI device drivers. All SCSI host adapters installed in your system are affected by the values you enter here. A list of valid values follows: NOTE The following value keys are case-sensitive and must be entered exactly as shown.
If the Parameters Device keys already exist, skip to Step 8 below to begin entering values. If the keys do not yet exist, you will need to create them by continuing with Step 4. 4. Click on the adpu160m key. 5. Select Add Key from the Edit menu; Type Parameters in the Key Name edit box. Leave the Class edit box blank. 6. Click on the Parameters key. 7. Select Add Key from the Edit menu; Type Device in the Key Name edit box. Leave the Class edit box blank. 8.
• /INSTRUMENTATION—enables recording of I/O statistics and errors. If this option is not specified, instrumentation defaults to disabled. The data type for this value is REG_SZ. • /INSTR_ERRLOG_Z=nnn—sets the maximum number of error log entries, if /INSTRUMENTATION is enabled. If a number is not specified, the maximum number or error log entries defaults to 32. Valid values are 0-128. The data type for this value is REG_SZ. • /MAXTAGS=nnn—specifies the tagged command queue depth.
8. Click on the Device key. 9. Select Add Value from the Edit menu; type Driver Parameters in the Key Name edit box. Enter REG_SZ as the data type and press Enter. 10. A String Editor text box appears. Enter valid parameters in the text box. When entering multiple parameters, each parameter must be separated by a space. NOTE Changes made with the Registry Editor do not take effect until you shut down and then restart your system. Hot-Plug PCI Feature Hot-Plug PCI is supported by the Windows NT 4.
NOTE The file hotp160m.reg adds Hot-Plug related entries into the NT Registry, including the driver-specific registry value /HOTPLUG. Running hotp160m.reg will overwrite your current driver-specific registry values located at: \HKEY_LOCAL_MACHINE\System\CurrentControlSet\ Services\adpu160m\Parameters\Device\DriverParameters If you have previously added other driver specific registry values, you should note them before running the hotp160m.reg file. After running hotp160m.
Removing a Host Adapter in Windows NT 4.0 1. From the Control Panel, double-click the SCSI Adapters icon. 2. Click the Drivers tab. 3. Using the arrow keys select the following driver: Adaptec 29160(N), 29160, 39160, AHA-3960D, AIC-7892/7899 Ultra160 PCI SCSI Controller (NT 4.0) 4. Click the Remove button. 5. If you are sure you are removing the correct host adapter type, click Yes. 6. Click Yes to restart the computer and initialize changes. Click No to return to the SCSI Adapters window.
Press spacebar NOW to invoke the Last Known Good menu 3. Once your computer is operational again, check all of the hardware and software configuration changes you want to make. Look specifically for conflicts with parts of the existing system configuration that are not being changed. Error Messages Error messages generated by the adpu160m.sys driver can be viewed by opening the Windows NT Event Viewer error logs. To view events generated by the driver, follow these steps: 1.
adpu160m.sys Error Messages The following error messages are listed sequentially according to the last three digits of the error message. For example, [xxxxx010], [xxxxx011], [xxxxx012], etc. NOTE When reporting problems to HP Customer Support, be sure to include the complete error message in your problem description.
it could indicate that the device or system is malfunctioning. Unplug or power down unused devices to see if the problem persists. [xxxxx023] Target device parity error The driver has detected a parity error by the target device. [xxxxx024] Data overrun or underrun The adapter was given more or less data than the expected amount of data. [xxxxx031] Target device queue full The target device internal buffer is full. [xxxxx032] Target device busy The target device reports a Busy status.
[xxxxx096] Adapter hardware initialization failure—possible resource conflict The driver has attempted to initialize the adapter hardware but failed. This might suggest that the adapter resources (e.g., IRQ) conflict with another board installed in your system. [xxxxx097] Unable to allocate memory This indicates that there may be a problem with the amount of memory installed in your system. Verify that your system has at least the minimum amount of memory required by your operating system.
36
4 Microsoft Windows 2000 Installation This chapter explains how to install the HP Ultra3 Family Manager Set driver for Windows 2000. If you are performing a first-time Windows 2000 installation, see Installing the Driver When Installing Windows 2000. If Windows 2000 is already installed in your system, see To Update the Driver When Windows 2000 is Already Installed on page 37.) Installing the Driver When Installing Windows 2000 1.
1. Start Windows 2000. 2. Click the Start button on the Windows 2000 task bar, and then point to Settings. 3. Click the Control Panel. 4. Double-click the System icon. 5. Select the Hardware tab and click the Device Manager button. 6. Under SCSI and RAID Controllers, click on the + sign to the left. This will display the SCSI adapters currently installed. Right-click on the device you wish to update and select Properties. 7. Click the Driver tab and click the Update Driver button.
3. Follow the directions from “Installing the Driver When Installing Windows 2000” on page 37. Using Advanced Configuration Parameters Advanced users may use software parameters to alter the configuration of the Windows 2000 device drivers supplied by HP. All Windows 2000 configuration information is stored in a data structure supplied by Windows 2000, called the Registry. You can edit this information through a tool called the Registry Editor.
• DisableMultipleRequests— This limits the number of commands to each logical device to one. The data type for this value is REG_DWORD. • MaximumLogicalUnit — This can limit the scan for connected devices on the SCSI bus. Valid values are 0 to 7. If 1 is specified, the Windows 2000 SCSI manager assumes that no SCSI targets support LUNs other than 0. Otherwise, LUNs from 0 to 7 are scanned during system initialization. The data type for this value is REG_DWORD.
10. Select Add Value from the Edit menu. In the Value Name edit box, enter one of the valid parameter values. Make sure to enter the appropriate data type for the value. To enter additional values, repeat Steps 8 and 9. NOTE Changes made with the Registry Editor do not take effect until you restart your system. Using Driver-specific Parameters Follow the instructions below to enter the registry values that affect the configuration information for SCSI PCI device drivers.
\HKEY_LOCAL_MACHINE\System\CurrentControlSet\ Services\adpu160m\Parameters\Device If the Parameters\Device keys already exist, skip to Step 10 below to begin entering parameters. If the keys do not yet exist, you will need to create them by continuing with Step 4. 4. Click on the adpu160m key. 5. Select Add Key from the Edit menu; Type Parameters in the Key Name edit box. Leave the Class edit box blank. 6. Click on the Parameters key. 7.
Problems and Solutions I made changes to the host adapter configuration and Windows 2000 no longer boots! The boot manager for Windows 2000 contains recovery logic to allow you to return to the last known good configuration. If you have changed your host adapter configuration and Windows 2000 no longer boots, follow these steps to recover: 1. Undo any hardware changes you have made to the computer since it was last operational. 2. Reboot the computer. Watch the display carefully during bootup.
3. Click on the Words option. In the Data section of the dialog box, the entry in the second row and second column (to the right of the 0010: entry) lists the error message generated by the driver. The common error messages for the driver are described below. NOTE The entry in the third row of the last column identifies the SCSI ID of the device originating the error. Driver Error Messages The following error messages are listed sequentially according to the last three digits of the error message.
[xxxxx012] Error issuing command [xxxxxx99] Error issuing command The driver does not recognize the target device. [xxxxx021] Target device protocol error An unexpected event occurred during data transfer between the adapter and target device. Normally, this indicates a faulty or non-compliant target device. [xxxxx022] Adapter or target device protocol error The adapter or target device has broken the communication protocol. A badly behaving device could cause this message to appear.
[xxxxx081] Adapter initialization failure [xxxxxx8A] Adapter initialization failure [xxxxxx83] Adapter initialization failure An error has occurred while the driver was setting up its internal data structures. Verify that your adapter is supported by this version of the driver. [xxxxx089] Unable to allocate memory This indicates that there may be a problem with the amount of memory installed in your system. Verify that your system has at least the minimum amount of memory required by your operating system.
ponent external to the miniport driver, such as the operating system or an ASPI application. [xxxxxd4] Adapter hardware failure - adapter reset The host adapter hardware failed and the miniport driver has to reset the hardware. [xxxxx0d6] Internal driver error An error has occurred while the driver was setting up its internal data structures. Try installing the most up-to-date version of the driver available from the HP Web site at http://netserver.hp.
48
5 Novell NetWare Installation This chapter explains how to install the HP Ultra3 Family Manager Set driver adpt160m.ham for Novell NetWare— NetWare 3.3, 4.2, and 5.0. If you are performing a first time NetWare installation, see “Installing the Driver When Installing NetWare” in the next section. If NetWare is already installed in your system, see “Installing the Driver When NetWare is Already Installed” on page 54. Installing the Driver When Installing NetWare To install the adpt160m.
4. Reboot your computer after configuring for CD-ROM access. 5. Follow the instructions in your NetWare documentation for installing a new server. 6. After NetWare installs the DOS portion of the software, down and exit to DOS from the server prompt. 7. Copy the adpt160m.ham and adpt160m.ddi from the NetWare directory of the Ultra3 Family Manager Set disk for NetWare to the c:\server.312 directory. 8. Change directory to c:\server.312, and copy the nwpa_up.exe patch file to the directory. 9. Run nwpa_up.
The slot number can be added to the startup.ncf file, as described in Step 21 below, to automate driver load using the parameter slot=x, where x is the detected slot number (for example, load c:\server.312\adpt160m slot=2). 17. Load Install. Create the NetWare partition, SYS volume, and mount the volume. Complete the installation of the System and Public Files. 18. Create the autoexec.ncf file. Add the following lines and then save the file. load after311 load c:\server.312\nwpaload search add 1 c:\server.
4. Press F3 and enter a:\netware as the path to the adpt160m.ham driver for NetWare. 5. Select adpt160m.ham and press Enter. 6. Select No not to save existing file, Yes to save existing file cdrom.nlm. 7. Select No not to save existing file, Yes to save existing file nbi.nlm. 8. Select No not to save existing file, Yes to save existing file nwpa.nlm. 9. Select No not to save existing file, Yes to save existing file nwpaload.nlm. 10. Select Save parameter and continue, and press Enter. 11.
10. To install additional adapters, follow the procedures from Step 4. 11. When complete, select Continue to complete the installation. DOS Drivers for CD-ROM Access The CD-ROM drivers need to be installed only if DOS access to a CD-ROM drive attached to a SCSI host adapter is required. If NetWare is already installed, or if the CD-ROM drive is not connected to a SCSI adapter, these drivers do not need to be copied or installed.
NOTE This will assign the CD-ROM to the next available drive letter, typically D if there is only one DOS drive. If you are using MS-DOS 5.0 and do not already have mscdex.exe, you will need to either upgrade to MS-DOS 6.0 or above, or download mscdex.exe from Microsoft BBS or CompuServe forum. 4. Reboot your system. You are now able to access your CD-ROM drive from the command line and from Windows. Installing the Driver When NetWare is Already Installed To update or install the adpt160m.
Loading the Driver at Server Bootup To automatically load the adpt160m.ham at server bootup, the startup.ncf file (usually located in your server’s startup directory) must contain a load command line that specifies the location of the driver and any appropriate command line options (see “Using the Load Command Line Options” on this page). For additional information on the startup.ncf file, refer to your NetWare documentation. The correct syntax to load the driver is: load [pathname]adpt160m.
adpt160m.ham Command Line Options 56 Option Values Default Description auto_disable_tagq= on, off off Enables/disables auto disable tagged queuing algorithm. dev_enable= 0-FFFF FFFF Allows you to enable the driver's registration of SCSI devices on a per target basis. By default, all targets are scanned. A bit value of 0 causes the target not to register under the operating system. These devices are still accessible via ASPI.
Option Values Default Description multlun_targets= 0-FFFF FFFF A bit mask to enable LUNs on selected targets. By default, LUNs on all targets are enabled. This bit mask is entered in hex (see “Bit Mask Options” on page 58). slot= 0-xxxxb 0 Defines a physical slot number for the host adapter. If 0 is specified, or if this option is not specified, then the driver loads for all Ultra3 host adapters. verbose= yes, no no Displays host adapter configuration information at load time. a.
Bit Mask Options Use the example below as an aid for calculating Bit Mask option hex values. Each SCSI device is enabled by a 1 in its corresponding bit position. The table that follows the figure, lists the binary-to-hex conversions. Using this example, if you want to enable scanning for LUNs 0, 2, and 6 on all targets, then use the command line option of lun_enable=0045. Figure 5-1.
Sample Load Commands Here is a simple load command with no option switches (if loaded from drive A): load a:\netware\adpt160m.ham If an error message appears when attempting to load the driver, refer to “Troubleshooting” on page 63. Here is an example of the adpt160m.ham driver being loaded with command line options (if loaded from drive A): load a:\netware\adpt160m.ham verbose=y slot=2 Using NetWare and the Host Adapter This section contains useful information on using NetWare and your host adapter.
Menu Choice Default Value 1. Volume Segments On Drive1 (select for list) 2. Read After Write Verify1 Hardware Level 3. Drive Light Status1 Not Supported 4. Driver Operating Status1 Active 5. Removable Drive Mount Status2 Mounted 6. Removable Drive Lock Status2 Not Locked 1Valid 2Valid for both removable and non-removable types of SCSI disk drives. for removable media only. Mount Status Mounting causes a drive to come on-line as a NetWare storage device.
Using the NetWare Tape Backup Included with Novell NetWare is a server-based tape backup utility called sbackup.nlm. This utility allows you to backup server disk drives to a server tape drive. The utility supports HP host adapters. Novell NetWare documentation contains instructions for loading the server backup software. Refer to the NetWare Server Backup Manual to load the tapedai, tsa, and sbackup modules. 1. Once you have loaded adpt160m.ham, load tsaxxx.nlm (tsa312.nlm, tsa400.nlm, tsa410.
NOTE For multiple LUN CDs, enable multiple LUN scanning with the lun_enable switch (e.g., load adpt160m lun_enable=FF). The lun_enable switch is needed for adpt160m.ham. Enter the following line at the prompt: scan all luns 1. Enter the following line at the prompt and then note the number and name of the CD: :cd device list 2. Enter the number or volume name of the CD at the command line: :cd mount [x] [name] 3. Edit the startup.
Troubleshooting Error Messages The error messages listed below are the messages associated with the adpt160m.ham driver. Messages are listed sequentially according to the last three digits of the error code. For example, [xxxxx080], [xxxxx081], [xxxxx082], etc. NOTE When reporting problems to HP Customer Support, be sure to include the complete error code in your problem description.
[xxxxx084] Adapter software initialization failure An error has occurred while the driver was setting up its internal data structures. Try installing the most up-to-date version of the driver available from the HP Web site located at http://netserver.hp.com/netserver/ [xxxxx085] Unable to allocate memory This indicates that there may be a problem with the amount of memory installed in your system. Verify that your system has at least the minimum amount of memory required by your operating system.
[xxxxx099] Adapter software initialization failure [xxxxx09a] Adapter software initialization failure [xxxxx09b] Adapter software initialization failure An error has occurred initializing one of the driver’s internal data structures for a device connected to the adapter. This may result in problems accessing the device. Try installing the most up-to-date version of the driver available from the HP Web site located at http://netserver.hp.
[xxxxx0ca] Invalid command line syntax [xxxxx0cb] Invalid command line syntax [xxxxx0cc] Invalid command line syntax The command line syntax for the driver is incorrect. See “Using the Load Command Line Options” on page 55 for entering the correct syntax. [xxxxx07c] Unable to allocate memory [xxxxx07d] Unable to allocate memory [xxxxx07e] Unable to allocate memory [xxxxx07f] Unable to allocate memory This indicates that there may be a problem with the amount of memory installed in your system.
6 SCO OpenServer Installation This chapter explains how to install the HP Ultra3 Family Manager Set driver ad160 for SCO OpenServer 5.0.x. The ad160 driver supports the HP Ultra3 SCSI host bus adapter. If you are performing a first time SCO OpenServer installation, see “Installing the Driver When Installing SCO OpenServer” below, to begin driver installation. If SCO OpenServer is already installed in your system, see “Installing the Driver When SCO OpenServer is Already Installed” on page 68.
NOTE Remember that UNIX commands are case sensitive. Enter the commands exactly as shown in the instructions. 1. Insert the SCO OpenServer 5.0.x boot disk into the primary floppy disk drive and turn ON the computer. Alternatively, insert the SCO OpenServer 5.0.x boot CD into the primary CD-ROM drive and turn ON the computer. When you see these prompts: SCO OpenServer (TM) Release 5 Boot : Type ahslink and press Enter. (The boot drive should be ID0 or ID1.) 2.
CAUTION Improper or corrupt driver updates might destroy your existing UNIX file system. Back up all important files before proceeding. Installing or updating the driver involves the following tasks, which must be completed in the order presented: • Back up the old UNIX kernel and any other important files. • Use installpkg to load the driver. • Change the primary host bus adapter to an Ultra3 SCSI host bus adapter, if necessary. • Rebuild the kernel to reflect the new changes.
mount /dev/boot /stand cp /stand/unix /stand/unix.orig NOTE c If you ever need to boot up from the pre-update kernel, load the unix.orig backup kernel at the UNIX boot: prompt. To do this, type unix.orig and press Enter. This step is optional. For extra security, you may back up the mdevice file and the sdevice.d directory To perform this backup, type the following and press Enter: copy -rom /etc/conf /etc/conf.
Please enter the names of the packages you wish to install, or q to quit: At this point, type ad160 and press Enter.
d Modify the mscsi file according to your hardware setup: • If you are booting from an Ultra3 SCSI host bus adapter, make sure the host adapter prefix for the host adapter number 0 is ad160. • If you are not booting from an Ultra3 SCSI host bus adapter, make sure the host adapter prefix for the host adapter number 0 is the appropriate prefix for each device on your primary HP host adapter. See the table above. e 4 Save the file and exit the text editor.
b Check the host bus adapter BIOS messages to verify that all your installed SCSI devices are listed. If some or all of your installed SCSI devices do not appear at this time, your SCSI cables may be loose, or the SCSI device setup may not be complete. If so, go back and correct any problem before proceeding. c Wait for UNIX to boot with the new kernel. See “Troubleshooting” on page 76 if the system crashes or if “panic” (UNIX error) messages are displayed at boot time.
Changing the Boot Disk If you are changing the boot device from a non-SCSI hard disk to a SCSI hard disk attached to an HP Ultra3 SCSI host bus adapter, you must reinstall SCO OpenServer. If you are already booting from a SCSI hard disk attached to an HP PCI SCSI host bus adapter, and wish to boot from the same SCSI hard disk attached to an HP Ultra3 host bus adapter, you may elect to either reinstall SCO OpenServer with the new driver, or update SCO OpenServer with the new driver.
char variable = {1,22}; The first number is 1, which overrides the default variable with the value 22. Examples: The following specifies whether the host bus adapter checks parity on incoming SCSI data: ad160_parity[SCSI_NAD160] If the second number is set to 0, parity checking is enabled. If it is set to 1, parity checking is disabled.
Troubleshooting My computer does not recognize my SCSI devices. At boot time, check to see if the BIOS messages for your primary Ultra3 host bus adapter lists all installed SCSI devices.
b Look on the first screen of SCSISelect in the upper right hand corner for Bus:Device xx:xxh (shown in hexadecimal). • If the device number is high, power OFF the computer, move the HP Ultra3 SCSI host bus adapter to a PCI slot at the other end of the motherboard, and run SCSISelect again to see if the number is lower. The host bus adapter LED lights during activity. This light helps to determine which adapter SCSISelect displays information for.
adl60 Sdsk 0 0 0 0 NOTE Each field is separated by a tab. Do not use the spacebar to separate fields. The meanings of the fields are as follows: Table 6-1. Host Adapter Prefix SCSI Device Type Host Adapter Number Target ID Logical Unit Number ad160 Sdsk 0 0 0 Bus1 0 1 This field applies to SCO OpenServer 5 only. • Host Adapter Prefix: Identifies the name of the host bus adapter driver. If you are booting from an Ultra3 SCSI host bus adapter, the Host Adapter Prefix must be adl60.
If you are booting from an HP Ultra3 SCSI host bus adapter and are using ISA/ EISA-based host bus adapters as secondary devices, you must disable the BIOS on all ISA/EISA-based host bus adapters. If you are booting from ISA/EISA-based host bus adapters and are using an Ultra3 SCSI host bus adapter as a secondary device, see your ISA/EISA-based host bus adapter documentation to ensure that the host bus adapter is at the lowest BIOS base address.
9. Type Y to rebuild the kernel environment. 10. Reboot the system. Error Messages The error messages listed below are the messages associated with the adl60 driver. Messages are listed sequentially according to the last three digits of the error code. For example, [xxxxx010], [xxxxx011], [xxxxx012], etc. NOTE When reporting problems to Customer Support, be sure to include the complete error message in your problem description.
[xxxxx0a3] Adapter diagnostic failure - possible resource conflict The driver failed the internal software or hardware diagnostic. Refer to your host bus adapter User’s Guide for troubleshooting information. [xxxxx0ca] Cannot initialize device The system, host bus adapter, or target device is busy or is not responding. The target device could not be initialized. [xxxxxcb] Unable to allocate memory. Decrease ad160_instr_buffersz in space.
82
7 SCO UnixWare Installation This chapter explains how to install the HP Ultra3 Family Manager Set drivers adst21 and adst70 for UnixWare— UnixWare 2.1x and UnixWare 7.01/7.1. adst21 driver (or package) is used with UnixWare 2.1x. The adst70 driver (or package) is used with UnixWare 7.01/7.1. If you are performing a first time UnixWare installation, see “Installing the Driver When Installing UnixWare” in the next section to begin driver installation.
6. If necessary, enter the DCU (Device Configuration Utility) to view/change the UnixWare device driver configuration data. 7. Follow the on-screen instructions to continue with installation. Refer to the UnixWare documentation and on-screen help files for help in selecting options. NOTE If your installation fails, do not attempt to use the update installation pkgadd procedure to fix the installation. Follow the instructions in the UnixWare documentation and in this User’s Guide to retry the installation.
was loaded in the previous procedure. Loading the driver causes the driver to become a permanent part of the new boot kernel on rebuild. 4. Rebuild the UnixWare Kernel—Rebuilds the kernel with the new driver. 5. Boot the New Kernel—Reboots the computer with the new kernel. NOTE Remember that UnixWare commands are case sensitive. Enter the commands exactly as shown. Back Up the Computer If you have not already done so, back up all important files on the computer.
If a mail message informs you that the installation has failed, turn to “Troubleshooting” on page 90. 5. Type pkginfo -l adstxx and press Enter. 6. Verify that the adst21 or adst70 driver is now listed. If the adst21 or adst70 driver does not appear in the pkginfo listing, turn to “Troubleshooting” on page 90. The listing should be similar to PKGINST: adst21 NAME: Ultra160 Driver for UnixWare 2.1x or PKGINST: adst70 NAME: Ultra160 Driver for UnixWare 7.1 Modify the New System File 1.
cd /etc/conf/bin ./idbuild -B Status messages appear. 2. When the kernel has been built, type the following and press Enter after each line (0 in -g0 is zero, not the letter O): cd /etc/conf/cf.d cp unix /stand/unix cd / shutdown -g0 3. Type y and press Enter when the computer asks if you really want to shut down. System Is Down should appear on the screen. The UnixWare kernel is now ready for host adapter operation. Boot the New Kernel To reboot the computer with the new kernel, follow these steps: 1.
Using Tunable Parameters For UnixWare, some parameters are defined in the following files: /etc/conf/pack.d/adst21/space.c or /etc/conf/pack.d/adst70/space.c These parameters can be tuned for either the adst21 driver or the adst70 driver. Please refer to the comments in the appropriate space.c file for a description of these parameters. After modifying the space.c file, you must rebuild the kernel then reboot the system for the new parameters to take effect.
1. Back up all important computer files. 2. At the UnixWare root prompt, type the following: For UnixWare 2.1x: /etc/conf/bin/idinstall -d adst21 The following files will be deleted: /etc/conf/mdevice.d/adst21 /etc/conf/pack.d/adst21/Driver.o /etc/conf/pack.d/adst21/space.c /etc/conf/pack.d/adst21/disk.cfg /etc/conf/sdevice.d/adst21 For UnixWare 7.01/7.1: /etc/conf/bin/idinstall -d adst70 The following files will be deleted: /etc/conf/mdevice.d/adst70 /etc/conf/pack.d/adst70/Driver.o /etc/conf/pack.
Troubleshooting Problems and Solutions My computer crashes or displays panic messages during the bootup procedure! You may have to boot from the backup kernel created earlier, and then perform the driver update procedure again. To boot from the old kernel, follow these steps: 1. Reboot the computer. 2. At the Booting UNIX System… prompt or loading UnixWare graphics, press the Spacebar. 3. For UnixWare 2.1x: From the [boot]# prompt, first type KERNEL=old kernel (e.g., KERNEL=unix.work) and press Enter.
NOTE When reporting problems to Customer Support, be sure to include the complete error code in your problem description. [xxxxx003] Command completed with error [xxxxx004] Command completed with error [xxxxx005] Command completed with error [xxxxx006] Command completed with error [xxxxx007] Command completed with error [xxxxx008] Command completed with error [xxxxx009] Command completed with error A request issued to a target device completed with an indication that there is an error.
[xxxxx020] Adapter or target device not responding or not connected The target device did not respond to the adapter. If the device is present, refer to your host adapter’s user’s guide for troubleshooting information. If the device is no longer connected to the system, ignore this error. [xxxxx021] Target device protocol error An unexpected event occurred during data transfer between the adapter and target device. Normally, this indicates a faulty or non-compliant target device.
[xxxxx041] Command aborted [xxxxx042] Command aborted [xxxxx043] Command aborted [xxxxx044] Command aborted [xxxxx045] Command aborted An internal condition caused the driver to abort the command. In most cases, the command is retried and is recovered, and normal operation continues. [xxxxx046] Target device did not respond to abort sequence The target device did not abort the command requested by the driver. Some devices do not support the abort command properly.
[xxxxx096] Adapter hardware initialization failure - possible resource conflict The driver has attempted to initialize the adapter hardware but failed. This might suggest that the adapter resources (e.g., IRQ) conflict with another board installed in your system. [xxxxx097] Unable to allocate memory This indicates that there may be a problem with the amount of memory installed in your system. Verify that your system has at least the minimum amount of memory required by your operating system.
8 Linux Support The HP Ultra3 SCSI host bus adapter supports the following Linux Operating Systems: Linux Operating System World Wide Web URL Caldera Operations eDesktop 2.4 www.caldera.com Debian Linux 2.2 www.debian.com RedHat Linux 6.2 www.redhat.com SuSE Linux 6.4 www.suse.com TurboLinux Workstation 6.0 www.turbolinux.com Installation Guides are available at the web sites listed above. Refer to your HP Netserver User Guide for additional information on Linux support for your system.
96
A Product Specifications These specifications list the operating conditions for the Ultra3 SCSI adapter. Check the User Guide for the server containing the adapter, and ensure that the target operating environment is suitable for both the server and adapter. Electrical Power Requirements 5.0V +/- 5% @ 1.2A maximum Power Consumption 6 W maximum Bus Type PCI 2.1 Interface Protocol Bus Mastering DMA Host Bus Burst Data Rate 266 MB/second SCSI Bus Multimode LVD and SE Peripheral Bus 64-bit/66.
Electrical Device Support Up to 15 LVD or SE SCSI devices Cable Length 25m for a single LVD SCSI device Up to 12m for 15 LVD devices Electrical Termination Automatic active, programmable via SCSISelect Physical Dimensions 6.875 x 3.725 x 0.44 inches 174.63 x 94.62 x 11.
Regulatory Meets electromagnetic compliance requirements of: USA: CFR 47 part 15, Class B, C63.4 - 1992 Canada: Industry Canada, ICES-003, CISPR 22, Class B Europe: EN50081, EN 55022, Class B Japan: VCCI, CISPR 22 Class B ITE South Korea: Min.
100
B Troubleshooting Troubleshooting Checklist Most problems that occur with your host adapter result from errors in preparing and connecting devices on the SCSI bus. If you have problems when using your host adapter, check these items first.
If the message still appears, follow the drive manufacturer's instructions to make sure the drive is set to spin up when the power is switched ON. Start unit request failed The BIOS was unable to send a Start Unit Command to the device. Run the SCSISelect utility and disable Send Start Unit Command for the device. Time-out failure during … An unexpected time-out occurred. Check SCSI bus termination. Try disconnecting the SCSI peripheral cables from the host adapter and then starting the HP Netserver.
C Regulatory Information Regulatory Notices - Electromagnetic Compliance Electromagnetic Compatibility (EMC) requirements have been established in many countries to regulate the radio frequency energy generated by Information Technology Equipment (ITE). This energy is generated during the normal and intended use of this equipment and so it is limited by country regulations to levels intended to minimize potential interference to other electrical equipment, including public safety services.
frequency energy and, if not installed and used in accordance with the instructions, may cause harmful interference to radio communications. However, there is no guarantee that interference will not occur in a particular installation. If this equipment does cause harmful interference to radio or television reception, which can be determined by turning the equipment off and on, correct the interference by one or more of the following measures: • Reorient or relocate the receiving antenna.
class A accessory in a system that has been labeled as a class B product, the requirements and notice for class A equipment shall be applied. Notice for Canada (Industry Canada) This digital apparatus meets all requirements of the Canadian Interference-Causing Equipment Regulations. Cet appareil numérique respecte toutes les exigences du Règlement sur le matériel brouilleur du Canada. Notice for Japan The equipment you have purchased may be in either the class A or class B category.
radio interference may be caused. In this case, you may need to take appropriate corrective actions. Notice for Korea The equipment you have purchased may be in either the class A or class B category. Class A Equipment: Please note that this equipment has been approved for business purposes with regard to electromagnetic interference. If purchased in error for use in a residential area, you may wish to exchange the equipment where you purchased it.
Notice for Taiwan Class A Warning 107
Declaration of Conformity (US, EU, Australia) DECLARATION OF CONFORMITY according to ISO/IEC Guide 22 and EN 45014 Manufacturer's/Supplier Name: Manufacturer's/Supplier Address: Hewlett-Packard Company 10955 Tantau Avenue Cupertino, CA 95014 USA declares, that the product Product Name: Model Number(s): Product Options: Ultra3 SCSI Host Bus Adapter P3413A ALL conforms to the following Product Specifications: Safety: IEC 950: 1991+A1 + A2 + A3 +A4/ EN 60950: 1992 + A1+ A2 + A3 +A4 EN 60825 - 1 (+A11); 19
D Warranty and Support The hardware warranty below applies to components purchased as accessories. If your component was factory installed as part of an HP Netserver model, refer to the HP Netserver Warranty and Service/Support Booklet for the warranty limitations, customer responsibilities, and other terms and conditions.
warranty for those products. HP SureStore drives are considered external accessories and carry their own warranty. The customer may be required to run HP-supplied configuration and diagnostic programs before a replacement will be dispatched or an on-site visit is authorized. Third-Party Hardware Products HP does not warrant third-party hardware products. Third-party hardware products may be warranted in accordance with the third-party warranty statement accompanying the product.
Index A H aspi8u2.sys 53 aspicd.sys 53 autoexec.bat 53 Hardware accessories limited warranty 109 host adapter 101 Hot-plug PCI 29 B I Backup 61 Bit mask options 56, 58 Booting from UnixWare 86 Installation NetWare driver 49–54 UnixWare driver 83–87 Windows NT driver 23–25 interference 104 C CD-ROM 49, 53, 61 Command line options 54, 55 Command syntax 85 config.
CD-ROM support 61 command line options 54, 55 error messages 63 installing the driver 49–54 load command 54, 55, 59 max_tags 62 monitor.nlm 59 optimizing performance 62 removable media 59 server bootup 55 tag queuing 56 troubleshooting 63 tsa.
registry editor 25 removing a host adapter 30 removing the driver 30 troubleshooting 31–35 113
114