
45xx Modular Disk Subsystem Manual for G-Series Releases
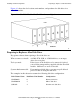
Table Of Contents
- What’s New in This Manual
- About This Manual
- 1 Introduction
- 2 Installing and Configuring the 6760 Adapter
- 3 Checking Hardware Operation
- 4 Installing and Removing CRUs
- Glossary
- Index

45xx Modular Disk Subsystem Manual for G-Series Releases—142466
4-1
4
Installing and Removing CRUs
This section describes procedures for removing and installing customer-replaceable
units (CRUs) in the 45xx modular disk subsystem. You can remove and install these
components without using special tools. Information on installing and removing the
6760 ServerNet device adapter is in the 6760 ServerNet/DA Manual.
What’s in This Section
This section contains these topics:
•
Replacing a 45xx Disk Drive on page 4-1
•
Replacing a Fan CRU on page 4-7
•
Replacing a Back-End Board (BEB) on page 4-10
•
Replacing a Power Supply on page 4-13
•
Replacing a 6760 ServerNet Device Adapter on page 4-15
Replacing a 45xx Disk Drive
This subsection describes the steps to take when replacing a 45xx disk drive, which you
might need to do in the event of uncorrectable disk errors. When adding a disk drive to
a 45xx disk module, you must first remove the empty disk drive slot cover plate from the
slot where you want to install the disk drive. Use the following procedures in this
subsection:
•
Preparing to replace a 45xx disk drive
•
Removing a 45xx disk drive
•
Installing a 45xx disk drive
•
Resuming operations on a 45xx disk drive
FRAGILE. When removing components from a 45xx module, be sure to place them in an area
where they cannot be stepped on or otherwise damaged.
To protect a disk from mechanical damage, handle the disk drive with great care when it is out
of the 45xx disk module. Do not let it drop, or subject it to sudden or jarring movements.